Daily Operation
Daily Operation covers some frequently occurring tasks in Connect on-Device, such as depositing and dispensing.
See also
Depositing
Prerequisite: This task requires the DEPOSIT permission.
Following the end of trading, the complete cash contents of each till is deposited into the device. Depending on permissions, the process can differ.
Note
Permissions are declared using brackets.
Select Start in idle mode. To skip this step, use Connect on-Device Studio and select Identify/User ID input on the start screen.
Sign in by entering user ID.
Select Start Deposit.
Select Cash.
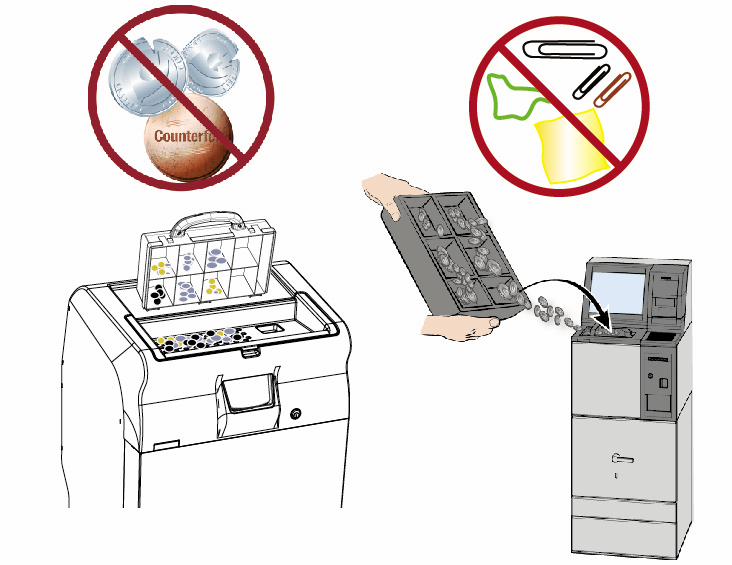
Put the coins in the machine.
Remove any foreign objects including any foreign coins.
Place all notes into the note reader (option). The display shows details of the counted coins and notes that are being processed.

Check the reject pocket of both the coin and note devices for rejected cash, and re-deposit these items.
Select Done once all acceptable coins and notes have been deposited.
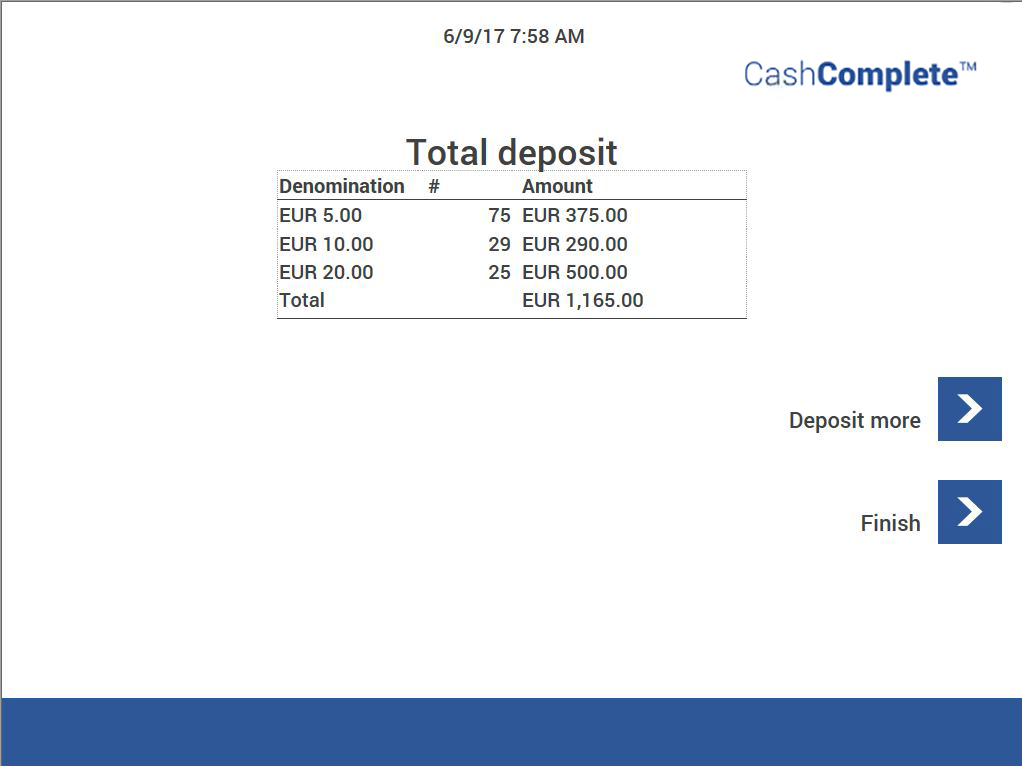
The following options are displayed (the DEPOSIT_ONCE permission excludes the Deposit More option):
Deposit More - the device restarts to accept more coins for the same user on the same transaction.
Finish - this option completes the transaction, prints a receipt, logs off, and returns to the Start screen.
Note
For more information on optional login methods, see Editing the user identification settings.
The number of deposited coins for each denomination in a deposit can't exceed the upper target level set for the coin machine.
Dispensing
Prerequisite: This task requires an account with one of the following permissions:
DISPENSE with an addition
DISPENSE* (where * means 'all mixes')
FREE_FLOAT
Select Start in idle mode. To skip this step, use Connect on-Device Studio and select Identify/User ID input on the start screen.
Sign in by entering user ID. Depending on how the machine is configured, do one of the following:
Insert your card
Enter your card and PIN code using the touch screen and then press Enter.
Enter login information on the touch screen and then press Enter.
Select Start Dispense (requires the DISPENSE permission).
From the touch screen, select a predefined mix (requires the DISPENSE* permission) or the free float option (requires the FREE_FLOAT permission). The cash drawer compartment automatically slides out a bit (RCS-800).
Insert an empty cash drawer in correct position.
To start the dispense of coins and notes, close the cash drawer compartment manually (RCS-800).
Note
For more information on optional login methods, see Editing the user identification settings.
The cash drawer compartment only reopens when all coins and notes have been dispensed (RCS-800).
When you have completed the steps, a receipt is printed. The receipt contains details on the exact mix of dispensed coins and notes.
In case of a machine error, the receipt states exactly what has been dispensed. Check the receipt to determine if the correct mix has been dispensed. If there are discrepancies in the dispensed totals, follow the procedure for clearing errors.
Filling up an incomplete mix
Prerequisite: This task requires the EDIT_INCOMPLETE_MIX permission.
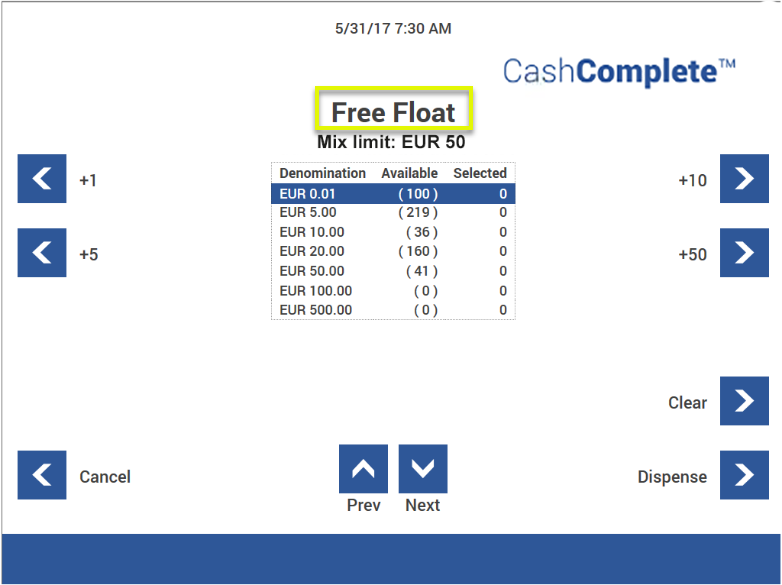
If one or more denominations are missing in the machine, a predefined mix is displayed as incomplete.
To dispense, select the incomplete mix.
The Free Float window is displayed and the missing amount for the mix is presented as Mix limit. The Mix limit changes as you add or remove coins to the mix.
Manually changing a cash drawer
Prerequisite: This task requires the FREE_FLOAT permission.
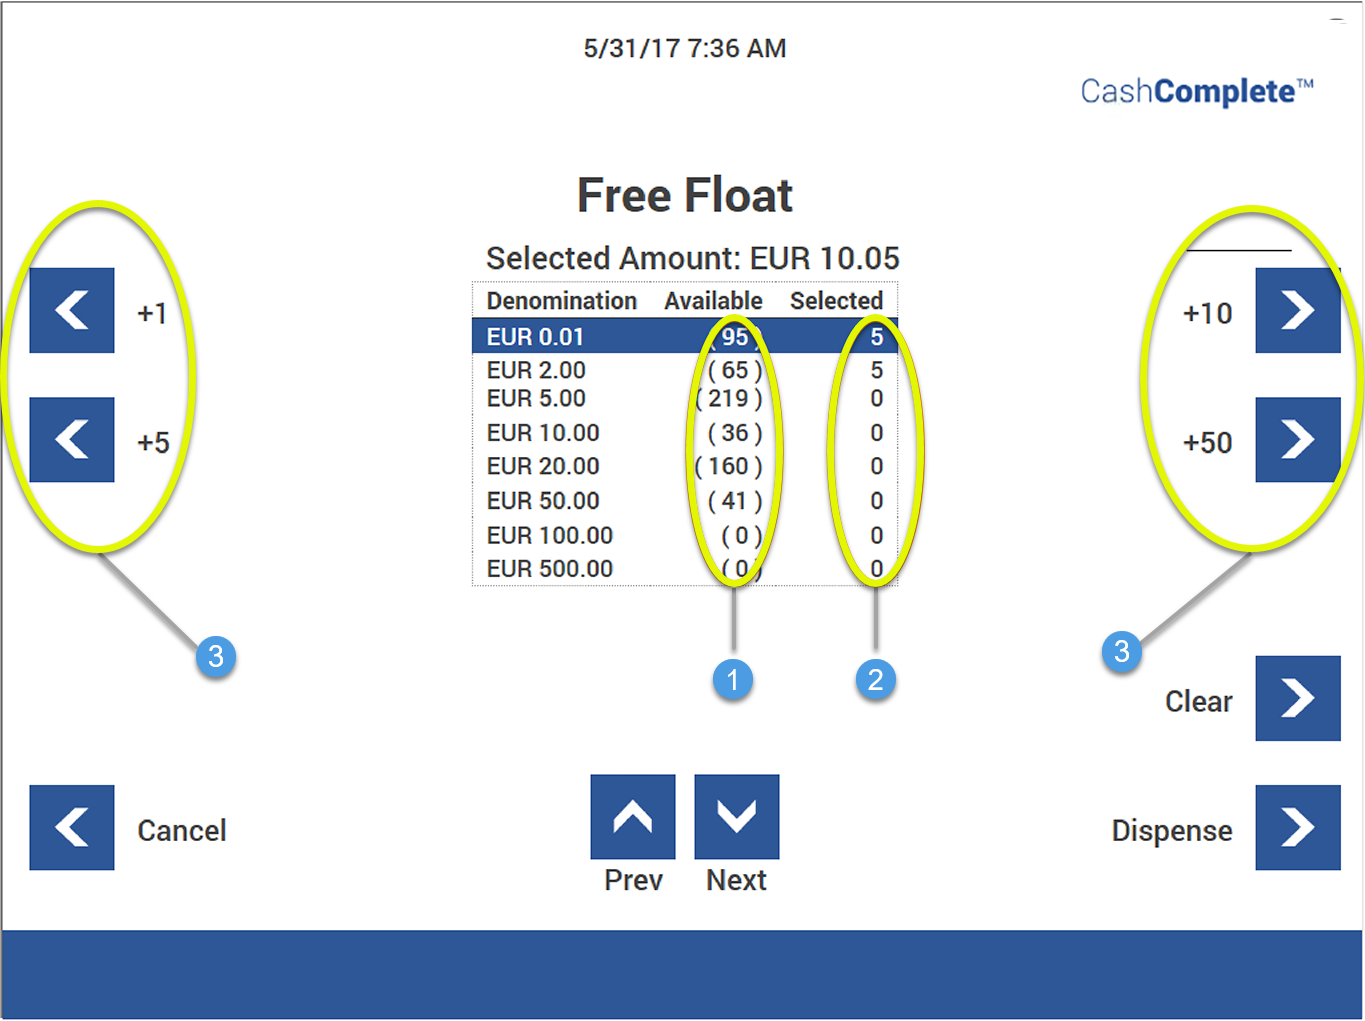
1. Available denominations 2. Amount to be dispensed 3. Quantity buttons
Sign in by entering user ID.
Press Start Dispense.
Press Free Float (requires the FREE_FLOAT permission).
Select denomination from the list.
Tip
You step up and down in the list using Prev and Next.
Highlight the denomination you want to dispense.
Press the Quantity buttons (3), for example, +10, +50.
Increase the amounts to be dispensed until the required amount appears in the right column (2).
Select Clear to set the number for the highlighted denomination to zero.
Repeat steps 4-7 for all denominations you want to add to the free float.
Select Dispense to start dispensing. To cancel, click Cancel.
To start the dispense of coins and notes, insert an empty cash drawer in the correct position and close the cash drawer compartment manually.
Remove the cash drawer and close the cash drawer compartment.
Remove the banknotes.
Note
For more information on optional login methods, see Editing the user identification settings.
There is an upper limit for the number of coins for the ongoing dispense. The limit is set by the number of available coins in the coin dispenser and the cash drawer layout.
Coins are dispensed into cash drawer cups, any requested notes are dispensed from the note unit.
When all coins are dispensed, the till drawer slides out.
When you have completed the steps, a receipt is printed.
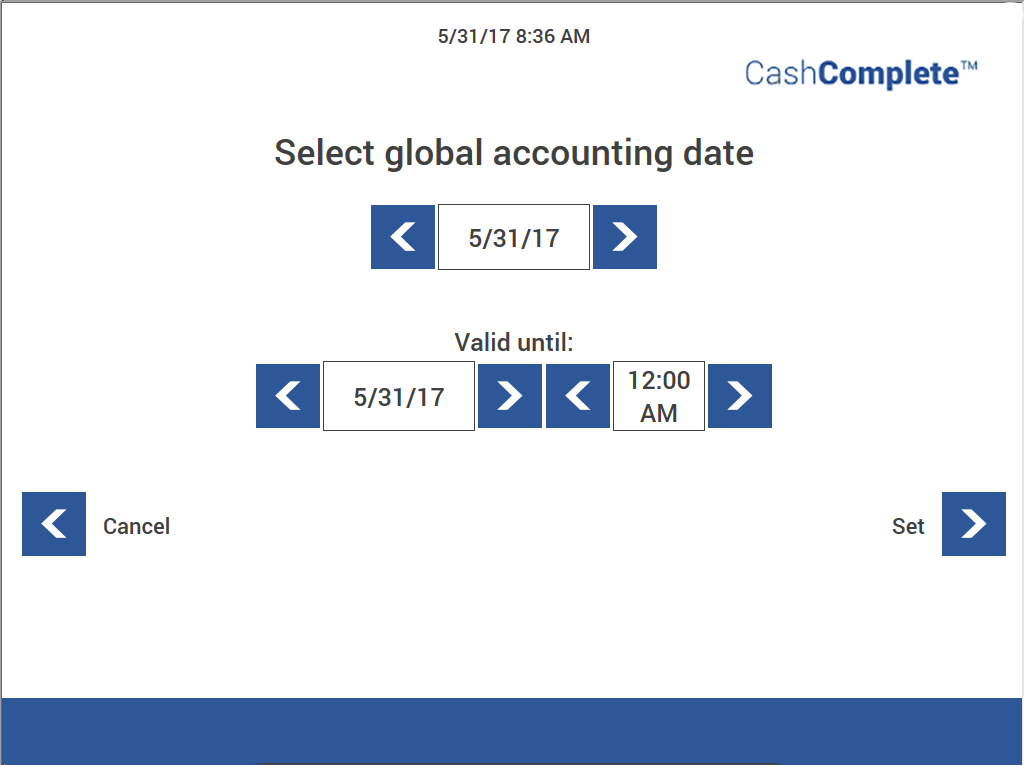
Selecting a global accounting date
Prerequisite: This task requires the SET_GLOBAL_ACCOUNTING_DATE permission.
Use Select global accounting date to define a different accounting date than the actual date for a dispense or deposit. The setting affects all users.
Selecting a session date
Prerequisite: This task requires the SET_SESSION_ACCOUNTING_DATE permission.
Use Session date to define a different date than the current date for a session. The setting expires at logout.
Changing users
Prerequisite: This task requires the CHANGE_USER permission.
Log in with an account that has the required permission.
Select Change user and enter the user ID for the new user to be activated.
To leave the user, select Return to original user.
Note
Select the PayComplete™ logo in the top-right corner to display information about the original user.
Moving coins to low level
Prerequisite: This task requires the MOVE_COINS_TO_LEVEL permission.
Sign in by entering your user ID.
Select Move Money.
Select Move coins to low level.
Purging
Prerequisite: This task requires the PURGE_COINS permission.
Use Purge to remove all coins from the selected dispenser/dispensers, for example, at service or when making an inventory of the machine. Follow the instructions on the touch screen.
The Transport box (RCS 800 and RCS 400 2.0 with transport box) fill level is indicated both in numbers and with a bar at the bottom of the display. On a RCS 400 without transport box the coins are transported to the cups or cash drawer.
Note
When the Transport box is full, the purge is automatically interrupted and the transport box drawer opens up to be emptied.
A receipt containing information about the number of coins in the dispensers, before and after the purge, and dispensed coins is printed.
Make sure to check the dispensers for any remaining coins after a purge.
Printable receipt types
You can print a number of different receipts.
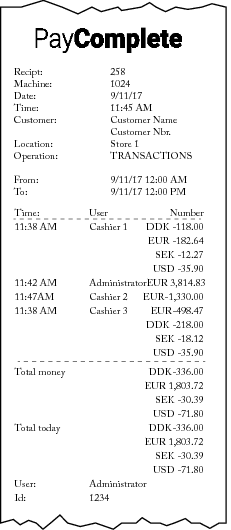
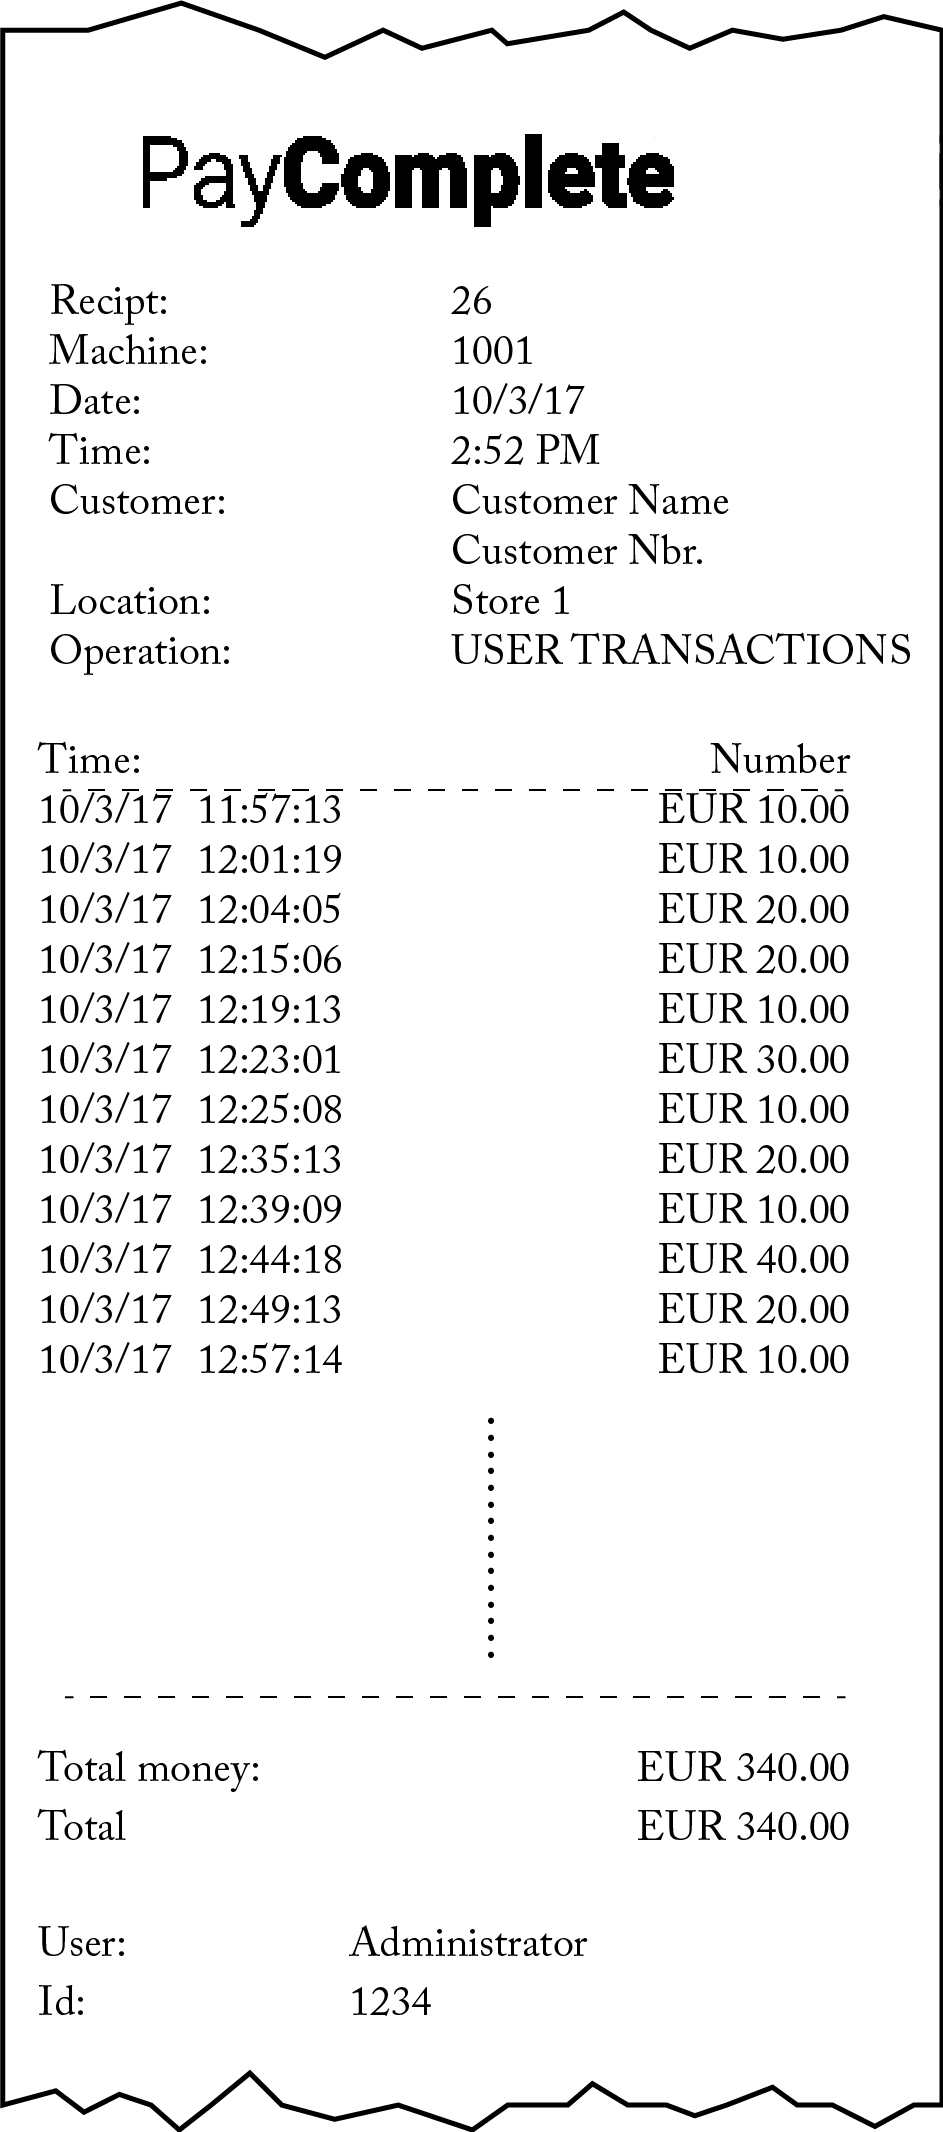
Prerequisite: This task requires the PRINT_DAILY_OPERATIONS permission.
You can print a receipt with information about all transactions for the day.
 |
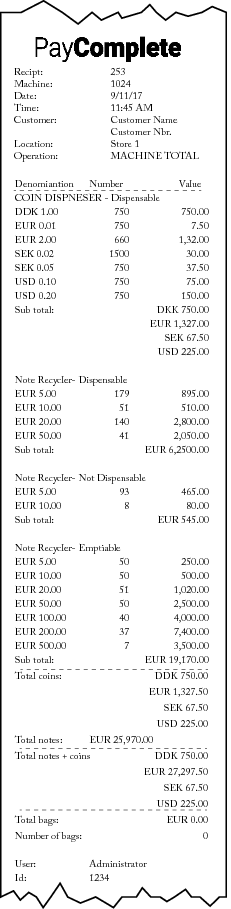
Prerequisite: This task requires the PRINT_MACHINE_TOTAL permission.
You can print a receipt of the machine contents.
 |
Prerequisite: This task requires the PRINT_FINAL permission.
You can print a receipt with information about all transactions that have been completed for the current user since the last time the report was run.
 |
Printing a duplicate of a receipt
Use this procedure to select whether or not you want to print a duplicate of a receipt after completing a deposit or a dispense.
Important
This feature requires these permissions:
CC_ALL_RECEIPTS or CC_BOX_RECEIPT
RECEIPTS_REQUEST_CONTINUE
This permission is always needed when you want to print a duplicate of a receipt.
RECEIPTS_REQUEST_OPTIONAL
This permission is needed when you want to give the user the option not to print a duplicate receipt. This permission requires the RECEIPT_REQUEST_CONTINUE permission to work.
The option to select whether or not to print a duplicate of a receipt is available from Connect on-Device version 3.42.0.
Sign in to Connect on-Device.
Complete a deposit or a dispense.
When asked to take your receipt, select Continue.
When asked if you want to print a second receipt:
Select Yes, print receipt to print a duplicate of the receipt
Select No, don't print to decline printing a duplicate of the receipt.
Select OK.
Resetting service and cleaning reminders on screen
Prerequisite: This task requires the OPERATOR_VIEW, CONFIRM_CLEANING, and CONFIRM_SERVICE permissions.
 |
 |
Service reminder symbol (to the left) and Cleaning reminder symbol (to the right).
Note
For more information on how to configure and activate service and cleaning reminders, see Device properties.
Disconnect the device.
Clean the device.
Connect the device.
Select Start in idle mode.
Sign in with an account that has the required permissions.
Select Administration.
Select Operator view.
Select Confirm Cleaning.
Select Start in idle mode.
Sign in with an account that has the required permissions.
Select Administration.
Select Operator view.
Select Confirm service.
Select Logout to return to operator mode.
Allocating a lane
You use lane allocation to associate a till to a work unit, such as a cash register.
Note
A lane is also referred to as a work unit.
When you have allocated a lane, it isn't available to other users for allocation until you have deallocated it.
Start Connect on-Device.
In the Filter box, enter the characters to filter on.
In the Please select work unit list, select the work unit you want to open.
Select the Select button to open the work unit.
On the Enter allocation ID page, type or scan the till ID.
Select Dispense.
Select Start dispense.
On the Select Mix page, select the mix you want to dispense from.
On the [mix name] page, select the currency and denominations you want to dispense.
Select the Dispense button.
The lane (work unit) is now associated with the till and shown as Open in Connect on-Device. The lane is unavailable to other users.
Deallocating a lane
You deallocate (close) a lane to end the association between the lane and a till.
Note
A lane is also referred to as a work unit.
A lane can be deallocated for one of the following reasons:
To make a deposit and end the shift
To end a shift without first making a deposit
Daybreak occurs
Note
Daybreak automatically deallocates the lane unless the configuration is set to ignore daybreak.
When you have deallocated a lane, it is closed and another user can allocate (open) it.
Sign in to Connect on-Device.
In the Filter box, enter the characters to filter lane on.
In the Please select work unit list, select the lane you want to close.
Select the Select button to select the lane.
On the Enter allocation ID page, type or scan the till ID.
Select Deposit. Optionally, you can select End of shift to close the lane without making a deposit.
On the Select Type page, select the item you want to deposit, for example, cash or bag drop.
Make the deposits.
Select Stop when you have completed the deposits.
On the Total deposits page, select how to proceed. The options are:
End shift — select to end the shift
Deposit more — select to make an additional deposit
Finish — select to finish the deposit without ending the shift
If you selected End Shift, on the Total deposits page, select Send to send an end of shift message.
Note
You can end the shift without making any deposit.
The lane (work unit) is now closed and available for allocation by another user.
Allocating a user
You use user allocation to associate a till to a user.
Note
Only one user at a time can select an allocation ID, that is, the code on the till. The exception is user with 'user auto id'.
Start Connect on-Device.
On the Enter allocation ID page, type or scan the till ID.
Select Dispense.
Select Start dispense.
On the Select Mix page, select the mix you want to dispense from.
On the [mix name] page, select the currency and denominations you want to dispense.
Select the Dispense button.
The user is now associated with the till and shown as Open in Connect on-Device.
Deallocating a user
You deallocate (close) a user to end the association between the user and a till.
A user can be deallocated for one of the following reasons:
To make a deposit and end the shift
To end a shift without first making a deposit
Daybreak occurs
Note
Daybreak automatically deallocates the user unless the configuration is set to ignore daybreak.
When you have deallocated a user, it is closed and another user can be allocated to the till.
Log in to Connect on-Device.
On the Enter allocation ID page, type or scan the till ID.
Select Deposit. Optionally, you can select End of shift to close the user without making a deposit.
On the Select Type page, select the item you want to deposit, for example, cash or bag drop.
Make the deposits.
Select Stop when you have completed the deposits.
On the Total deposits page, select how to proceed. The options are:
End shift — select to end the shift
Deposit more — select to make an additional deposit
Finish — select to finish the deposit without ending the shift
If you selected End Shift, on the Total deposits page, select Send to send an end of shift message.
Note
You can end the shift without making any deposit.
The user is now closed and another user can be allocated to the till.