Configuration without Connect on-Device Studio
Use these procedures to configure the machine without Connect on-Device Studio.
See also
Setting up receipt — quick start
Editing hopper levels for coin dispensers
Selecting a global accounting date
Free float and cups/cash draw limit
Configuring supported currencies for bag drop
Configuring bag size for manual refill
Setting a role filter on work units or work unit groups
Configuring reading mode for a barcode scanner
Making an inventory of a machine
Article 6 handling in Connect on-Device
Connect on-Device installation folder and folder structure
The Connect on-Device installation folder contains configuration files with examples of settings for new features.
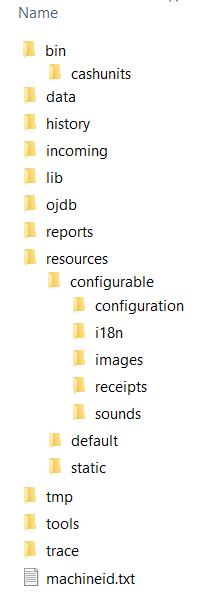
Connect on-Device folder structure
When you upgrade the software, new features and limits are not automatically added to the configuration files in the configurable folder of the installation folder structure. Check the release notes to find which features to use.
Open the configuration files in the installation folder and copy the new strings to the upgraded configuration files in the configurable folder.
Configured limits and settings for the added features are persistent. That is, when you upgrade the software the next time, the configured limits and settings are unaffected by the software upgrade.
Tip
Persistent means that the data is unaffected by a software upgrade.
Important
When editing, make sure you do all the changes in the persistent files. That is, in the files that are unaffected by the software upgrade. Do not edit the files in the Static folder.
If you have custom icons and are running Connect on-Device, version 3.15.1 or later, AND have used Connect on-Device Studio to add your custom icons, the icon files are persisted when you upgrade the software.
If you have custom icons and are running Connect on-Device, version 3.15.0 or earlier, you have to manually copy the custom icon files to
[installation folder]\resources\static\images\display\defaultof the new installation. Make sure to make a backup of your custom icon files before upgrading.
Folder or file | Contents |
|---|---|
bin | Startup scripts |
cashunits | Box contents for devices |
data | Runtime data — Persistent
|
history | Legacy log and journal files |
incoming | This folder can be used when you want to add/edit/delete users in the |
lib | Program files |
ojdb | Application database — Persistent |
reports | Nightly reports |
resources | Application configuration and resources |
configurable | User-editable configuration and resources — Persistent
|
configuration | Configuration files |
i18n | Translation files
|
images | Image files
|
receipts | Header and footer for receipts |
sounds | Custom sounds used by the application |
default | Original configuration and resources |
static | Application maintained configuration and resources |
tmp | Temporary files |
tools | Startup scripts for additional tools
|
trace | Application logs |
machineid.txt | Machine license ID |
Machine UUIDs
A UUID is the unique identifier of a machine's Connect on-Device installation.
In Connect on-Device you set the machine UUID to identify individual machines, or Connect on-Device instances, in the communication with Connect.
The UUID is automatically generated the first time you start Connect on-Device.
These are the most common situations when you may want to change a UUID;
You need to replace a machine
You need to replace a computer connected to a machine
You need to replace a hard drive
If you want the new machine to appear as the old, you need to copy the UUID of the old machine and then change the UUID of the new machine into that of the old machine.
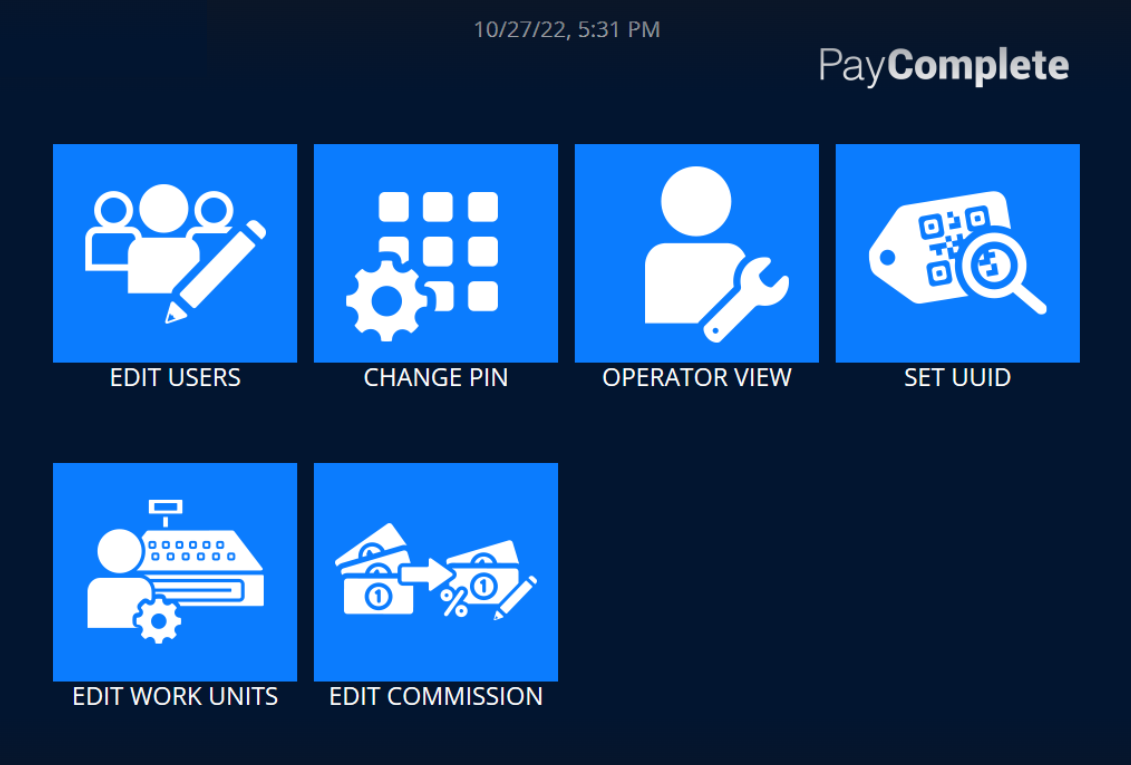
You can change the UUID from within Connect on-Device, both manually and by scanning a QR code containing the UUID. From the Administration main menu in Connect on-Device, you can view the current UUID and print it.
Important
Changing the UUID requires a user account with a role that has the SET_MACHINE_ID permission.
Setting the UUID
You configure the UUID for a machine when you want to replace the machine, the computer, or the hard drive.
Important
Prerequisite:
The user account you use when signing in to Connect on-Device must have a role with the SET_MACHINE_ID permission.
Sign in to Connect on-Device.
Select Administration.
Select SET UUID.
Select Print to print the UUID code and the QR code.
Select Set UUID to open the view where you enter the UUID.
Enter the UUID into the text field or scan the QR code to enter the UUID.
Select Enter.
Note
Connect on-Device restarts when the UUID has been set.
Manually upgrading Connect on-Device licenses
Prerequisites: You need an account with the following permissions:
OPERATOR_VIEW
SERVICE_MODE
You upgrade your license from Basic Edition to any other edition when you need to expand the functionality of your Connect on-Device.
Sign in with an account that has the required permissions.
Select Administration.
Select Operator View.
Select License.
Copy the license ID in the License ID box and send it to your PayComplete™ representative.
There are several ways of entering the license key:
In the License key box, select the Import button to open a file browser where you select the license key text file to import. Use this option when you have received the license key in a text file from your PayComplete™ sales representative.
In the License key box, paste the license key in the License key box. Use this option when you have received the license key in an email sent by your PayComplete™ sales representative. This option is available from Connect on-Device version, 3.18.0.
You can also generate the License key from Connect. For more information on this, please refer to the Connect documentation.
Select Confirm to verify that you want to upload the license key to the machine.
Select Done to close the dialog box.
Select Logout to return to the main menu.
Note
Step 6 only applies when you do not intend to use Connect.
When you use Connect and your machine never has been online, copy the License ID and paste it in the machine configuration in Connect.
Configuration files overview
In the Connect on-Device installation, configuration files are included. You can change the default configuration by editing the files in a text editor, such as Atom.
Important
Before making changes to a configuration file, make sure you have a backup copy of the file.
File name | Description |
|---|---|
PercontaCashunit1.xml | Dispenser levels for coin dispensers in position 1A-1D are defined in this file. For more information, see Editing hopper levels for coin dispensers. |
PercontaCashunit2.xml | Dispenser levels for coin dispensers in position 2A-2D are defined in this file. For more information, see Editing hopper levels for coin dispensers. |
workunit.xml | The groups/work units are defined in this file. For more information, see Adding a work unit. |
exchangeRates.xml | The exchange rates are defined in this file. |
com.scancoin.device.transportbox | The high and full settings for the transport box is configured in this file. For more information, see Configuring supported currencies for bag drop. |
com.scancoin.common.dispense. DispenseService | A daily dispense limit for users and roles can be configured in this file. By default, no daily limit is configured. |
com.scancoin.flow.dispense.lv. internal.DispenseFlow | A global free float limit for each denomination can be set as well as a cups/cash drawer limit in this file. |
com.scancoin.core.userpref.User Preference | Machine set-up for language on display and receipt are defined in this file. The available currencies for bag drop are configured in this file. For more information, see: |
machine.properties | The information defined in this file is used on the receipt. For more information, see Defining dispense limits. |
Devices.properties | Settings for cleaning and service reminders as well as settings for number of coins for each outlet are defined in this file. |
moneyremaining | Settings for remaining number of banknotes after a move notes activity are defined in this file. |
Configuring languages
You configure languages for the display and receipts in the com.scancoin.core.userpref.UserPreference file.
Open the
com.scancoin.core.userpref.UserPreferencefile in a text editor.Define the language in lower-case letters using the two-letter ISO-639 code.
Define the country in uppercase letters using the two-letter ISO-3166 code.
Defining dispense limits
Dispense limits limit the amount of money that can be dispensed from a machine. You can configure dispense limits for a group of machines. You can specify dispense limits for multiple currencies.
Important
Before defining dispense limits, you must enable dispense limits in the com.scancoin.common.remote.properties file.

Distributed dispense limits are dispense limits shared by all machines within one machine group. It is possible to configure distributed dispense limits on one machine in a machine group, and then all machines in that machine group get the same dispense limits.
From Connect, you can configure and combine distributed dispense limits for:
Machine — limits the amount of money that can be dispensed from the machine or for a group of machines.
Role — limits the amount of money a user with that role can dispense from the machines in the selected smart machine group.
Machine user (user/role) — limits the amount of money a user can dispense from the machines in the selected smart machine group.
Work unit — limits the amount of money a work unit can dispense from the machines in the selected smart machine group.
There are two available settings for dispense limits:
Machine limit
User limit — You can configure the user limit per role or individual.
You configure the dispense limits in the com.scancoin.common.dispense.DispenseService file.
Note
Defined value as exponent value, that is, “50 cents” equals “50”.
DailyDispenseLimit.role.{roleName}={Currency list}DailyDispenseLimit.user.{userId}={Currency list}A currency list consists of the currency, a colon symbol (:) and the total value. Entries are separated with commas, for example: EUR:10000, SEK:50000
Note
If a currency is not listed, it will not be limited
It is possible to set a dispense limit per machine. The machine has an account of its own. The dispense limit per machine overrules the dispense limit set per user, for example:
DailyDispenseLimit.machine=EUR:10000
The daily dispense limit is, by default, reset every midnight.
To reset at any other hour set the DayBreakHour, for example:
DayBreakHour=15
To set the DayBreakHour for a certain user, for example:
DayBreakHour.user.(userID)=16
Use commas to separate transactions.
Possible values are:
DISPENSE (default)
DEPOSIT and DISPENSE
Example: DEPOSIT and DISPENSE: TransactionTypesAffectingLimits=DEPOSIT,DISPENSE
DailyDispenseLimit.user.{cashierAnna}={EUR:150000}The code has the following effect on Cashier Anna’s deposit and dispense actions during one day.
Anna dispenses a float, 1500 Euro.
Anna deposits 3000 Euro.
Anna can now dispense 3000 Euro.
Example: DEPOSIT and DISPENSE: TransactionTypesAffectingLimits=DISPENSE
DailyDispenseLimit.user.{cashierAnna}={EUR:150000}The code has the following effect on Cashier Anna’s deposit and dispense actions during one day.
Anna dispense a float 1500 Euro.
Anna deposits 3000 Euro.
Anna can not dispense a new float.
Use commas to separate the transactions. Possible values are DISPENSE, DEPOSIT and DISPENSE. The default option is DISPENSE.
Example: DISPENSE, DEPOSIT: MachineLimitTransactionTypes=DISPENSE,DEPOSIT
DailyDispenseLimit.machine=EUR:15000
The code has the following effect on the machine deposit and dispense actions during one day.
Total value of dispenses during a time period is 1500 Euro.
Total value of deposit is 3000 Euro.
It is possible to dispense another 1500 Euro from the system.
Example: DISPENSE: MachineLimitTransactionTypes=DISPENSE
DailyDispenseLimit.machine=EUR:15000
The code has the following effect on the machine deposit and dispense actions during one day:
Total value of dispenses during for example 9 hours is 1500 Euro.
No more cash can be dispensed from the system.
Use in conjunction with DayBreakHour=-1 to remove the daily renewal. ResettingTransactionTypes=END_OF_SHIFT
Set number of notes for MaxDispenseCountOfNotes.
Note
If no limit is set, the maximum allowed by the note devices is the limit.
Example: MaxDispenseCountOfNotes=80
Set canExceedInitial to false to limit the account to the initial value also when more than the initial value has been deposited.
When set to true, the deposit adds to the initial value and changes the dispense limit.
Example: canExceedInitial=true
DailyDispenseLimit.role.{cashier}={EUR:15000,DKR:1500} TransactionTypesAffectingLimits=Deposit DayBreakHour.user.cashier=20DailyDispenseLimit.machine=EUR:300000 DayBreakHour=06
The code limits the dispense according to the description below.
For a cashier the dispense limit is 150 Euro. Since the system also handles the Danish currency, this currency is also limited. If the cashier deposits money, the dispense limit is affected.
The reset time for a cashier is 20.00 (8 p.m.) when the store closes.
For the machine in total (for all users), the dispense limit is 3000 Euro.
The reset time for the machine is 06:00 (6 a.m.).
Custom data entry
Custom data entry is a method to add customer-defined data to different kinds of transactions.
You configure custom data entry in this file:
custom_data_entry.xml
The file is located in:
[installation folder]\resources\configurable\configuration\custom_data_entry.xml
The general structure of this document is:
<user_field_definitions>
    <entry-point start="id-of-first-step" />
    <steps>
        <step id="xxx" attributes />
        <step id="yyy" attributes />
    </steps>
</user_field_definitions>
The entered custom data is included in the resulting RM Transaction message as: <key>=<value> pairs. For more information, see the Connect on-Device RM Protocol, Transaction on SCAN NET.
Custom data entry is available for inclusion on receipts from a custom_data node in the generated receipt context.
The table lists the defined entry points for custom data entry.
Entry point | Description |
|---|---|
deposit | Allows for custom data entry before entering deposit flow. |
dispense | Allows for custom data entry before entering dispense flow. |
change | Allows for custom data entry before entering change flow. |
refill | Allows for custom data entry before entering deposit- or manual refill flow. |
empty | Allows for custom data entry before entering empty notes flow. |
purge | Allows for custom data entry before entering purge dispense coins and/or notes. |
ship_out | Allows for custom data entry before entering ship out notes/bags or transport box flow. |
move | Allows for custom data entry before entering move notes flow. |
You can enable custom data entry for each flow with a defined entry point, except for deposit and dispense, which for legacy reasons still require permissions: DEPOSIT_CUSTOM_DATA and/or BAGDROP_CUSTOM_DATA and DISPENSE_CUSTOM_DATA respectively.
<-- Defines starting step for custom data deposit. Optional -->
<deposit start="start_deposit" />
<!-- Defines starting step for custom data dispense. Optional --> <dispense start="start_dispense"/>
These are the possible kinds of custom data entry steps:
pure_storage — Stores a value without user interaction.
enter_data — Allows for numeric or alphanumeric input.
selection — Allows for selection from a predefined list of values.
script — Stores the result of executing an inline groovy script without user interaction.
The binding for the script contains the machine UUID as "uuid", current user ID as "userId", role ID as "roleId", optionally work unit name as "unitId", in addition to any/all custom data stored by previous step(s) mapped by their respective keys.
Note
script is available in Connect on-Device version 3.18.0 and later.
Each step has an optional 'next' attribute for the ID of a following step. If no ID is provided, custom data entry is completed and the normal flow is resumed.
You can add an optional list of role ID(s) to limit access to different steps or choices, for example:
<step id="xxx" attributes>
    <role>req_role1</role>
    <role>req_role2</role>
</step>
Note
A step with required roles is only available for users with matching roles.
Name | Description | Required | Default | ||||||||||||||||||||||||||||||||||||||||||||||
|---|---|---|---|---|---|---|---|---|---|---|---|---|---|---|---|---|---|---|---|---|---|---|---|---|---|---|---|---|---|---|---|---|---|---|---|---|---|---|---|---|---|---|---|---|---|---|---|---|---|
id | Step ID. | - | - | ||||||||||||||||||||||||||||||||||||||||||||||
key | Custom data storage key. | Yes | - | ||||||||||||||||||||||||||||||||||||||||||||||
value | Custom data value. | Yes | - | ||||||||||||||||||||||||||||||||||||||||||||||
displays | On-screen label; The value is displayed on screen as label (value). | No | - | ||||||||||||||||||||||||||||||||||||||||||||||
restart_here[a] | If true, this step is used as (re)starting point for multiple deposits. | No | false | ||||||||||||||||||||||||||||||||||||||||||||||
restart_button_text><XREF>[a] | Text for “restart” button for multiple deposits. | - | orchard.BackToCustom Data | ||||||||||||||||||||||||||||||||||||||||||||||
next | ID of next step. | No | - | ||||||||||||||||||||||||||||||||||||||||||||||
[a] Only for deposit | |||||||||||||||||||||||||||||||||||||||||||||||||
<pure_storage id="start_deposit" key="kind"
value="AA" displayas="Kind" />
Adds custom data with key: 'kind' and value: 'AA' to a transaction. It is displayed on screen as Kind (AA).
<pure_storage id="sxx" key="extra" value="XX">
    <role>admin</role>
    <role>admin2</role>
</pure_storage>
Adds custom data with key: 'extra' and value: 'XX' to a transaction if the user has role admin or admin2.
Name | Description | Required | Default |
|---|---|---|---|
id | Step ID | Yes | - |
key | Custom data storage key | Yes | - |
title | Title of step on screen | Yes | - |
extra_text | Additional message for display | No | - |
numeric | True for numeric keyboard. Input is treated as text or number depending on decimals. | No | false |
decimals | Number of decimals for numeric input. A value >=0 enables truly numeric input, default is to retain leading zeros. | No | -1 |
minchars | Minimum number of characters required | No | 0 |
maxchars | Maximum number of characters for input | No | ∞ |
displayas | On-screen label; The entered value is displayed on screen as label (value). | No | - |
barcodeStartPos | Index of first character to use from a scanned barcode | No | 0 |
barcodeLength | Number of characters to use from a scanned barcode | No | -1 |
restart_here1[a] | If true, this step is used as (re)starting point for multiple deposits. | No | false |
restart_button_text<XREF>[a] | Text for “restart” button for multiple deposits | No | orchard.BackToCustomData |
regex | Ensures a defined, formatted input. The format is set as a Regular Expression. If the input text does not match the format in the Regular Expression, that is has the wrong syntax, it will be ignored. | No | ull |
confirmation | Whether or not a confirmation screen is required. Can be set to true or false. If set to true, then a confirmation dialog will be displayed. | No | false |
confirmation_title | Heading used for the confirmation screen - text will be displayed above the keyboard. | No | If empty |
retries | Number of retries. If set to 2, user will be asked 1 time and will have 2 additional attempts. User can enter incorrect data 2 times. To disable retries use 0. | No | 2 |
next | ID of next step | No | - |
<enter_data id="enter_sid" key="sid" title="Enter SID">
<role>cit</role>
</enter_data>
Allows a user with role “cit” to enter arbitrary text, which is added to custom data as “sid”.
<enter_data id="enter_txid" key="tx" title="Enter
transaction identifier" extra_text="Additional
message" numeric="true" decimals="0" maxchars="4"
displayas="TX" restart_here="true" />
Allows a user to enter a 4-digit number without decimals, which is added to custom data as “txid” and is displayed on screen as, for example, TX (1234).
<?xml version="1.0" encoding="US-ASCII" standalone="yes"?>
<user_field_definitions xmlns="http://www.w3.org/1999/xhtml"
                        xmlns:xsi="http://www.w3.org/2001/XMLSchema-instance"
                        xsi:noNamespaceSchemaLocation="file:custom_data_entry.xsd">
     <deposit start="enter_id" />
     <steps>
           <enter_data title="Enter custom id (AAA123)" key="custom_id" id="enter_id" regex="[A-Z]{3}[0-9]{3}" confirmation="true" confirmation_title="Enter custom id again" retries="2"/>
	</steps>
</user_field_definitions>
Allows a user to extend the Custom_Data function with a confirmation message.
Name | Description | Required | Default |
|---|---|---|---|
id | Step ID | Yes | - |
key | Custom data storage key | Yes | - |
title | Title of step on screen | Yes | - |
displayas | On-screen label; The entered value is displayed on screen as label (value). | No | - |
restart_here1[a] | If true, this step is used as (re)starting point for multiple deposits. | No | false |
restart_button_text<XREF>[a] | Text for “restart” button for multiple deposits | No | orchard.BackToCustomData |
<heading>
    <td>#</td>
    <td>Description</td>
</heading><choice value="svc">
<td>1.</td>
<td>Service</td>
</choice>Name | Description | Required | Default |
|---|---|---|---|
value | Custom data value | Yes | - |
next | ID of next step. | No | - |
In the example below, the user is assigned the permission to select a type from a predefined list of choices. Users with role “xtra” have an additional choice. The selected value is added to custom data as “typ” and is displayed on screen as for example: @ (AA)
<selection id="choose_deposit_type" key="typ" title="Choose
Deposit Type" displayas="@">
    <heading>
        <td>Available types</td>
    </heading>
    <choice value="AA" next="enter_sid">
        <td>Typ 1</td>
    </choice>
    <choice value="AB" next="enter_sid">
        <td>Typ 2</td>
    </choice>
    <choice value="BA" next="enter_sid">
        <td>Typ 3</td>
    </choice>
    <choice value="BB" next="enter_sid">
        <td>Typ 4</td>
    </choice>
    <choice value="XX" next="enter_tx">
        <td>Extra special</td>
        <role>xtra</role>
    </choice>
</selection>Name | Description | Required | Default |
|---|---|---|---|
id | Step ID | Yes | - |
key | Custom data storage key | Yes | - |
displayas | On-screen label; The entered value is displayed on screen as label (value). | No | - |
restart_here1[a] | If true, this step is used as (re)starting point for multiple deposits. | No | false |
restart_button_text<XREF>[a] | Text for 'restart' button for multiple deposits | No | orchard.BackToCustomData |
<source>
  <![CDATA[
  new BigInteger("${uuid}".split('-').last(), 16)
  ]]>
</source>Add the result from reading a URL containing “uuid” and “userId” (ID) from script binding with key “ident” to a transaction.
<script id="1" key="ident">
     <source>
     <![CDATA[
     "http://123.45.67.89:4321?x=${uuid}&u=${userId}".toURL().text
     ]]>
     </source>
</script>
Example of an auto-increment counter.
<script id="Step0" key="Counter">
     <source>
  <![CDATA[
  def file = new File("data/file.txt")
  def counter = Integer.parseInt(file.exists() ? file.text : "0")
  file.text = Integer.toString(counter + 1)
  return counter
  ]]>
     </source>
</script>Deposit with bus number and comment - complete example
The example is from a bus company. When making a deposit, the bus driver must report the bus number and also any problem with the bus.
Open and edit the
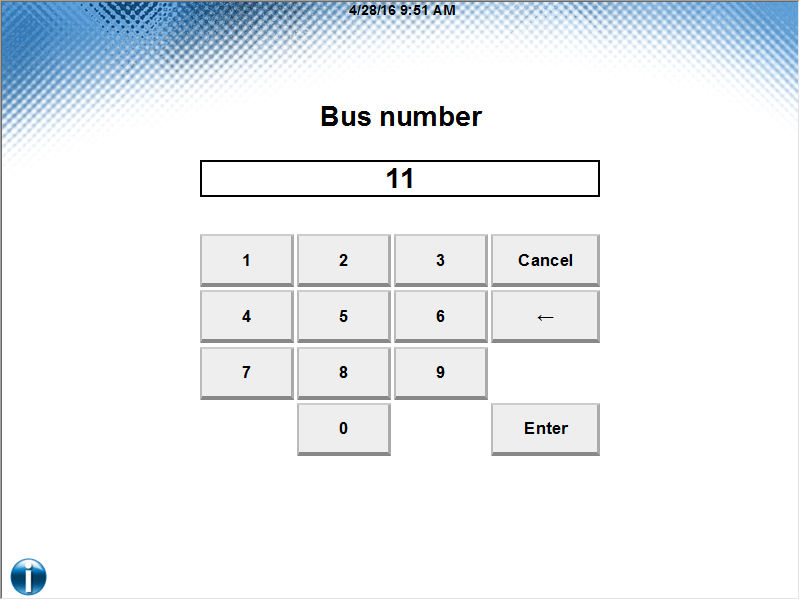
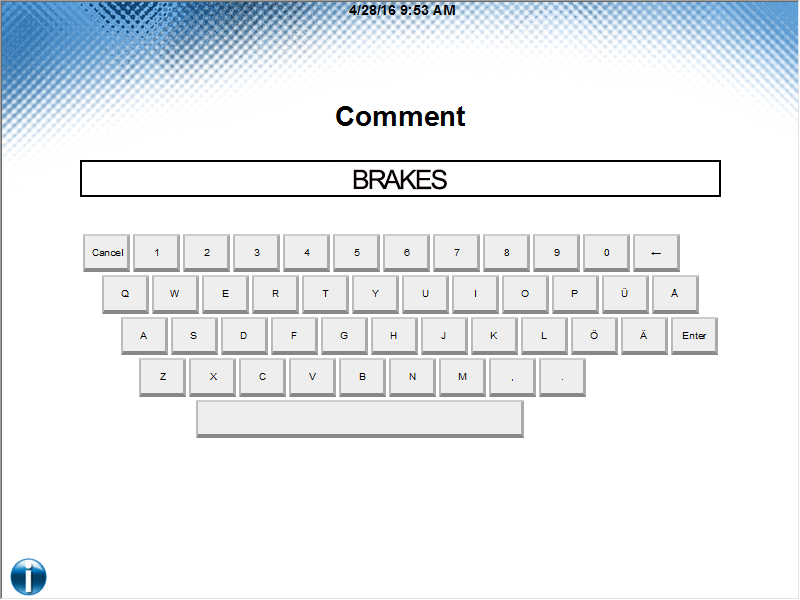
custom_data_entry.xmlfile in a text editor, such as Atom.<?xml version="1.0" encoding="US-ASCII" standalone="yes"?> <user_field_definitions xmlns="http://www.w3.org/1999/ xhtml"> <!-- Defines which step to start with for custom deposit--> <deposit start="depo_enter_counter" /> <!-- Define which step to start with for custom deposit--> <dispense start="disp_enter_counter" /> <steps> <!-- Deposit --> <enter_data title="Bus number" key="bus_number" id="depo_enter_counter" numeric="true" next="depo_additional_data_comment" /> <enter_data title="Comment" key="comment" numeric="false" id="depo_additional_data_comment" /> <!-- Dispense --> <enter_data title="Bus number" key="bus_number" id="disp_enter_counter" numeric="true" /> </steps> </user_field_definitions>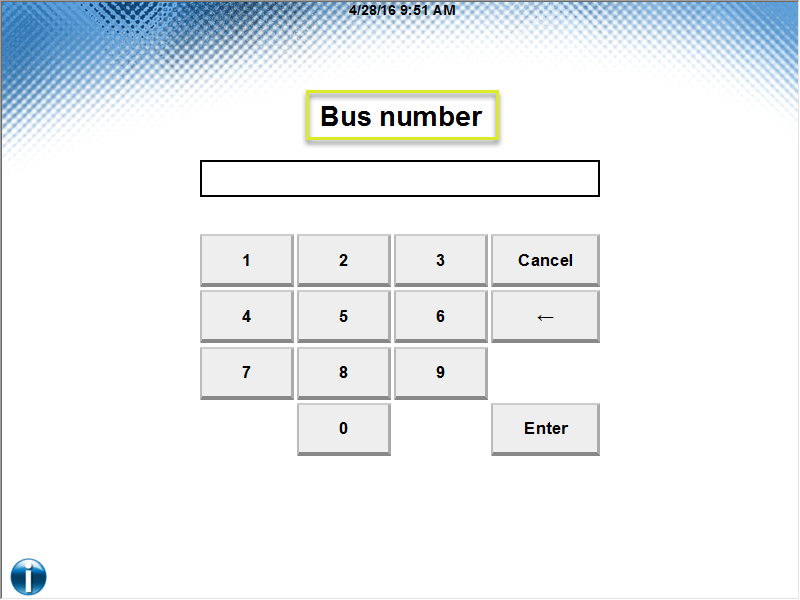
enter_data title="Bus number"
After saving the changes, make a deposit to test the updated custom_data_entry file and to make the new keys available for the receipt editor.
Bus driver workflow
Using Receipt Builder
Go to the Receipt Builder Configuration Guide to find information on how to build receipts.
Note
For more information, see Connect on-Device Receipt Builder Configuration Guide.
Setting up receipt — quick start
Note
Receipt Builder is included in the installation. See [installation folder]\tools\ReceiptJ.
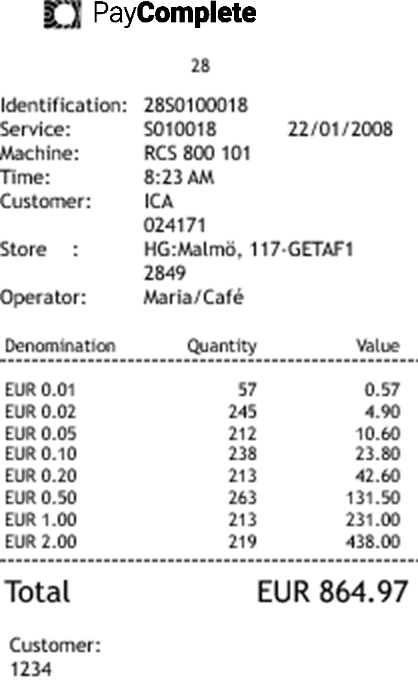
The receipt above has the following information:
Text on receipt | Description |
|---|---|
Regional number | The area code (28, two positions). |
Identification | The Identification consists of several parts:. The area code (28, two positions) followed by the function (S, one position) followed by the machine-unique ID (01, two positions: 0-9 and a-z). |
Service | Repeats function and machine-unique ID. |
Machine | The Machine ID fetched from the |
Time | Shows the time the receipt was printed. |
Customer | The name of the customer (ICA, maximum 20 positions) followed by the customer number (024171, maximum 10 positions). |
Store | The store name (HG:Malmö, maximum 12 positions) followed by the store name (117-GETAF1, maximum 12 positions) followed by the store number (2849, maximum 10 positions) |
Operator | The operator designation (Maria/Café) |
The information on a receipt, such as area code, machine ID, machine serial number, and so on, is defined in a properties file named machine.properties. You can edit this file using a text editor.
regional.number=28
rcs.function=S
machine.unique.id=01
machine.name=RCS 800
machine.serial.number=101
customer.name=ICA
customer.number=024171
store.name1=HG:MALMÖ
store.name2=117-GETAF1
store.number=2849
In the (
[installation folder]\resources\configurable\configurationfolder, open themachine.propertiesfile.Edit the
machine.propertiesfile. The editable strings are:1
regional.number
Area code, 2 position
2
rcs.function
Machine function, 1 position
3
machine.unique.id
Unique machine ID, 2 positions 0-9 and a-z
4
machine.name
Machine name, 14 positions
5
machine.serial.number
Machine serial number, 6 positions
6
customer.name
Customer name, 20 positions
7
customer.number
Customer number, 10 positions
8
store.name1
Store name, 12 positions
9
store.name2
Store name, 12 positions
10
store.number
Store number, 10 positions
Press Ctrl + s.
Select File > Save to save the changes.
Select File > Exit to close the file.
Start Connect on-Device.
You can add custom logos to receipts.
The logo must meet the following requirements:
Maximum width: 550 pixels. The recommended size is approximately 200x20 pixels (width x height).
1 bit
Black and white
PNG format
Prepare your logo so that it meets the requirements listed above.
Name the file
receipt_logo.png.Locate the printer folder in the resources folder in the CashComplete directory and replace the
receipt_logo.pngfile with your file. The path to the file is:CashComplete\resources\configurable\images\receipts\receipt_logo.png.
Configuring mix groups
Note
You cannot configure mix groups in Connect on-Device Studio (previously, Configurator Tool) introduced in Connect on-Device, version 1.8.x.
However, you can use Connect on-Device Studio to configure the normal mixes without corrupting the mix groups.
It is possible to dispense two or more different mixes to two or more tills with just one Mix selection on screen and with just one receipt. This feature can be used by cashiers to dispense both their till for the cash register and a till with additional change in one single operation. You configure Mix groups in the same configuration file as regular mixes (moneymixes.xml).
Locate the configuration folder in the Connect on-Device installation folder, and open the file
moneymixes.xml([installation folder],\resources\configurable\configuration\moneymixes.xml).Make a copy of the moneymixes.xml file before you start editing it.
Make the changes in the file. See the example below. A configuration like in the example, makes it possible to both dispense the mix group (Mix3) and the two sub mixes (Mix1 and Mix2) individually.
<moneymixes>
    <mix name="Mix1" displayname="Cash register">
        <coin currencycode="EUR" denomination="10"
numberOfItems="5"/>
    </mix>
    <mix name="Mix2" displayname="Additional change">
        <coin currencycode="EUR" denomination="10"
numberOfItems="5"/>
    </mix>
    <mixgroup name="Mix3" displayname="Cash register and
additional change">
        <submix name="Mix1"/>
        <submix name="Mix2"/>
    </mixgroup>
</moneymixes>
Note
If you don’t want cashiers to be able to dispense the sub mixes individually, you can either remove the permissions for those mixes from the cashier role, or you can set the mixes to invisible. You set the mixes to invisible like this: mix name="Mix1" displayname="Cash register" invisible=”true>
Editing hopper levels for coin dispensers
Open the
PercontaCashunit1.xmlfile located at ([installation folder]\data\cashunits\PercontaCashunit1.xml) to edit the hopper level values low, high, and full for hopper 1A to 1D.Open the
PercontaCashunit2.xmlfile to edit low, high, and full level values for position 2A to 2D.
Note
Do not change any of the other attributes because this can lead to an inconsistent count.
physicalcu name value (PUxxx) indicates the hopper position 1A-1D or 2A-2D. See the tables PU001-PU004.
<logicalcu thresholdstatus="LOW" number="3" cukind="DISPENSE"
cutype="COIN_CYL" unitid="00000" initcount="0" count="0"
status="OK" physicalname="PU001" depositcount="0"
dispensecount="0" rejectcount="0" >
    <cashtype kind="COIN" ccy="EUR" value="10" />
    <threshold full="4300" high="4200" low="200" empty="0" />
    <physicalcu name="PU001" unitid="00000" count="0
    " thresholdstatus="LOW" status="OK" >
    <threshold full="4300" high="4200" low="200" empty="0" />
    </physicalcu>
</logicalcu>Full, default value is high value + 100, the physical limit of the hopper (how many coins it can hold). The denomination is rejected.
Low, default value 200, the desired number of coins left after dispense down to low level.
<logicalcu thresholdstatus="LOW" number="3" cukind="DISPENSE"
cutype="COIN_CYL" unitid="00000" initcount="0" count="0"
status="OK" physicalname="PU001" depositcount="0"
dispensecount="0" rejectcoun
    <cashtype kind="COIN" ccy="EUR" value="10" />
    <threshold full="4300" low="200" empty="0" />
    <physicalcu name="PU001" unitid="00000" count="0"
thresholdstatus="LOW" status="OK" >
    <threshold full="4300" low="200" empty="0" />
    </physicalcu>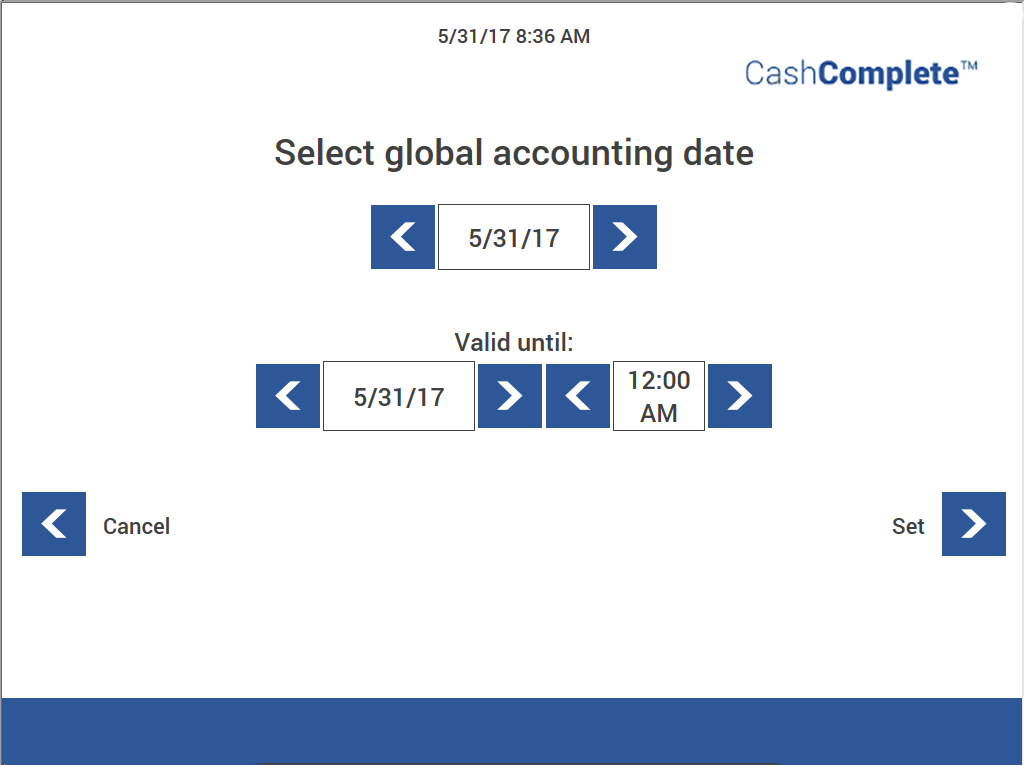
</logicalcu>Selecting a global accounting date
Prerequisite: This task requires the SET_GLOBAL_ACCOUNTING_DATE permission.
Use Select global accounting date to define a different accounting date than the actual date for a dispense or deposit. The setting affects all users.
Selecting a session date
Prerequisite: This task requires the SET_SESSION_ACCOUNTING_DATE permission.
Use Session date to define a different date than the current date for a session. The setting expires at logout.
Free float and cups/cash draw limit
Note
Cash draw limit (TillLimit) is a feature available in Connect on-Device, version 2.5.x. and later.
Check the default installation folder for the settings ([installation folder]\resources\default\configuration: com.scancoin.flow.dispense.lv.internal.DispenseFlow).
In the com.scancoin.flow.dispense.lv.internal.DispenseFlow file, you can set a global free float limit and a cash draw limit for each denomination. ([installation folder]\resources\configurable\configuration: com.scancoin.flow.dispense.lv.internal.DispenseFlow)
FreeFloatLimit limits the count on the Free float screen.
TillLimit limits the number of coins that fit into cups (RCS 400 only) or cash drawer. For more information, see Device properties.
Note
Free limit also applies to notes when a note unit is connected to the RCS.
If enabled, the smallest of FreeFloatLimit and TillLimit will be used in Free float. The TillLimit sets the number of coins if it is set lower than the FreeFloatLimit. FreeFloatLimit will not limit predefined mixes. FreeFloatLimit is not active when editing a mix. All dispense functions will be limited to the values stated in this file.
Defined denominations as exponent value. that is, 50 = denomination of 50 cents,
String | Description |
|---|---|
FreeFloatLimit.Denomination | Number of coins allowed in a free float mix, set for each denomination. |
Till.Limit.Denomination | Defines the number of coins that fits into the cash drawer or cup. |
To use Free Float you need FREE_FLOAT_XX permission.
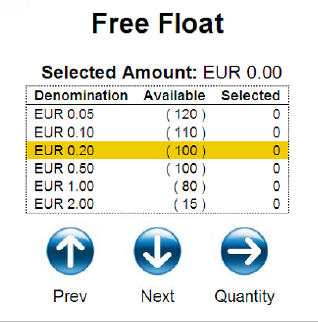
Item | Description |
|---|---|
Denomination | - |
Available | The number of available coins for the free float. |
Selected | Number of coins selected for the free float |
Device properties
Note
MAX_DISPENSE is a feature included in sw version 2.5.x and later. For more information, see Connect on-Device installation folder and folder structure.
All limits are retained when upgrading but when upgrading from sw version 2.4 or earlier, the limits are not filled in. The limits are available in the default directory.
In the Devices.properties file, you can configure settings for scanning at bag emptying, cleaning and service reminders on screens well as limits for number of coins for each outlet (for sw version 1.7.0 and later [Installation folder]\resources\configurable\configuration\Devices.properties).
MAX_DISPENSE for each outlet is used for distributing coins of the same denomination into different compartments in the cash drawer. It is used for machines with the same denomination in several coin dispensers.
In the example below, a machine is set up with six dispensers of the same denomination, that is, 1 SEK. With the settings in the example, 100x1 SEK are distributed into each compartment.
Note
The TillLimit is set to 600 for 1 SEK.
For more information, see Free float and cups/cash draw limit.
Without the MAX_DISPENSE limit, all 600x1 SEK would drop down into one of the compartments.
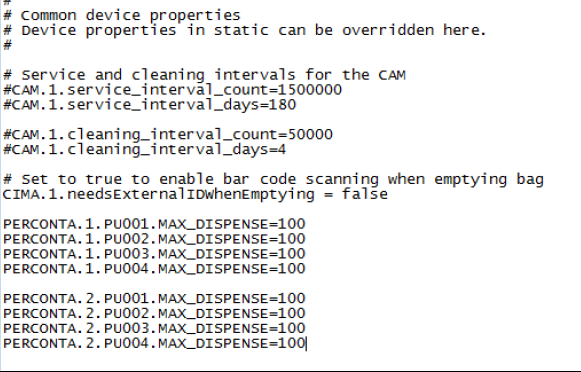
CAM.1.service_interval_count | Set number of coins between service reminder on screen |
CAM.1.service_interval_days | Set number of days between service reminder on screen |
CAM.1.cleaning_interval_count | Set number of coins between cleaning reminder on screen |
CAM.1.cleaning_interval_days | Set number of days between cleaning reminder on screen |
CIMA.1.needsExternalIDWhenEmptying | Set to true to enable scanning barcode on the new bag when emptying bag |
CIMA.1.scanExternalIDBeforeEmptying | Set to true to scan before the old bag is taken from the machine |
PERCONTA.1.PU00x.MAX_DISPENSE | Set the limit for number of coins to each outlet |
To enable that a new bag must be scanned before being placed in the machine, open the Devices.properties file ([installation folder]\resources\default\configuration\Devices.properties) and set CIMA.1.needsExternalIDWhenEmptying to true.
#Common device properties
# Device properties in static can be overridden here.
#

# Service and cleaning intervals for the CAM
#CAM.1.service_interval_count=1500000
#CAM.1.service_interval_days=180

#CAM.1.cleaning_interval_count=50000
#CAM.1.cleaning_interval_days=4

# Set to true to enable bar code scanning when emptying bag
CIMA.1.needsExternalIDWhenEmptying = false

PERCONTA.1.PU001.MAX_DISPENSE=100
PERCONTA.1.PU002.MAX_DISPENSE=100
PERCONTA.1.PU003.MAX_DISPENSE=100
PERCONTA.1.PU004.MAX_DISPENSE=100

PERCONTA.2.PU001.MAX_DISPENSE=100
PERCONTA.2.PU002.MAX_DISPENSE=100
PERCONTA.2.PU003.MAX_DISPENSE=100
PERCONTA.2.PU004.MAX_DISPENSE=100An alternative way to scan a barcode when emptying a cash box or bag is to use a number that is incremented by 1 for each box- or bag-exchange.
You need to activate the implementation by setting the containerIdGenerator property to increment in the [installation folder]\resources\default\configuration\Misc.properties] file.
# By default, "external id when emptying" is retrieved from a scanned barcode.
# Another implementation is to use a number that is incremented by 1 for each exchange.
# the id is between 1-99999 and then goes back to 1. Set value to "increment".
containerIdGenerator=increment
Transport box settings
In the com.scancoin.device.transportbox file the high and full settings for the transport box is configured (for Connect on-Device, version 1.7.0 and later [installation folder]\resources\configurable\configuration\ com.scancoin.device.transportbox).
Default values are:
high=5000 coins
full=5500 coins
If the high level is reached, a warning is displayed in idle mode indicating that the transport box should be emptied.
If the full level is reached and any of the coin hoppers are full, the coin deposit is disabled until the transport box is emptied
Configuring supported currencies for bag drop
Use this procedure to configure supported currencies for bag drop.
Locate the
com.scancoin.core.security.LoginServicefile ([installation folder]\resources\configurable\configuration\com.scancoin.core.security.LoginService).currencies.supported.bagdrop=EUR#currencies.supported.bagdrop=EUR;SEK;USD;NOK;DKK
Enter one or several currency codes allowed for the bag drop. If multiple currencies are configured, separate the currencies using a semi colon, like this: currencies.supported.bagdrop=EUR;SEK;NOK. If no currencies are configured, the master currency is used.
Configuring bag size for manual refill
Use this procedure to configure the bag size for manual refills.
Locate the
com.scancoin.flow.cashbox.refill.ManualCashboxReplenishServicefile (for Connect on-Device, version 1.7.0 and later ([installation folder]\resources\configurable\configuration \com.scancoin.flow.cashbox.refill.ManualCashbox ReplenishService).bags1.currency=EUR bags1.bagSizes=1:100;200:200;500:100 bags1.currency=SEK bags1.bagSizes=1:20;5:1200 bags1.currency=NOK bags1.bagSizes=50:100
Code | Description |
|---|---|
bagsX.currency | X is for the bag number. Enter one currency code for each bag number, ISO 4217 Currency Code List. Enter bag number and size for each denomination: bags1.currncy=EUR bags1.bagizes=1:100;200:200;200:200;500:100 Denomination is written without decimals, for example, EUR 2.00 is written as “200”. In the example above, the bag will contain: 100 pieces of 1 cents, 200 pieces of 2 EUR coins, and 100 pieces of 5 EUR coins. |
Adding a work unit
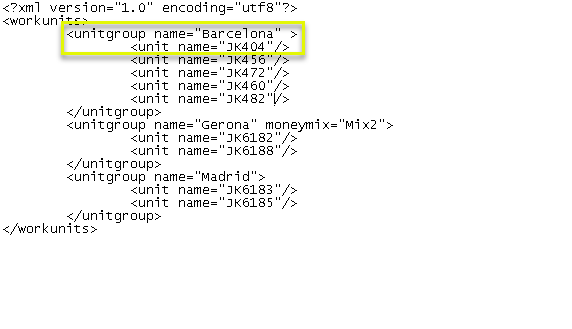
The work unit permission tool is used to make it easier to manage a group that needs access to the same money mix(es). The unitgroup name is not displayed or printed or stored in the database.
Information about the unitname is shown, printed on the receipt, and is stored in the database.
Unlock the upper service door and bring out the service keyboard.
Locate the configuration folder in the CashComplete directory, and open the
workunits.xmlfile ([installation folder]\resources\configurable\configuration\workunits.xml).Copy an existing work unit and edit the information.
Item | Code | Description |
|---|---|---|
1 | unitgroup name | In this example, the listed unitnames (JK404, JK456 etc) in the unitgroupname= “Barcelona” have access to all defined money mixes. If no mixes are listed, all mixes are available. The listed unitnames (JK6182, JK6188) in the unitgroupname=”Gerona” only have access to money mix Mix2. (unitgroupname= “Gerona” moneymix=”Mix2”) To add several money mixes to a work unit, separate them with a comma “Mix1,Mix2”. A user must also have permission to dispense the money mix in the work-unit (unitgroup name) they belong to. For more information, see Editing a role. |
2 | unitname | Name of the group. These groups are displayed and printed and stored in the database. |
The example shows what a user with access to the work unit permission (WORK_UNIT or WORK_UNIT_NO_CHECK) can see.
The example is based on a flight company. The employee selects the correct flight number and then the money mix for the group (unitname) is dispensed.

Note
If there are more than 12 options (unitname), the options are shown as a scroll list.
Setting a role filter on work units or work unit groups
You can set a filter on a work unit or work unit group so that only users with certain roles can choose the unit.
Prerequisite: This task requires the EDIT_WORKUNITS permission.
Sign in to Connect on-Device.
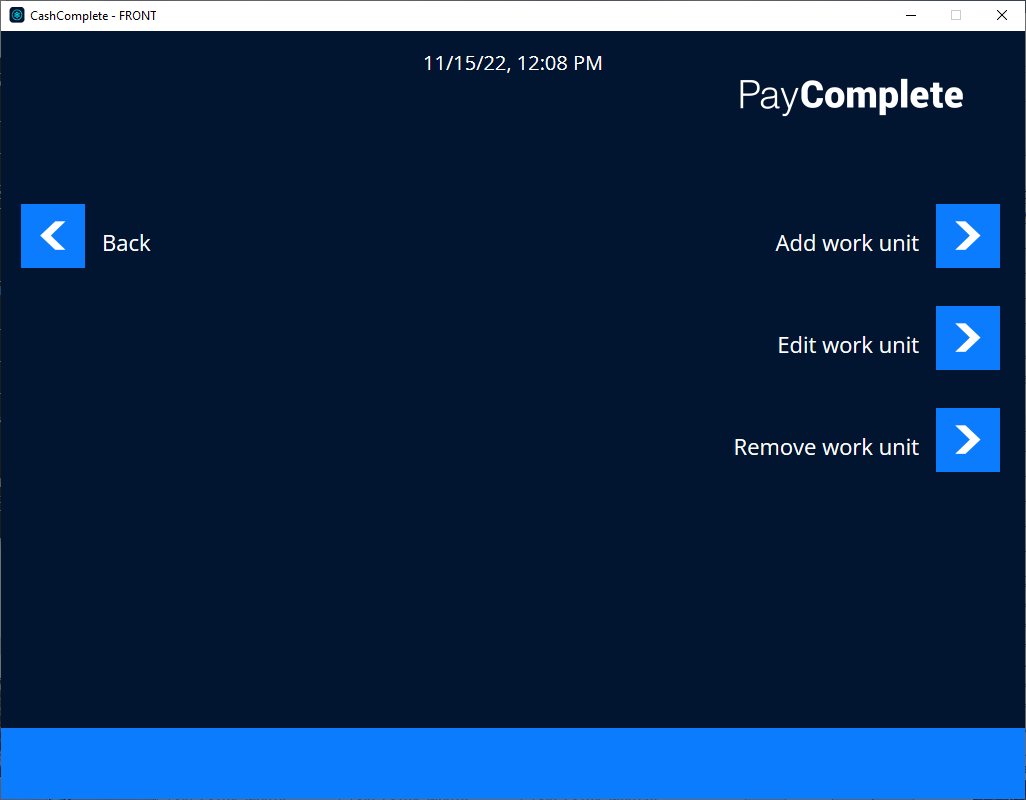
Select EDIT WORK UNITS.
Select Edit work unit.
In the Please select work unit list, select the work unit or work unit group on which you want to apply the role filter.
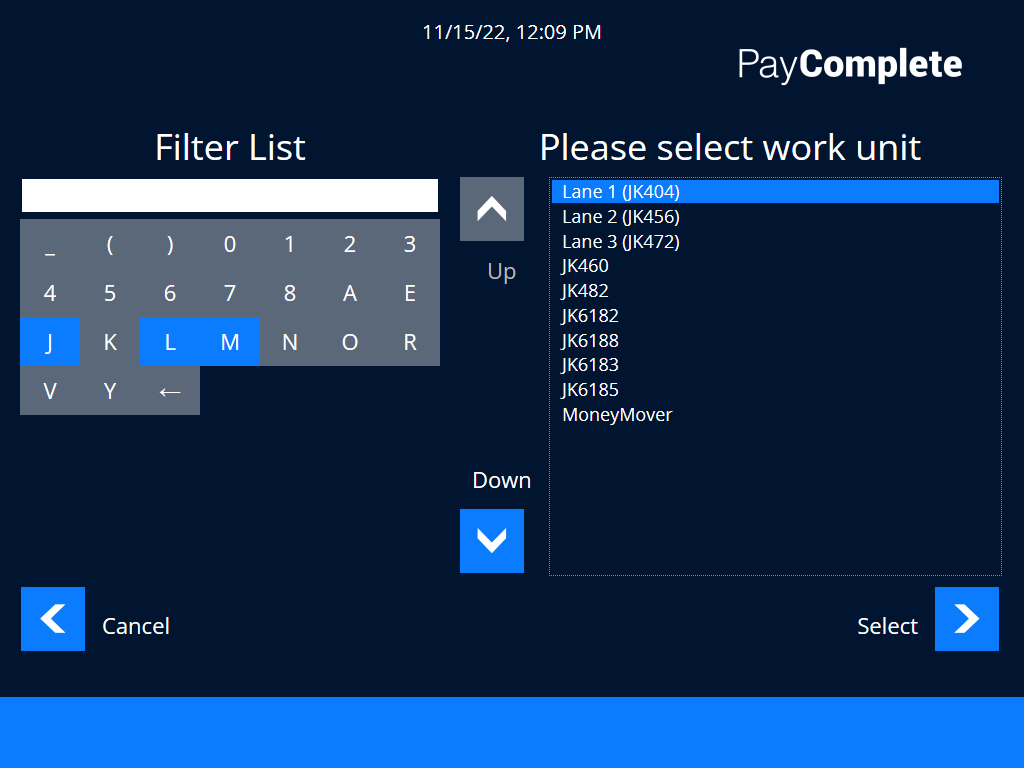
Select the Select button.
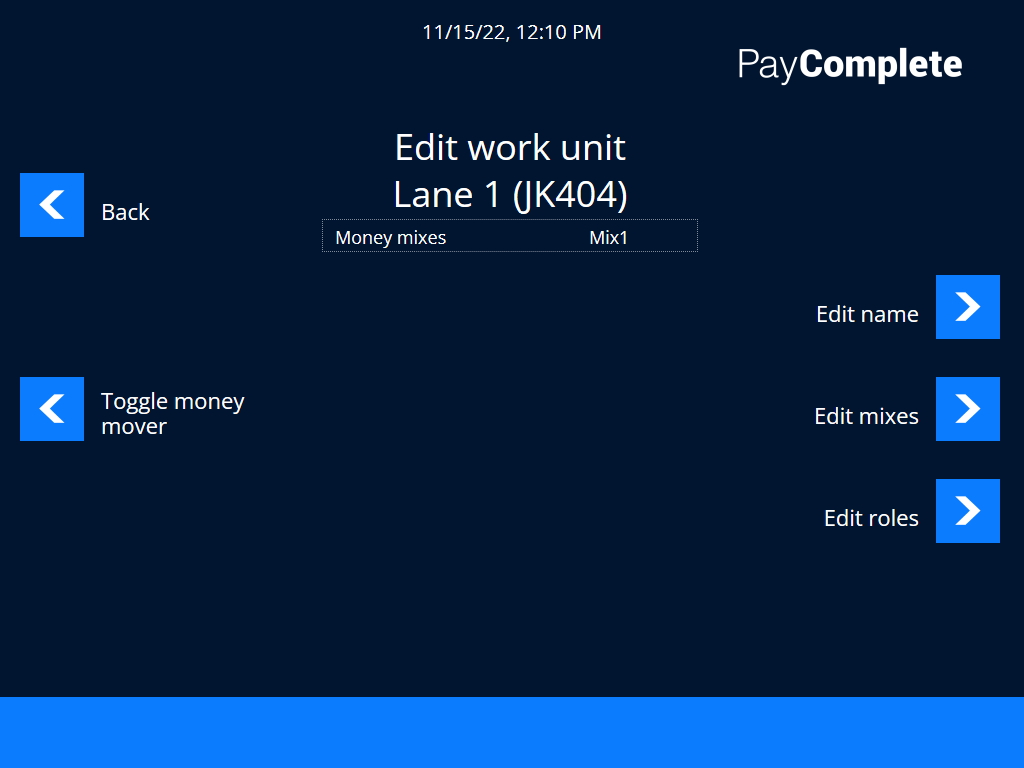
Select Edit roles.
In the Available roles list, select the roles that should be able to choose the work unit or work unit group.
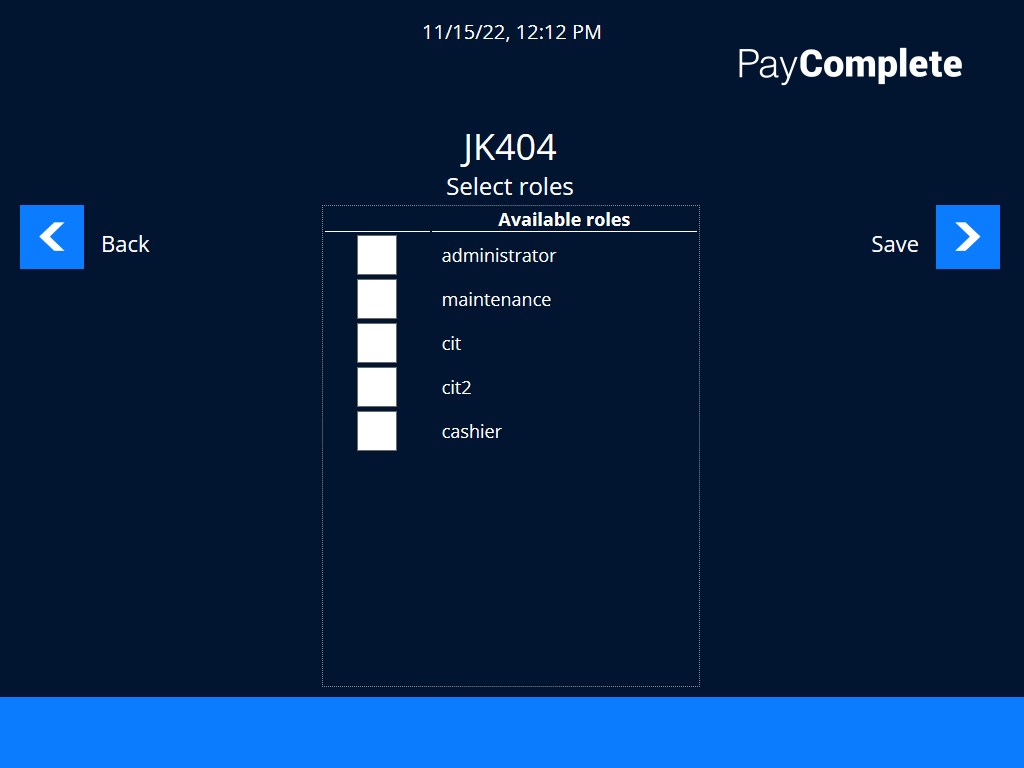
Select Save.
Configuring reading mode for a barcode scanner
To set the barcode scanner beam to continuous, follow the bar codes in the sequence listed below. The bar codes can also be found in the guide enclosed with the barcode scanner.
Description | Code | Bar code |
|---|---|---|
Start configuration | %$+/3 |  |
Continuous/Auto Power ON | %0273 | 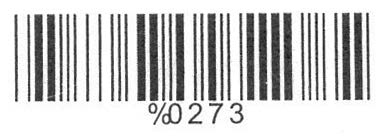 |
End Configuration | %$+/4 | 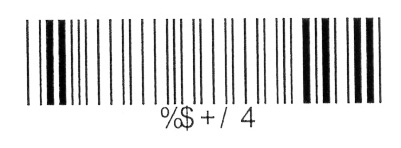 |
Save Parameters | %$+/0 |  |
Making an inventory of a machine
Note
Access to the Move coins menu requires the MOVE_COINS_TO_LEVEL permission.
For more information, see Connect on-Device installation folder and folder structure.
In the Move coins menu, select Purge and follow the instruction at the display to remove all coins from selected dispensers.
You need to remove coins, for example, at service or when making an inventory of the machine.
A receipt with information about the number of coins in the dispensers, before and after the purge, and dispensed coins is printed.
Note
Make sure to check the dispensers for any remaining coins after a purge.
Article 6 handling in Connect on-Device
Article 6 of European Central Bank (ECB) lays down measures necessary for the protection of euro banknotes against counterfeiting and obliges automated teller machine (ATM) operators within the euro area to withdraw from circulation all euro banknotes that they know or suspect to be counterfeit.
This document gives an overview of how PayComplete™ CDS and recyclers handle Article 6 requirements for HCM modules.
ECB Terms of Reference provide details on different note categories:
Unknown
False
Suspect
Good — Can be split into a=fit and b=unfit
The basic requirement in the ECB regulations is that category 2 notes must not be returned and it should be possible to report who deposited the note. Category 2 notes are stored in a separate pocket and are never mixed with other notes.
Category 3 notes should not be returned but can be mixed with other notes. For category 3 notes, it should be possible to track who deposited the note if its later found to be false. Category 3 notes are mixed with other notes and are credited to the customer’s account just as if it was an authentic note.
In Connect on-Device, you can configure the flow so that it isn't possible to return notes when they are detected as category 3 notes. When category 2 notes are removed from the machine, a receipt is printed. The receipt contains information about the account/card used for the deposit.
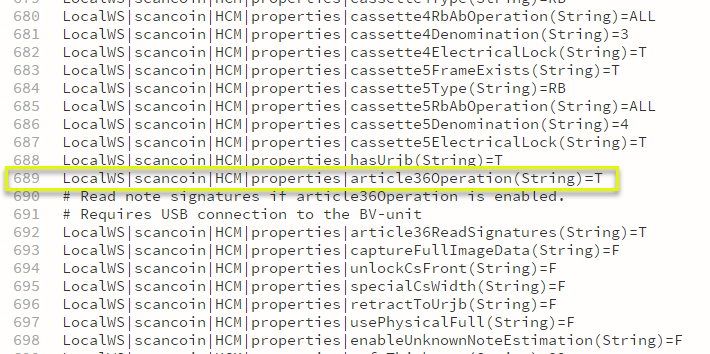
Activating Article 6 for a note device
Note
You must add known counterfeits to the note configuration file.
You can activate Article 6 detection for some note devices.
Open the Connect on-Device
[installation folder]\resources\static\configuration\Read.repositoryfile.Find the article36Operation(String) string for the current note device and change F to T.
The number, denomination, and value of suspected and detected counterfeits are printed on the receipt and displayed on the screen as:
C2 counterfeits
C3 suspected counterfeits
Time delay lock
Note
Valid in Connect on-Device version 3.1.0 and later.
The time-delay lock operates each time the safe is unlocked. You configure the lock in the units configuration file, for example, resources\static\configuration\com.scancoin.common.device.sds.
You can set three times:
delay — number of seconds until the door is unlocked,
reset — number of seconds the door remains unlocked,
resetSecondsAfterFirstOpen — number of seconds it is possible to unlock the door again after the first opening.
In the example below, the delay time is 60 seconds and the time window to open the lock is 30 seconds. Missing the opening time window results in a new delay period.
The resetSecondsAfterFirstOpen is set to 0. This resets the timer and the previous process is applied as soon as the door is locked.
locktimer.SDS.1.SAFE=delay:60,reset:3,resetSecondsAfterFirstOpen:0
Activation screen
Use the Activation screen to generate a QR code and an 8-digit activation code that you can use to remotely activate machines in Connect. You can skip this step.
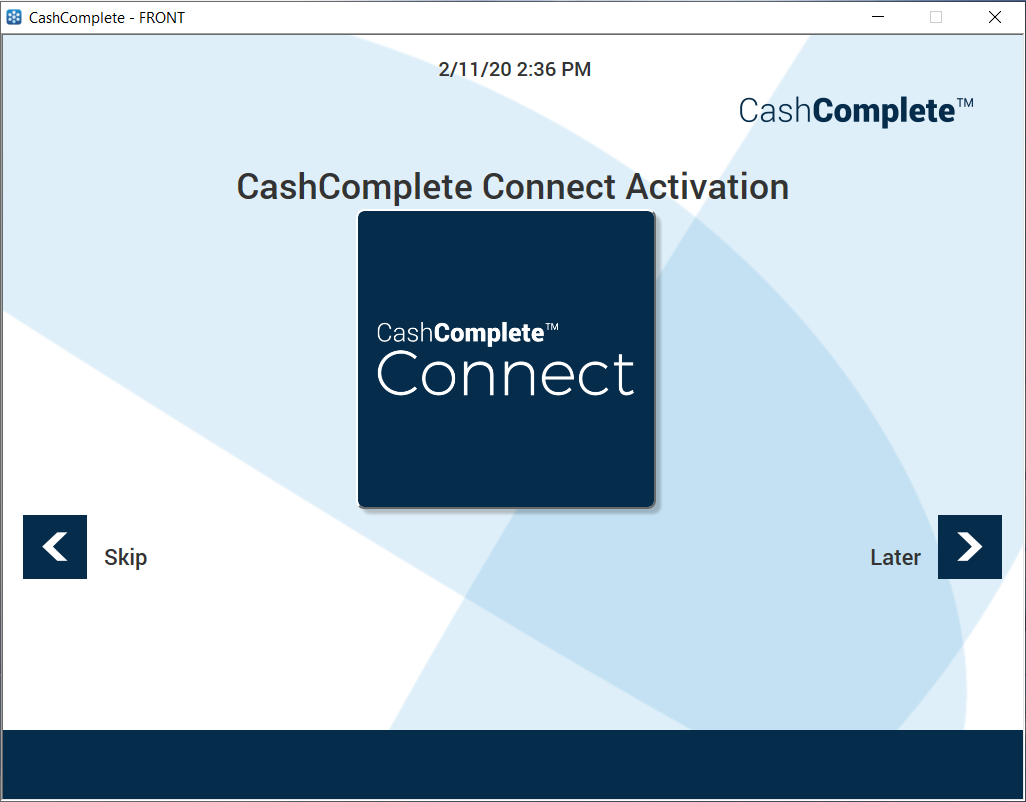
Ui item | Description |
|---|---|
Connect | Select the button to generate a QR code and an 8-digit activation code that you can use to remotely activate machines in Connect. |
Skip | Select to skip this step. |
Later | Select if you want the opportunity to generate activation codes later on. |
Activation codes screen
Use the activation codes screen in Connect on-Device to scan the QR code or copy the 8-digit activation code that you use to remotely activate machines in Connect. You can cancel this step.
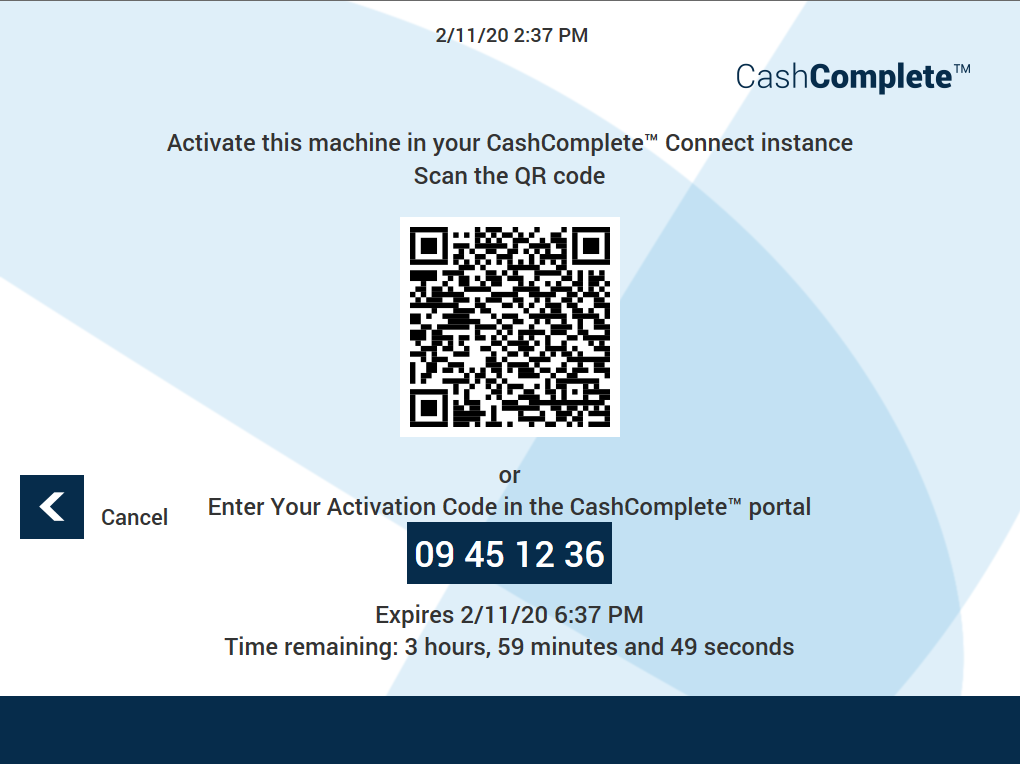
Ui item | Description |
|---|---|
Scan the QR code | Scan the QR code with a QR code scanner on your mobile device to start the activation wizard on your mobile device. |
8-digit activation code | Copy the code if you want to start the activation procedure by entering the 8-digit code in the portal. |
Cancel | Select to sign in to Connect on-Device without starting any machine activation. |
Configuring idle timeouts
You configure idle timeouts when you want to change how long Connect on-Device should wait for user input before canceling an ongoing operation. You configure idle timeout in the com.scancoin.core.userpref.UserPreference file.
Open the
com.scancoin.core.userpref.UserPreferencefile in a text editor.Edit the row of the timeout you want to configure.
See the table below for information on what the available idle timeouts do and their default values.
Save the file and close it.
Default value | How it's configured in the file |
|---|---|
Timeout in DEPOSIT/bagdrop flow in seconds, default 5 min | idle.timeout.DEPOSIT=300 |
Idle timeout in SELECT_SERVICE, default 5 min | idle.timeout.SELECT_SERVICE=300 |
Idle timeout waiting for the user to take the receipt, default 5 min | idle.timeout.TAKE_RECEIPT=300 |
Idle timeout waiting for the user to request a printed receipt, default 5 min | idle.timeout.OPTIONAL_RECEIPT=300 |
Idle timeout waiting for the user to confirm printing of next cc of receipt, default 5 min | idle.timeout.RECEIPT_REQUEST_CONTINUE=300 |
Idle timeout waiting for the user to empty note boxes, default 120 min | idle.timeout.EMPTY_NOTE_BOXES=7200 |
Note
The 'EMPTY_NOTE_BOXES' is new as of Connect on-Device, version 3.15.3.
Lane allocation
Note
In Connect on-Device a lane is represented as a work unit.
You use lane allocation to associate a till to a work unit, such as a cash register.
The association takes place when you select the work unit and dispense a money mix. No other user can allocate an already allocated work unit.
Work units are sent to Connect when Connect on-Device is restarted. If two work units have identical names, they are identified per the site they belong to.
If Connect is used, the allocation information is sent from Connect on-Device to Connect in a transaction message. The transaction message contains the following information about the allocation:
Allocation ID
Work unit name
Allocation timestamp
Deallocation time (end-of-shift)
Machine ID
Machine user ID
The allocation information is sent to all the machines on the site the work unit belongs to. When the machines have received information about the allocation, the allocating user can't dispense any additional mixes from other machines in that work unit. The user can still make free float dispenses and deposits on other machines in the work unit.
Transaction messages are saved locally on each machine. If the machine the dispense was made from goes offline, synchronization is lost between the machines on that site and it is possible for another user to allocate the already allocated work unit from another machine. When the machine comes back online, it automatically synchronizes with other machines on that site and the locally saved transaction messages are sent to Connect.
You deallocate a lane to end the association between the work unit and a till.
The work unit is deallocated (closed) when one of the following occurs:
The allocating user makes a deposit and then ends the shift
The allocating user ends the shift without a prior deposit
Daybreak, that is the reset time of the day — unless the configuration is set to ignore daybreak.
Note
Self-service checkout points is an example where a lane could be configured to ignore daybreak.
If Connect is used, the deallocation information is sent from Connect on-Device to Connect in a transaction message. The transaction message contains the following information on the deallocation:
Work unit name
Allocation ID
The deallocation information is sent to all the machines on the site the work unit belongs to. When the machines have received information about the deallocation, it is possible for another user to allocate the work unit.
Note
User and work unit allocation permissions can't be combined.
The following permissions are related to lane allocation:
Permission | Description |
|---|---|
WORK_UNIT | Allows the user to make deposits even if the work unit has not been allocated. For example, a supervisor should be able to make a deposit regardless of work unit allocation state. |
WORK_UNIT_ALLOCATION | Must be used in combination with the WORK_UNIT permission. Required on the user role to activate the lane allocation feature. Forces the user to select an allocation when logging in. If the user already has allocated a lane (work unit), no additional allocation is required. |
WORK_UNIT_ALLOCATION_DEPOSIT | Allows the user to make deposits even if the work unit has not been allocated, that is, a supervisor should be able to make a deposit regardless of work unit allocation state. |
FREE_FLOAT | When a work unit is allocated, all mixes except FREE_FLOAT are disabled and the user is allowed to make deposits. When a work unit isn't allocated, you can only dispense predefined mixes. |
ALLOCATION_END_SHIFT_ROLE:name_of_other_role | A temporary role. Activated when the user scans an allocated till. It is recommended to only grant enough permissions to allow a single Connect on-Device service to be available. When the service is available, Connect on-Deviceautomatically starts the service after the login procedure. When the service has ended or has been canceled, the original role and permissions are restored. For more information, see the example below. |
For more information, see Permissions A-L and Permissions M–Z.
If you have a system where all tills have their own unique IDs or barcodes, you can send the user directly to the deposit screen when deallocating a work unit. You need to assign the ALLOCATION_END_SHIFT_ROLE:name_of_other_role permission that temporarily changes the user’s role to name_of_other_role for the first service. The temporary role should only have the permission(s) required to scan an allocated work unit, for example, deposit.
When the service ends or the user cancels the operation, the original role and permissions are restored. For this particular use case, you need to enable the following permissions:
WORK_UNIT
WORK_UNIT_ALLOCATION
DEPOSIT
END_SHIFT_AFTER_DEPOSIT
Note
The ALLOCATION_END_SHIFT_ROLE permission should not be assigned to the alternative role.
There are two types of allocation IDs:
Unique ID — The till has a unique ID or a barcode. Use this ID when you want to keep track of each till in the work unit. The
CashComplete\resources\configurable\configuration\allocations.xmlfile contains a list of allocation IDs and barcodes. Before the user can select an allocation, the ID must be defined in this file and cannot be used to allocate more than one work unit at a time.Common ID - The common allocation ID is identical for all tills. Use this ID when you are only interested in which work unit is allocated. The workUnitAllocationAutoId property in the
CashComplete\resources\configurable\configuration\Misc.propertiesfile specifies a common ID, for example, workUnitAllocationAutoId=Open. The common ID is set for all allocations without any user intervention.
You can activate allocation daybreak. Allocation daybreak automatically deallocates a work unit when daybreak occurs. For more information, see Configuring allocation daybreak.
You activate daybreak by setting a flag in the CashComplete\resources\configurable\configuration\Misc.properties file. The activation is valid for the Connect on-Device installation. You configure Connect on-Device.
In certain cases, such as self-checkout points, you may want to ignore allocation daybreak. To ignore daybreak, you set a flag on the work unit. The flag prevents the work unit from being deallocated at daybreak. For more information, see Configuring ignore allocation daybreak.
Note
If a work unit group is configured to ignore allocation daybreak, this overrides a different configuration on a work unit in that work unit group.
The files in this table are used for the lane allocation feature.
File | Description |
|---|---|
| Contains a list of allocations and barcode IDs: <allocations> <allocation id="101" barcode="333101" /> <allocation id="102" barcode="333102" /> <allocation id="103" barcode="333103" /> <allocation id="104" barcode="333104" /> <allocation id="105" barcode="333105" /> <allocation id="106" barcode="333106" /> </allocations> |
| Contains current allocations. work unit=allocation and time stamp for the allocation. This file is volatile and should not be modified any other way: #Work Unit name (or Id) = Allocation Id + delimiter + allocation date #Tue May 19 11:19:13 CEST 2020 JK457=Open\u00012020-05-19 11\:19 JK481=Open\u00012020-05-19 11\:19 JK456=Open\u00012020-05-19 11\:19 JK480=Open\u00012020-05-19 11\:19 |
| Change the workUnitAllocationDayBreak property to true to activate allocation daybreak. |
| Edit the StartHourOfDay and StartMinuteOfDay properties to configure when daybreak occurs. |
See also
Configuration without Connect on-Device Studio
Configuring allocation daybreak
Configuring allocation daybreak
You configure allocation daybreak to automatically deallocate (close) a work unit or a user at daybreak. The configuration is valid for the Connect on-Device installation.
Note
If a work unit group is configured to ignore allocation daybreak, this overrides a different configuration on a work unit in that work unit group.
Open the file system on your computer and locate the following file:
[installation folder]\resources\configurable\configuration\Misc.properties.Change the AllocationDayBreak property to true.
For work units, change the workUnitAllocationDayBreak property.
For users, change the userAllocationDayBreak property.
Save and close the file.
Open the following file:
[installation folder]\resources\configurable\configuration\com.scancoin.receipt.common.DailyOperationsReceiptand edit the StartHourOfDay and StartMinuteOfDay properties.Save and close the file.
Note
The daybreak hour and minute in this file are also used for daily operations receipts.
Configuring ignore allocation daybreak
You use ignore allocation daybreak to ignore the allocation daybreak configured for a work unit, for example, a self-service checkout point. The configuration is valid for the work unit.
Important
This feature requires that the workUnitAllocationDayBreak property has been set to true. For more information, see Configuring allocation daybreak.
If a work unit group is configured to ignore allocation daybreak, this overrides a different configuration on a work unit in that work unit group.
Log in to Connect on-Device as an administrator.
Select ADMINISTRATION.
Select EDIT WORK UNITS.
Select Edit work unit.
Enter the characters to filter work unit on.
To edit allocation daybreak for a work unit, select the work unit in the Please select work unit list.
Select the Select button.
Select the Ignore allocation day break button.
RM protocol and Connect communication
When the deposit transaction and an allocation is made, the information is sent as follows (message has been truncated):
{
"MESSAGE_TYPE": "Transaction",
"TYPE": "DISPENSE",
"ALLOCATION_ADDED": {
  "WORK_UNIT_NAME": "JK404",
  "BARCODE": "333103",
  "ID": "103"
}
}
Deallocation (end shift):
{
"MESSAGE_TYPE": "Transaction",
"TYPE": "END_OF_SHIFT",
"ALLOCATION_REMOVED": {
  "WORK_UNIT_NAME": "JK404",
  "BARCODE": "333103",
  "ID": "103"
}
}
It is the responsibility of Connect to keep track of which work units are allocated per site. The compiled list of allocations should be sent to each Connect on-Device machine that is part of that site. The list of allocations can be appended to any response from Connect. This is an example (see SetWorkUnitAllocations):
{
"TIME_ZONE_UTC_OFFSET": "+02:00",
"SEQUENCE": 0,
"MACHINE_ID": "RMTester",
"MESSAGE_TYPE": "Reply",
"VERSION": "2.00",
"DATE_TIME": "20200519 11:19:13.860",
"REPLY_CODE": 0,
"SETTINGS": {
  "SetWorkUnitAllocations": {
   "JK457": "Open",
   "JK456": "Open",
   "JK481": "Open",
   "JK480": "Open"
  }
},
"UUID": "935c99ef-9cad-4dea-8ee6-362ec40c0662",
"RECEIVER": "1001",
"KEEP_ALIVE": true,
"MESSAGE_SEQUENCE": 2547
}
Connect on-Device expects to get the entire list. It will overwrite any allocation information stored on the Connect on-Device machine. If the list is empty all allocations are removed.:
"SETTINGS": {
  "SetWorkUnitAllocations": {
  }
If the element is omitted from the response, no changes are made locally on the Connect on-Device machine.
In addition to full allocation updates, Connect on-Device supports changes. 'Add' adds a new allocation. Existing allocations are not affected. 'Remove' removes the specified allocations.
{
"SETTINGS": {
  "AddWorkUnitAllocations": {
   "JK457": "Open",
   "JK480": "Open"
  }
}

{
"SETTINGS": {
  "RemoveWorkUnitAllocations": {
   "JK457": "Open",
   "JK480": "Open"
  }
}The format and usage for user allocations are similar to those for work unit allocations. The exception is that for user allocations, the key is the user login.
{
"SETTINGS": {
  "SetUserAllocations": {
   "1234": "Open",
   "4001": "Open"
  }
}

{
"SETTINGS": {
  "RemoveUserAllocations": {
   "1234": "Open",
   "4001": "Open"
  }
}

{
"SETTINGS": {
  "AddUserAllocations": {
   "1234": "Open",
   "4001": "Open"
  }
}User allocation
Use user allocation to associate a till to a user, such as a cashier.
The association takes place when you select the user and dispense a money mix. No other user can allocate the same user to a till.
If Connect is used, the allocation information is sent from Connect on-Device to Connect in a transaction message. The transaction message contains the following information about the allocation:
Allocation ID
User name
Allocation timestamp
Deallocation time (end-of-shift)
Machine ID
The allocation information is sent to all the machines on the site the user belongs to. When the machines have received information about the allocation, the allocating user can't dispense any additional mixes from other machines on that site. The user can still make free float dispenses and deposits on other machines on the site.
Transaction messages are saved locally on each machine. If the machine the dispense was made from goes offline, synchronization is lost between the machines on that site and it is possible for another user to allocate the already allocated user from another machine. When the machine comes back online, it automatically synchronizes with other machines on that site and the locally saved transaction messages are sent to Connect.
You deallocate a user to end the association between the user and a till.
The user is deallocated (closed) when one of the following occurs:
The allocating user makes a deposit and then ends the shift
The allocating user ends the shift without a prior deposit
Daybreak, that is the reset time of the day — unless the configuration is set to ignore daybreak.
If Connect is used, the deallocation information is sent from Connect on-Device to Connect in a transaction message. The transaction message contains the following information on the deallocation:
User name
Allocation ID
The deallocation information is sent to all the machines on the site the user belongs to. When the machines have received information about the deallocation, it is possible for someone else to allocate the user.
Note
User and work unit allocation permissions can't be combined.
The following permissions are related to user allocation:
Permission | Description |
|---|---|
USER_ALLOCATION | Allows the user to be allocated, that is, \"on shift\". Don't use in combination with WORK_UNIT_ALLOCATION. |
USER_ALLOCATION_DEPOSIT | Allows the user to make deposits even if the user has not been allocated, that is, a supervisor should be able to make a deposit regardless of user allocation state. Use in combination with USER_ALLOCATION. |
FREE_FLOAT | When a user is allocated, all mixes except FREE_FLOAT are disabled and the user is allowed to make deposits. When a user isn't allocated, you can only dispense predefined mixes. |
ALLOCATION_END_SHIFT_ROLE:name_of_other_role | A temporary role. Activated when the user scans an allocated till. It is recommended to only assign enough permissions to allow a single Connect on-Device service to be available. When the service is available, Connect on-Device automatically starts the service after the login procedure. When the service has ended or has been canceled, the original role and permissions are restored. For more information, see the example below. |
For more information, see Permissions A-L and Permissions M–Z.
If you have a system where all tills have their own unique IDs or barcodes, you can send the user directly to the deposit screen when deallocating a user. You need to assign the ALLOCATION_END_SHIFT_ROLE:name_of_other_role permission that temporarily changes the user’s role to name_of_other_role for the first service. The temporary role should only have the permission(s) required to scan an allocated user, for example, deposit.
When the service ends or the user cancels the operation, the original role and permissions are restored. For this particular use case, you need to enable the following permissions:
USER_ALLOCATION
DEPOSIT
END_SHIFT_AFTER_DEPOSIT
Note
The ALLOCATION_END_SHIFT_ROLE permission should not be assigned to the alternative role.
There are two types of allocation IDs:
Unique ID — The till has a unique ID or a barcode. Use this ID when you want to keep track of each till. The
CashComplete\resources\configurable\configuration\allocations.xmlfile contains a list of allocation IDs and barcodes. Before the user can select an allocation, the ID must be defined in this file and cannot be used to allocate more than one user at a time.Common ID - The common allocation ID is identical for all tills. Use this ID when you are only interested in which user is allocated. The userAllocationAutoId property in the
CashComplete\resources\configurable\configuration\Misc.propertiesfile specifies a common ID, for example, userAllocationAutoId=Open. The common ID is set for all allocations without any user intervention.
You can activate allocation daybreak. Allocation daybreak automatically deallocates a user when daybreak occurs. For more information, see Configuring allocation daybreak.
The files in this table are used for the user allocation feature.
File | Description |
|---|---|
| Contains a list of allocations and barcode IDs: <allocations> <allocation id="101" barcode="333101" /> <allocation id="102" barcode="333102" /> <allocation id="103" barcode="333103" /> <allocation id="104" barcode="333104" /> <allocation id="105" barcode="333105" /> <allocation id="106" barcode="333106" /> </allocations> |
| Change the userAllocationDayBreak property to true to activate allocation daybreak. Change the userAllocationAutoId to, for example 'On shift' or 'Working'. |
| Edit the StartHourOfDay and StartMinuteOfDay properties to configure when daybreak occurs. |
Cash-level warnings
You disable physical cash-level warnings from one, multiple, or all cash units on a device when you want Connect on-Device to ignore that cash-level information when determining whether or not to display a cash-level warning.
By default, a warning is displayed in Connect on-Device if the physical cash level in a cash unit is empty, low, high, or full.
You can disable the cash-level warnings for the following:
all cash units on a device
only a specific cash unit on a device
You can disable four types of physical cash-level warnings. The options are:
empty cash-level warnings — statement: disablePhysicalEmptyWarning=true
low cash-level warnings — statement: disablePhysicalLowWarning=true
high cash-level warnings — statement: disablePhysicalHighWarning=true
full cash-level warnings — statement: disablePhysicalFullWarning=true
You would typically disable, for example, incorrectly sent cash-level warnings from physical cash units, such as an HCM's physical hoppers incorrect warnings on low cash levels.
HCM.1.disablePhysicalLowWarning=true in the Devices.properties file allows Connect on-Device to ignore low-level warnings sent by cash units on the HCM.1 device.
HCM.1.PU01disablePhysicalLowWarning=true in the Devices.properties file allows Connect on-Device to ignore low-level warnings sent by the PU01 cash unit on the HCM.1 device.
HCM.1.PU00.disablePhysicalLowWarning=true
HCM.1.PU01.disablePhysicalLowWarning=true
HCM.1.PU02.disablePhysicalLowWarning=true
Setting the strings to true in the Devices.properties file means that Connect on-Device ignores low-level warnings sent by the PU00, PU01, and PU02 cash units on the HCM.1 device.
When you set the disablePhysical[Empty/Low/High/Full]Warning property to true, Connect on-Device ignores the cash-level warning from the cash unit or units and instead relies on the count and other calculations to determine whether or not a hopper's cash level should generate a warning.
The disablePhysicalLowWarning property does not prevent low-level warnings from being displayed in Connect on-Device. It only ignores the physical cash unit or units when calculating whether or not the conditions for a warning have been fulfilled and a low-level warning should be displayed.
Note
Don't mix statements for all cash units and for a specific cash unit on the same device. If you do, a statement set to true takes priority over a statement set to false.
You completely disable cash-level warnings for one or multiple cash units when you don't want Connect on-Device to show the warnings.
These are the statements you need to set to true if you want to completely disable volume-level warnings:
empty-level warnings — statement: disableEmptyWarning=true
low-level warnings — statement: disableLowWarning=true
high-level warnings — statement: disableHighWarning=true
full-level warnings — statement: disableFullWarning=true
Disabling cash-level warnings
You disable physical cash-level warnings from one, multiple, or all cash units on a device when you want Connect on-Device to ignore that cash-level information when determining whether or not to display a cash-level warning.
Note
These are the statements you use to omit cash-level information when Connect on-Device decides whether or not to display cash-level warnings:
empty-level warnings — statement: disablePhysicalEmptyWarning=true
low-level warnings — statement: disablePhysicalLowWarning=true
high-level warnings — statement: disablePhysicalHighWarning=true
full-level warnings — statement: disablePhysicalFullWarning=true
You completely disable cash-level warnings for one or multiple cash units when you don't want Connect on-Device to show the warnings.
Note
These are the statements you use to disable cash-level warnings:
empty-level warnings — statement: disableEmptyWarning=true
low-level warnings — statement: disableLowWarning=true
high-level warnings — statement: disableHighWarning=true
full-level warnings — statement: disableFullWarning=true
Open the file system on your computer and locate the following file:
[installation folder]\resources\configurable\configuration\Devices.properties.Open the file in a text editor.
To omit physical volume-level information for all cash units on a device, set the disablePhysical[Type]Warning statements to true:
For empty volume-level warnings, type: [device name].[device ID].disablePhysicalEmptyWarning=true.
For low volume-level warnings, type: [device name].[device ID].disablePhysicalLowWarning=true.
For high volume-level warnings, type: [device name].[device ID].disablePhysicalHighWarning=true.
For full volume-level warnings, type: [device name].[device ID].disablePhysicalFullWarning=true.
Save and close the file.
Open the file system on your computer and locate the following file:
[installation folder]\resources\configurable\configuration\Devices.properties.Open the file in a text editor.
To omit physical volume-level information for all cash units on a device, set the disablePhysical[Type]Warning statements to true:
For empty volume-level warnings, type: [device name].[device ID].[cash unit ID].disablePhysicalEmptyWarning=true.
For low volume-level warnings, type: [device name].[device ID].[cash unit ID].disablePhysicalLowWarning=true.
For high volume-level warnings, type: [device name].[device ID].[cash unit ID].disablePhysicalHighWarning=true.
For full volume-level warnings, type: [device name].[device ID].[cash unit ID].disablePhysicalFullWarning=true.
Save and close the file.
Open the file system on your computer and locate the following file:
[installation folder]\resources\configurable\configuration\Devices.properties.Open the file in a text editor.
To omit cash-level warnings for a cash unit, set the disable[Type]Warning property to true:
For empty cash-level warnings, type: [device name].[device ID].[cash unit ID].disableEmptyWarning=true.
For low cash-level warnings, type: [device name].[device ID].[cash unit ID].disableLowWarning=true.
For high cash-level warnings, type: [device name].[device ID].[cash unit ID].disableHighWarning=true.
For full cash-level warnings, type: [device name].[device ID].[cash unit ID].disableFullWarning=true.
Save and close the file.
Open the file system on your computer and locate the following file:
[installation folder]\resources\configurable\configuration\Devices.properties.Open the file in a text editor.
To omit cash-level warnings for a cash unit, set the disable[Type]Warning property to true:
For empty cash-level warnings, type: [device name].[device ID].disableEmptyWarning=true.
For low cash-level warnings, type: [device name].[device ID].disableLowWarning=true.
For high cash-level warnings, type: [device name].[device ID].disableHighWarning=true.
For full cash-level warnings, type: [device name].[device ID].disableFullWarning=true.
Repeat the previous step for all cash units whose warnings you want to disable. by typing a different cash unit ID.
Save and close the file.
Exchange rates
The LucidPOS interface can handle payments in different currencies by calculating the exchange rates. The POS system sends an amount to be paid to Connect on-Device via LucidPOS. The result of the deposit of different supported currencies is reported back to the POS system. The POS system then calculates the paid amount using its own exchange rates. If the requested amount has been reached, the POS system instructs Connect on-Device (via LucidPOS) to end the deposit and possibly pay out any surplus. This is the preferred way because exchange rates may differ between the POS system and Connect on-Device.
Some POS systems don't have this functionality, so LucidPOS has been extended to accept several currencies during payment and return the correct surplus based on exchange rates.
The exchange rate service always uses a master currency. That is, the currency used for exchange rate calculations. The master currency is specified in the Locality step in in the Connect on-Device Studio wizard.
Note
You can define several currencies but the exchange rate service only uses the currency specified as master currency.
Exchange rates are stored in the following .xml file: [installation folder]\resources\configurable\configuration\exchangeRates.xml file.
<?xml version="1.0" encoding="utf-8"?>

<exchangerates>

  <mastercurrency currency="EUR">

    <rate currency="SEK">9.3067</rate>

    <rate currency="USD">1.5337</rate>

    <rate currency="DKK">7.4609</rate>

    <rate currency="NOK">7.8764</rate>

  </mastercurrency>

  <mastercurrency currency="SEK">

    <rate currency="EUR">0.1074</rate>

    <rate currency="USD">0.1715</rate>

    <rate currency="DKK">0.8301</rate>

    <rate currency="NOK">0.8611</rate>

  </mastercurrency>

  <mastercurrency currency="NOK">

    <rate currency="CHF">0.2016</rate>

    <rate currency="DKK">0.9292</rate>

    <rate currency="EUR">0.1246</rate>

    <rate currency="GBP">0.099</rate>

    <rate currency="JPY">20.905</rate>

    <rate currency="SEK">1.1665</rate>

    <rate currency="USD">0.1929</rate>

  </mastercurrency>

</exchangerates>
Important
The exchange rate service is not enabled by default in Connect on-Device.
Enabling the exchange rate service
The exchange rate service is not enabled by default in Connect on-Device. To enable the service you need to modify the [installation folder]\resources\configurable\configuration\com.scancoin.common.exchangerate.ExchangeRateService file.
In the file explorer, find the
[installation folder]\resources\configurable\configuration\com.scancoin.exchangerate.ExchangeRateService file.Open the file in a text editor.
Modify the file to activated=true.
Save the file.
Restart Connect on-Device.
See also
Content Removal ID
If you use 'external ID when emptying' when you empty a cash box, you must scan or manually enter the code of the new cash box or bag. The code is then associated with the cash box until the next time the cash box is emptied, and you scan or manually enter a new code.
Note
The cash box or bag code is sent as the CONTAINER_ID field in all subsequent transactions where this cash box is involved. When the exchange transaction is sent, the REFERENCE field contains the removed cash box's container ID.
To use enable bar code scanning when emptying, you must edit the [installation folder]\resources\configurable\configuration\Devices.properties file for the device on which you want scanning to be possible.
Text
# Set to true to enable bar code scanning when emptying bag
COMBINED_MEI.1.needsExternalIDWhenEmptying = true
ELECTRUM.1.needsExternalIDWhenEmptying = true
KUAN.1.needsExternalIDWhenEmptying = true
NGENE.1.needsExternalIDWhenEmptying = true
BNECDM.1.needsExternalIDWhenEmptying = true
Optionally, you can use 'Content Removal ID'. In this case, the cash box CONTAINER_ID is automatically incremented the by 1 for the new cash box every time the previous cash box has been emptied. If no previous value exists, the initial value is set to 1. That is, the first exchange transaction has REFERENCE set to 1 and CONTAINER_ID set to 2.
To use 'Content Removal ID', you must edit the [installation folder]resources\configurable\configuration\Misc.properties file. For more information, see Configuring automatic incrementation of CONTAINER_ID.
{
  "MESSAGE_TYPE": "Transaction",
  "USER": {/../},
  "SUB_TYPE": "OUT",
  /../
  "DEVICE_MOVEMENTS": [{
    "DEVICE_ID": "HCM.1",
    "BOX_MOVEMENTS": [{
      "MOVEMENT": [{
        "TOTAL": -1750,
        "REJECTS": 0,
        "VALUES": [/../],
        "TYPE": "NOTE"
      }],
      "RESULTING_CONTENT":[/../],
        "TYPE": "NOTE"
      }],
      "BOX_ID": "AB0",
      "CONTAINER_ID": "100"
    }]
  }],
  "VALUE_BAGS": [/../],
  "REFERENCE": "99",
  "TYPE": "EXCHANGE"
}
In this example, the current container ID (Content Removal Id) is 99 as you can see in the REFERENCE field. The new container ID (100) has been set on the affected container.
{
  "MESSAGE_TYPE": "Transaction",
  "USER": {/../},
  /../
  "DEVICE_MOVEMENTS": [{
    "DEVICE_ID": "HCM.1",
    "BOX_MOVEMENTS": [{
      "MOVEMENT": [{
        "TOTAL": 400,
        "REJECTS": 0,
        "VALUES": [/../],
        "TYPE": "NOTE"
      }],
      "RESULTING_CONTENT": [/../],
      "BOX_ID": "AB0",
      "CONTAINER_ID": "100"
    }]
  }],
  "VALUE_BAGS": [/../],
  "TYPE": "DEPOSIT"
}
A subsequent deposit transaction resulted in content change of the deposit box with the new container ID (100).
{
  "MESSAGE_TYPE": "Transaction",
  "USER": {/../},
  "SUB_TYPE": "OUT",
  "DEVICE_MOVEMENTS": [{
    "DEVICE_ID": "HCM.1",
    "BOX_MOVEMENTS": [{
      "MOVEMENT": [{
        "TOTAL": -400,
        "REJECTS": 0,
        "VALUES": [/../],
        "TYPE": "NOTE"
      }],
      "RESULTING_CONTENT": [{
        "TOTAL": 0,
        "REJECTS": 0,
        "VALUES": [/../],
        "TYPE": "NOTE"
      }],
      "BOX_ID": "AB0",
      "CONTAINER_ID": "101"
    }]
  }],
  "VALUE_BAGS": [/../],
  "REFERENCE": "100",
  "TYPE": "EXCHANGE"
}
The next exchange transaction has set the new container ID (101) and sends the existing one as reference (100).
Important
You can't have both a scanned or a manually entered code and an automatically incremented one.
You can only empty one box per transaction because the REFERENCE field is placed on the transaction level.
You can prevent emptying (exchanging) several boxes per transaction with the EMPTY_NOTE_BOXES_SCAN permission.
Configuring automatic incrementation of CONTAINER_ID
You configure a CONTAINER_ID to be automatically incremented by 1 when you don't want to force the user to scan or manually enter a code when emptying a cash box or bag.
Important
You can't have both a scanned or a manually entered code and an automatically incremented one.
You can only empty one box per transaction because the REFERENCE field is placed on the transaction level.
You can prevent emptying (exchanging) several boxes per transaction with the EMPTY_NOTE_BOXES_SCAN permission.
Open the
[installation folder]\resources\configurable\configuration\Devices.propertiesfile.For each device where you want the CONTAINER_ID to automatically get incremented, make sure that needsExternalIDWhenEmptying is set to true.
Save the file.
Open the
[installation folder]\resources\configurable\configuratio\Misc.propertiesfile in a text editor, such as Atom.Change containerIdGenerator to increment: containerIdGenerator=increment.
Save the file.