Connect on-Device Studio User Interface
Connect on-Device Studio user interface
Note
Name: Do NOT change the name because the name parameter is used as an identifier in a number of files.
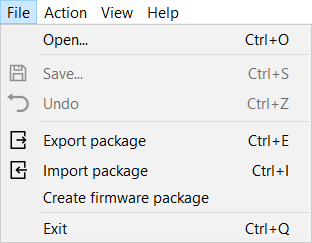
Menu bar
Use the menu bar to access the menus where you can make global settings and perform operations that don't directly relate to configuration.
 |
UI item | Description |
|---|---|
File menu | Select to open files, export and import packages, and close the program. |
Action menu | Select to open the Connect on-Device configuration wizard and to set the Connect on-Device Studio password. |
View menu | Select to change how Connect on-Device Studio is displayed. |
Help | Select to view information on the installed version of Connect on-Device Studio. |
File menu
Use the File menu to start the hardware configuration wizard or to set the Connect on-Device Studio password.
UI item | Description |
|---|---|
Open | Select to open a different installation than the current installation running on your computer, for example, a backup installation. |
Export Package | Select to open the Export Package dialog box where you configure export packages. |
Import Package | Select to open the Import Package dialog box where you configure import packages. |
Exit | Select to close the program |
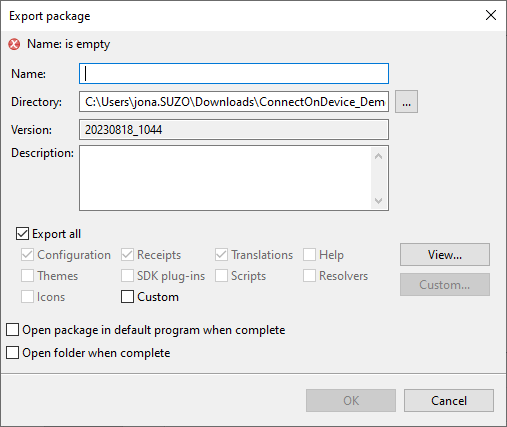
File menu — Export package
Use the Export package dialog box to export all or a number of selected parts to a package that can be added to Connect. In Connect you can distribute the package to multiple machines or manually import the package to a single machine.
Note
In Connect the package is called configuration template.
UI item | Description |
|---|---|
Name | Type a name for the export package. |
Directory | Select the folder where you want to save the export package file. |
Version | Displays the export package made up of the date when the export package was created and a unique number. |
Description | Type a description that helps you identify the export package. |
Export all | Select to include all available content in the export package. |
Export options |
|
Open package in default program when complete | Select to open the export package in the default program for the file type when the export package has been compiled. |
Open folder when complete | Select to open the folder where the export package was saved when the export has been compiled. |
OK | Select to save the settings and create the export package. |
Cancel | Select to cancel the selected settings and close the dialog box. |
See also
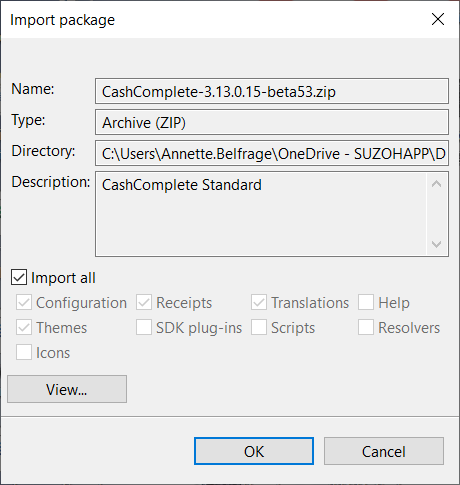
File menu — Import package
Use the Import package dialog box to import a package to a local installation or machine.
 |
UI item | Description |
|---|---|
Name | Displays the name of the package. |
Type | Shows the file format of the package (ZIP or JSON). Only archive.zip at this time. |
Directory | Shows the folder where the package file is stored. |
Description | Shows a description of the package. |
Import all | Select to include all available content when importing the package. |
Import options |
|
OK | Select to start importing the package. |
Cancel | Select to cancel the import and close the dialog box. |
See also
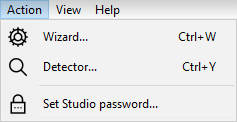
Action menu
Use the Action menu to start the hardware installation wizard, detect connected hardware, or to set the Connect on-Device Studio password.
Note
The contents of the installation wizard is dynamic. What you see depends on what you selected in the previous step.
UI item | Description |
|---|---|
Wizard | Select to start the hardware installation wizard. |
Detector | Select to open a dialog box where you can select ports to detect connected hardware. Before running the detector, you must have configured the hardware from the wizard. |
Linux configuration | Select to open a dialog box where you can configure USB protection. |
Set Studio password | Select to change the Connect on-Device Studio password. |
See also
Connect on-Device Studio User Guide
Action menu wizard — Connect on-Device coin hardware
Action menu wizard — Additional coin hardware
Action menu wizard — Note devices
Action menu wizard — Additional note devices
Action menu wizard — Additional devices
Action menu wizard — Additional hardware
Action menu wizard — Connectivity
Action menu wizard — Automatic provisioning
Action menu — Linux configuration
Use Linux configuration to configure USB access restrictions for Linux-based machines.
Note
This menu option is only available for Linux-based machines.
UI item | Description |
|---|---|
USB protection status | Shows the current USB protection status. These are the options:
|
Disable USB protection | Select to switch off USB protection on the machine. |
Enable USB protection | Select to switch on USB protection on the machine. |
Update the whitelist | Select to add USB devices that have permission to connect to the machine. |
Cancel | Select to ignore the configuration and close the wizard. |
Finish | Select to save the configuration and close the page. |
See also
Action menu wizard — Connect on-Device coin hardware
Use Connect on-Device coin hardware to configure the hardware you want to use for coin management.
Note
The contents of the installation wizard is dynamic. What you see depends on what you selected in the previous step.
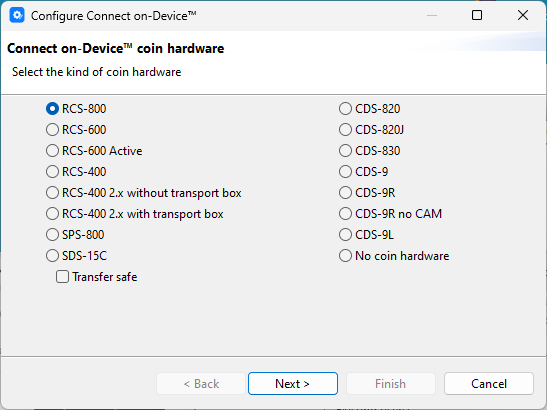
UI item | Description |
|---|---|
List of coin hardware | Select coin hardware. If you don't need any coin hardware, select No coin hardware. |
Next | Select to continue |
Cancel | Select to ignore the configuration and close the wizard. |
Action menu wizard — Additional coin hardware
Use Additional coin hardware to configure the coin acceptors/recyclers and ccTalk coin dispensers you want to use for coin management.
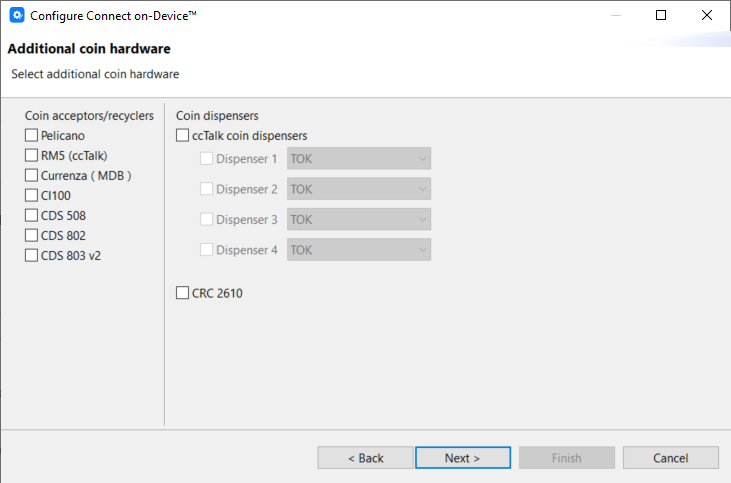
UI item | Description |
|---|---|
Coin acceptors/recyclers | Select one or more coin acceptors/recyclers. |
Coin dispensers | Select one or more ccTalk coin dispensers |
Back | Select to go back. |
Next | Select to continue |
Cancel | Select to ignore the configuration and close the wizard. |
Action menu wizard — Note devices
Use Note devices to configure note devices connected to the hardware, such as NMD100, HCM, and Cima

UI item | Description |
|---|---|
List of devices | Select the note devices connected to your hardware. |
Back | Select to go back. |
Next | Select to continue |
Cancel | Select to ignore the configuration and close the wizard. |
See also
Action menu wizard — Connect on-Device coin hardware
Action menu wizard — Additional coin hardware
Action menu wizard — Additional note devices
Action menu wizard — Additional devices
Action menu wizard — Additional hardware
Action menu wizard — Connectivity
Action menu wizard — Automatic provisioning
Action menu wizard — Connection
Action menu wizard — Note devices — RCS-750N
Use Note devices - RCS-750N to configure hardware, flow, and currencies.
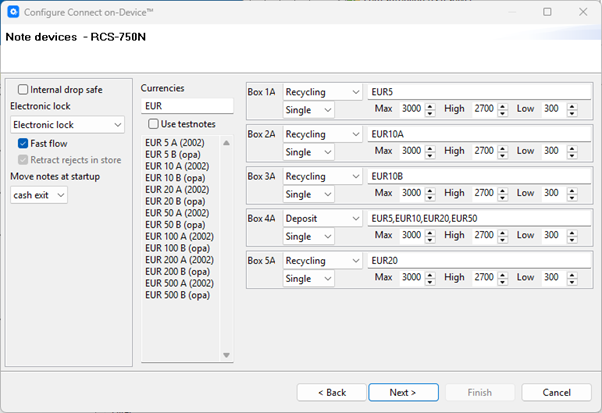
UI item | Description |
|---|---|
Internal drop safe | Select if there is a drop box inside the safe |
Electronic lock | Select the kind of lock. These are the options:
|
Fast flow | Select to print the receipt as soon as the notes are moved from the escrow to the safe. |
Retract rejects in store | Select to move notes that don't pass the validation to the retract box. |
Move notes at startup | Select where to move notes detected in the note acceptor. These are the options:
|
Currencies | Select the 3-character ISO code for the currency you want to use. The currency fields are updated from the |
Use testnotes | Select to use test notes instead of authentic notes. |
Back | Select to go back. |
Next | Select to continue |
Cancel | Select to ignore the configuration and close the wizard. |
Action menu wizard — Note devices — RCS-90N
Use Note devices - RCS-90N to configure note devices for deposits and dispenses, bag sealer, and the type of electronic lock to use. Regardless of how you configure RCS-90N note devices, the device always has a bag for 'to bag' deposits.
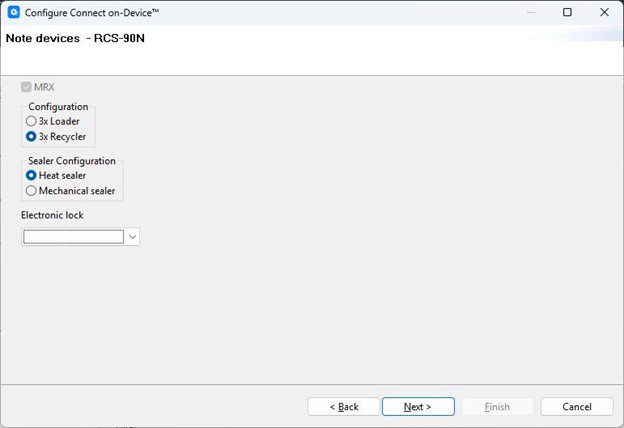
You can either configure loaders or recyclers. At this point, Connect on-Device doesn't support mixed configurations
UI item | Description |
|---|---|
3x Loader | Select the notes cassette that is only able to dispense and has to be loaded manually |
3x Recycler | Select to be able to both deposit and dispense |
Heat sealer | Select to use a heat sealer to seal the bag. |
Mechanical sealer | Select to use a mechanical sealer to seal the bag. |
Electronic lock | Select the type of electronic lock for the safe door. These are the options:
|
Back | Select to go back. |
Next | Select to continue |
Cancel | Select to ignore the configuration and close the wizard. |
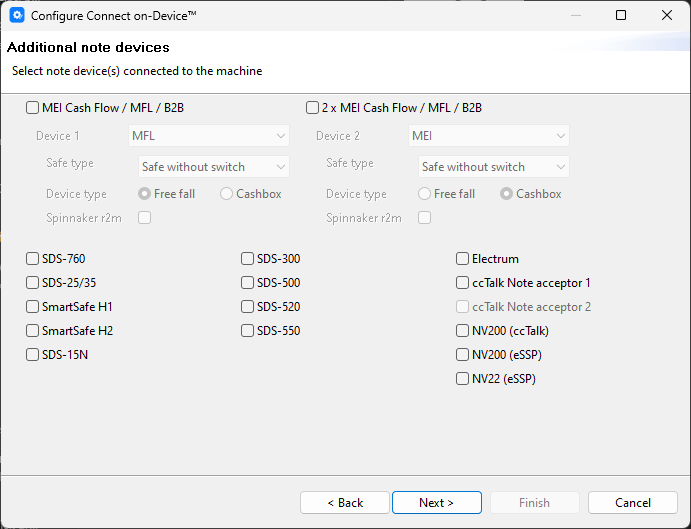
Action menu wizard — Additional note devices
Use Additional note devices to configure additional note devices connected to the hardware.
UI item | Description |
|---|---|
List of devices | Select the note devices connected to your hardware. |
Back | Select to go back. |
Next | Select to continue |
Cancel | Select to ignore the configuration and close the wizard. |
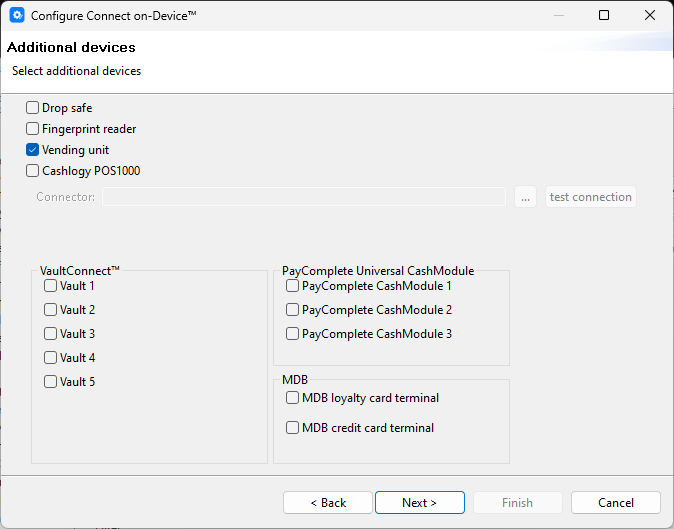
Action menu wizard — Additional devices
Use Additional devices to configure any additional devices connected to the hardware, such as drop safes, vending units, MDB loyalty card or credit card terminals, PayComplete™ cash modules, and VaultConnect vaults.
UI item | Description |
|---|---|
List of devices | Select the additional devices connected to your hardware. |
Back | Select to go back. |
Next | Select to continue |
Cancel | Select to ignore the configuration and close the wizard. |
See also
Action menu wizard — Connect on-Device coin hardware
Action menu wizard — Additional coin hardware
Action menu wizard — Note devices
Action menu wizard — Additional note devices
Action menu wizard — PayComplete™ Universal CashModule
Action menu wizard — Additional hardware
Action menu wizard — Connectivity
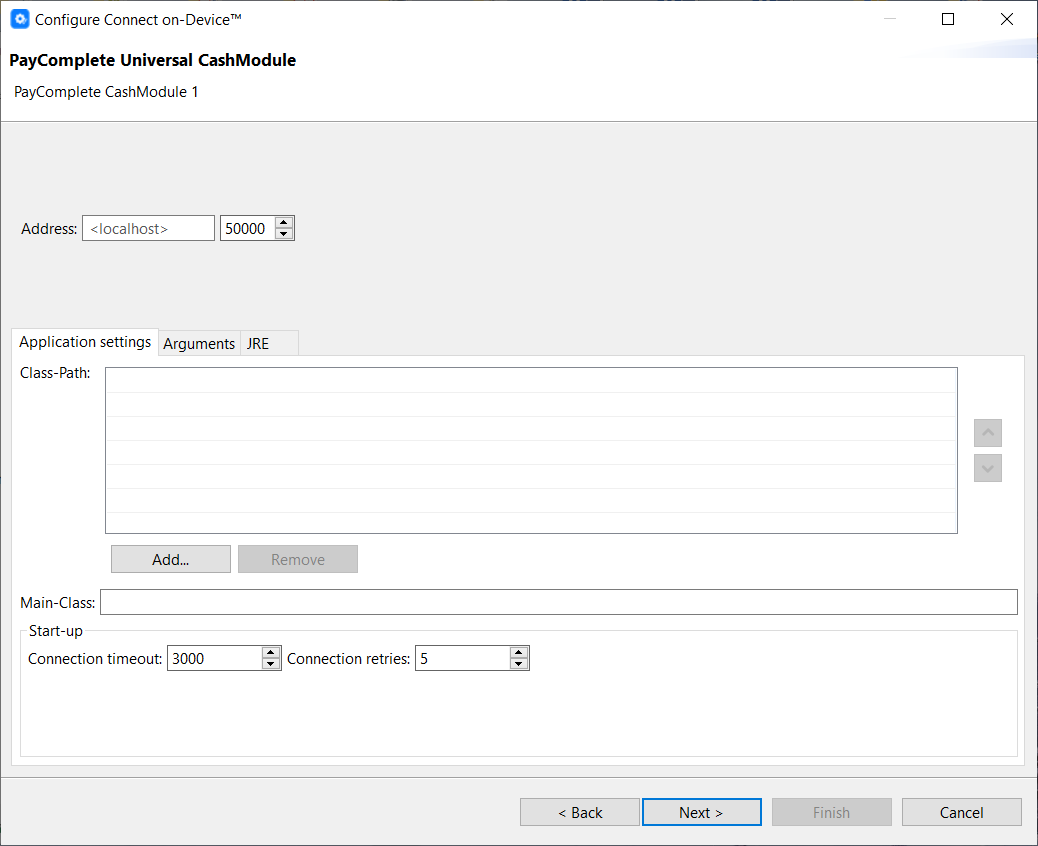
Action menu wizard — PayComplete™ Universal CashModule
Use PayComplete™ Universal CashModule to configure 1..3 external applications that Connect on-Device should connect to.
Note
This step is shown if you selected a PayComplete™ CashModule in the Action menu wizard — Additional devices step.
UI item | Description |
|---|---|
Address | Enter the host/port to connect to. By default, localhost:5000. |
Application settings | Class-Path — Enter a list of JAR files required to run the application. Add — Select to add a JAR file to the list. Remove — Select to delete the selected JAR file from the list. |
Arguments | Program arguments are optional command line arguments for the DDK application to run. VM options are optional Java VM options for the DDK application to run. Working directory — Default — Select to run the DDK application with the Connect on-Device installation directory as CWD, for example, Working directory — Other — Select to choose an alternative CWD for the DDK application to run in the default base directory for DDK applications. For example, |
JRE | Current —Selected to run the DDK application using the same Java Runtime Environment Connect on-Device is running with. Alternate — Select to choose an alternative Java Runtime Environment if the DDK application requires a different version of Java to run. |
Main-Class | Enter the fully qualified name of the class containing the application main entry point. |
Connection timeout | Enter the number of milliseconds Connect on-Device tries to connect to the application. |
Connection retries | Enter the number of times Connect on-Device retries to connect if the connection fails. |
Back | Select to go back. |
Next | Select to continue |
Cancel | Select to ignore the configuration and close the wizard. |
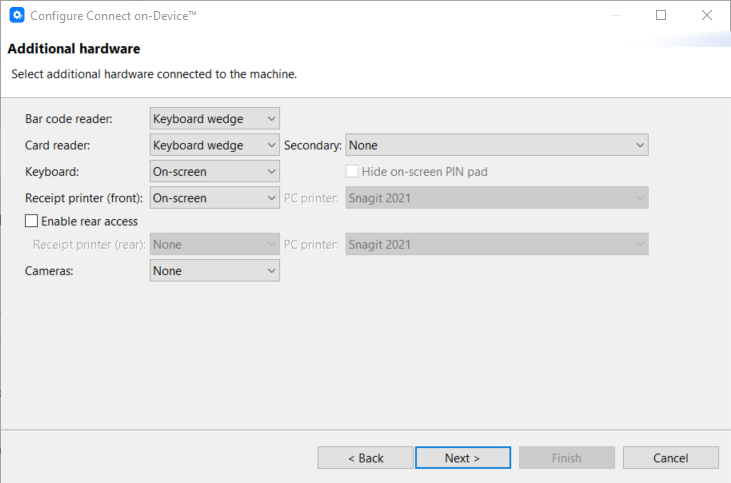
Action menu wizard — Additional hardware
Use Additional hardware to configure any additional hardware, such as a barcode scanner, keyboard, and receipt printer.
UI item | Description |
|---|---|
List of devices | Select the additional devices connected to your hardware. |
Back | Select to go back. |
Next | Select to continue |
Cancel | Select to ignore the configuration and close the wizard. |
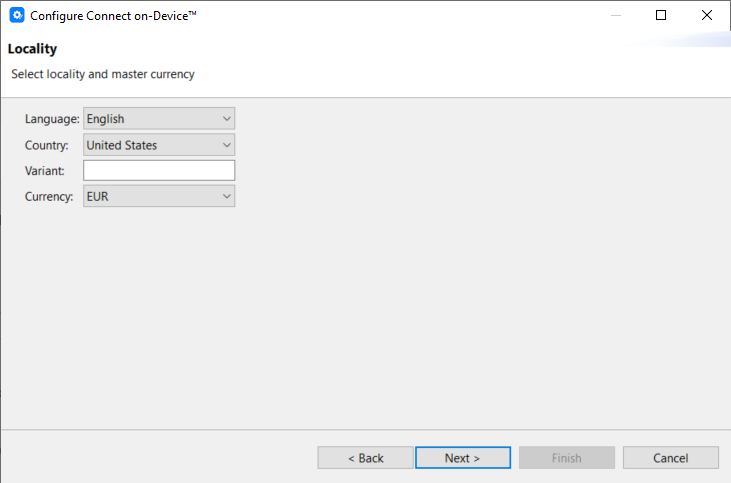
Action menu wizard — Locality
Use Locality to configure language, country, variant, and currency.
UI item | Description |
|---|---|
Language | Select the display language for Connect on-Device. |
Country | Select the country where the machine is located. The selected country determines the date and time formats and the thousand separator. |
Variant | Enter a variant for a customized translation for a specific customer or for a specific market, such as 'en_US' for the American market. |
Currency | Select currency. |
Back | Select to go back. |
Next | Select to continue |
Cancel | Select to ignore the configuration and close the wizard. |
See also
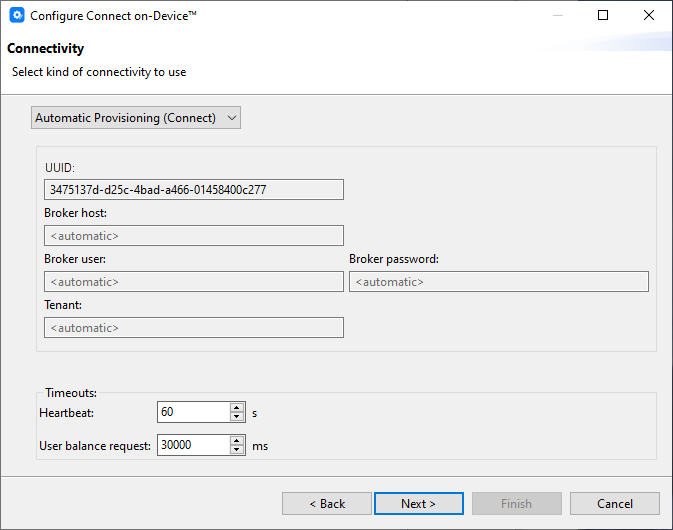
Action menu wizard — Connectivity
Use the Connectivity page to configure the connection to the reporting system
 |
UI item | Description |
|---|---|
Drop-down list showing the remote reporting system type | Select: None — no connection SoftOne — (RM) supervisor system Connect — Connect system Automatic provisioning (Connect) — Select to enable remote activation and configuration in Connect. |
UUID | Shows the machine's unique identifier (UUID). |
Broker Host | Enter the node (URL) of the remote system. If it's automatic, do not enter any value. |
Broker User | Enter the node you want to use to connect to the remote system. If it's automatic, do not enter any value. |
Broker Password | Enter the password of the user. If it's automatic do not enter any value. |
Tenant | Enter the customer ID. If it's automatic do not enter any value. |
Heartbeat | Select the interval at which Connect on-Device sends SystemStatus messages about the machine. By default, the interval is set to 60 seconds. Important! The Connect on-Device heartbeat setting must match the online status timeout in Connect. |
Back | Select to go back. |
Next | Select to continue |
Cancel | Select to ignore the configuration and close the wizard. |
See also
Action menu wizard — Connect on-Device coin hardware
Action menu wizard — Additional coin hardware
Action menu wizard — Note devices
Action menu wizard — Additional note devices
Action menu wizard — Additional devices
Action menu wizard — Additional hardware
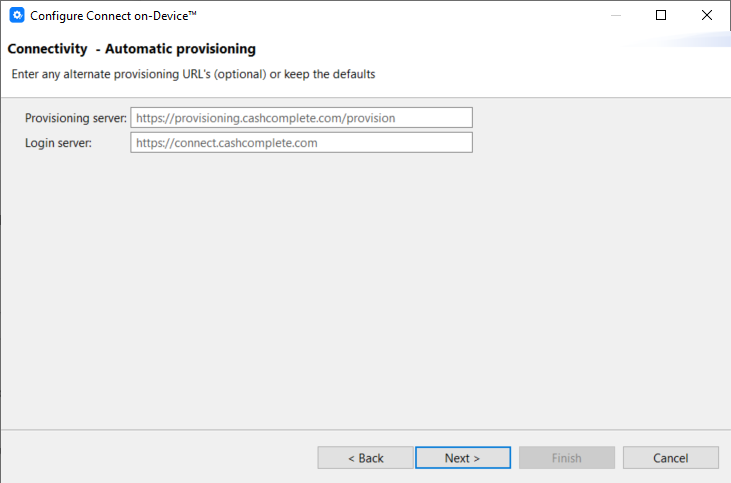
Action menu wizard — Automatic provisioning
Use Automatic provisioning to configure an alternative provisioning URL (optional).
UI item | Description |
|---|---|
Provisioning server | Enter the URL to the server where the provisioning service is deployed. |
Login server | Enter the URL to the server used to sign in to Connect. |
Back | Select to go back. |
Next | Select to continue |
Cancel | Select to ignore the configuration and close the wizard. |
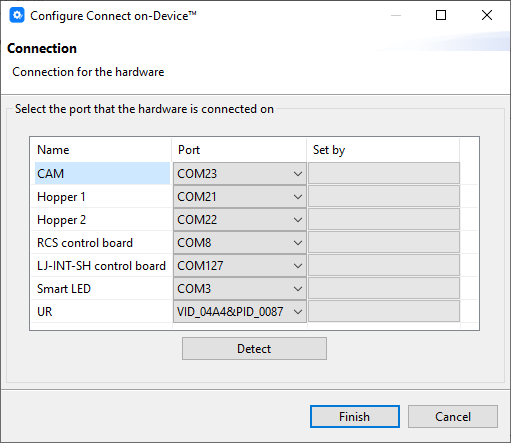
Action menu wizard — Connection
Use Connection to view or select COM ports for your devices.
If the COM ports have changed for some reason, you can run hardware detection from the Action menu Detector option.
Note
Before running the detector, you must have configured the hardware from the wizard.
UI item | Description |
|---|---|
Name | Shows the names of the devices you selected in the previous steps of the wizard. |
COM port | Shows the automatically selected COM ports. If no COM port can be found, you can manually select one from the list. |
Set by | Shows a status for the COM port detection. There are three options:
|
Back | Select to go back. |
Finish | Select to save the configuration and close the wizard. |
Cancel | Select to ignore the configuration and close the wizard. |
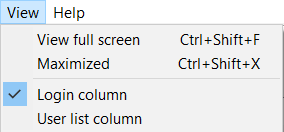
Connect on-Device Studio View menu
Use the View menu to change how you view Connect on-Device Studio or the contents in the configuration views. The View menu is dynamic and the commands differ depending on the context you are in. The View full Screen and Maximized options are always available.
UI item | Description |
|---|---|
View full screen | Select to display Connect on-Device Studio in full screen mode. |
Maximized | Select to maximize the configuration view within the Connect on-Device Studio window. |
Descriptions | Select to include a description of the items in the configuration view. |
Copy all to editable | (Language — Texts) Select to Connect on-Device Studio |
Copy to editable | (Language — Texts) Select to |
Idle | (Display) Shows |
Login | (Display) Shows |
Login column | (Users) — Select to toggle the visibility of the Login column. |
Out of Use | (Display) Shows |
Service menu | (Display) Shows |
Source | (Display) Shows |
User list column | (Users) — Select to toggle the visibility of the User list column. |
Help menu
Use the Help menu to display information on the Connect on-Device Studio installation.

UI item | Description |
|---|---|
About | Select to display Connect on-Device Studio information window. |
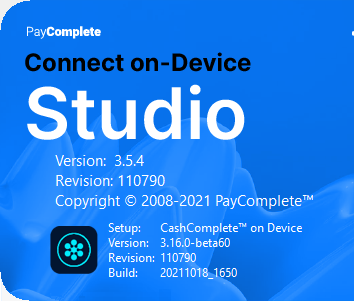
Version | Shows the version number of the Connect on-Device Studio installation. |
Revisions | Shows the revision number of the Connect on-Device Studio installation. |
Copyright | Shows copyright information. |
Setup | Shows the Connect on-Device Studio installation being configured. This is usually the installation Connect on-Device Studio belongs to, but it can be a different installation if there are several installations on the same computer and one of them has been opened from the File menu. |
Version | Shows the compatible version of Connect on-Device. |
Revision | Shows the compatible revision of Connect on-Device. |
Build | Shows the software build number. |
Tip
Click anywhere inside the information window to close the window.
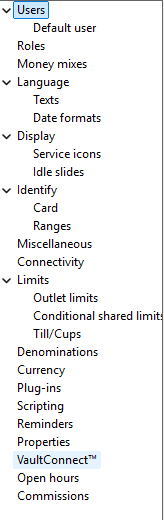
Connect on-Device Studio navigation pane
Use the Connect on-Device Studio navigation pane to access different configuration options.
UI item | Description |
|---|---|
Users | Use this view to add, edit, or remove users. |
Roles | Use this view to add and remove roles, or edit the permissions assigned to the role. |
Money mixes | Use this view to add, edit, or remove money mixes. |
Language | Use this view to edit the language for Connect on-Device. |
Display | Use this view to edit the visual appearance of. Connect on-Device. |
Identify | Use this view to edit how users authenticate when accessing Connect on-Device. |
Miscellaneous | Use this view to edit the components that appear on the Connect on-Device screen. |
Connectivity | Use this view to configure how Connect on-Device connects to Connect . |
Limits | Use this view to configure dispense limits and conditional limits. |
Denominations | Use this view to configure accepted denominations per device. |
Currency | Use this view to override the default number of fractions for a currency and to configure the cutover date for the new value. |
Plug-ins | Use this view to add, edit, or remove plug-ins. |
Scripting | Use this view to add scripts for the following:
|
Reminders | Use Reminders to configure reminders. For example, you can configure a reminder that it's time to clean the machine when the machine has counted 10.000 coins or that it's time to service the machine after the specified number of days. |
Properties | Use Properties to configure and export specific properties in configuration files. |
VaultConnect | Use this view to view a list of enabled vaults and their accepted denominations. |
Open hours | Use this view to configure open hours and import calendars. |
Commissions | Use this view to add, edit, or remove commissions for a role or work unit. |
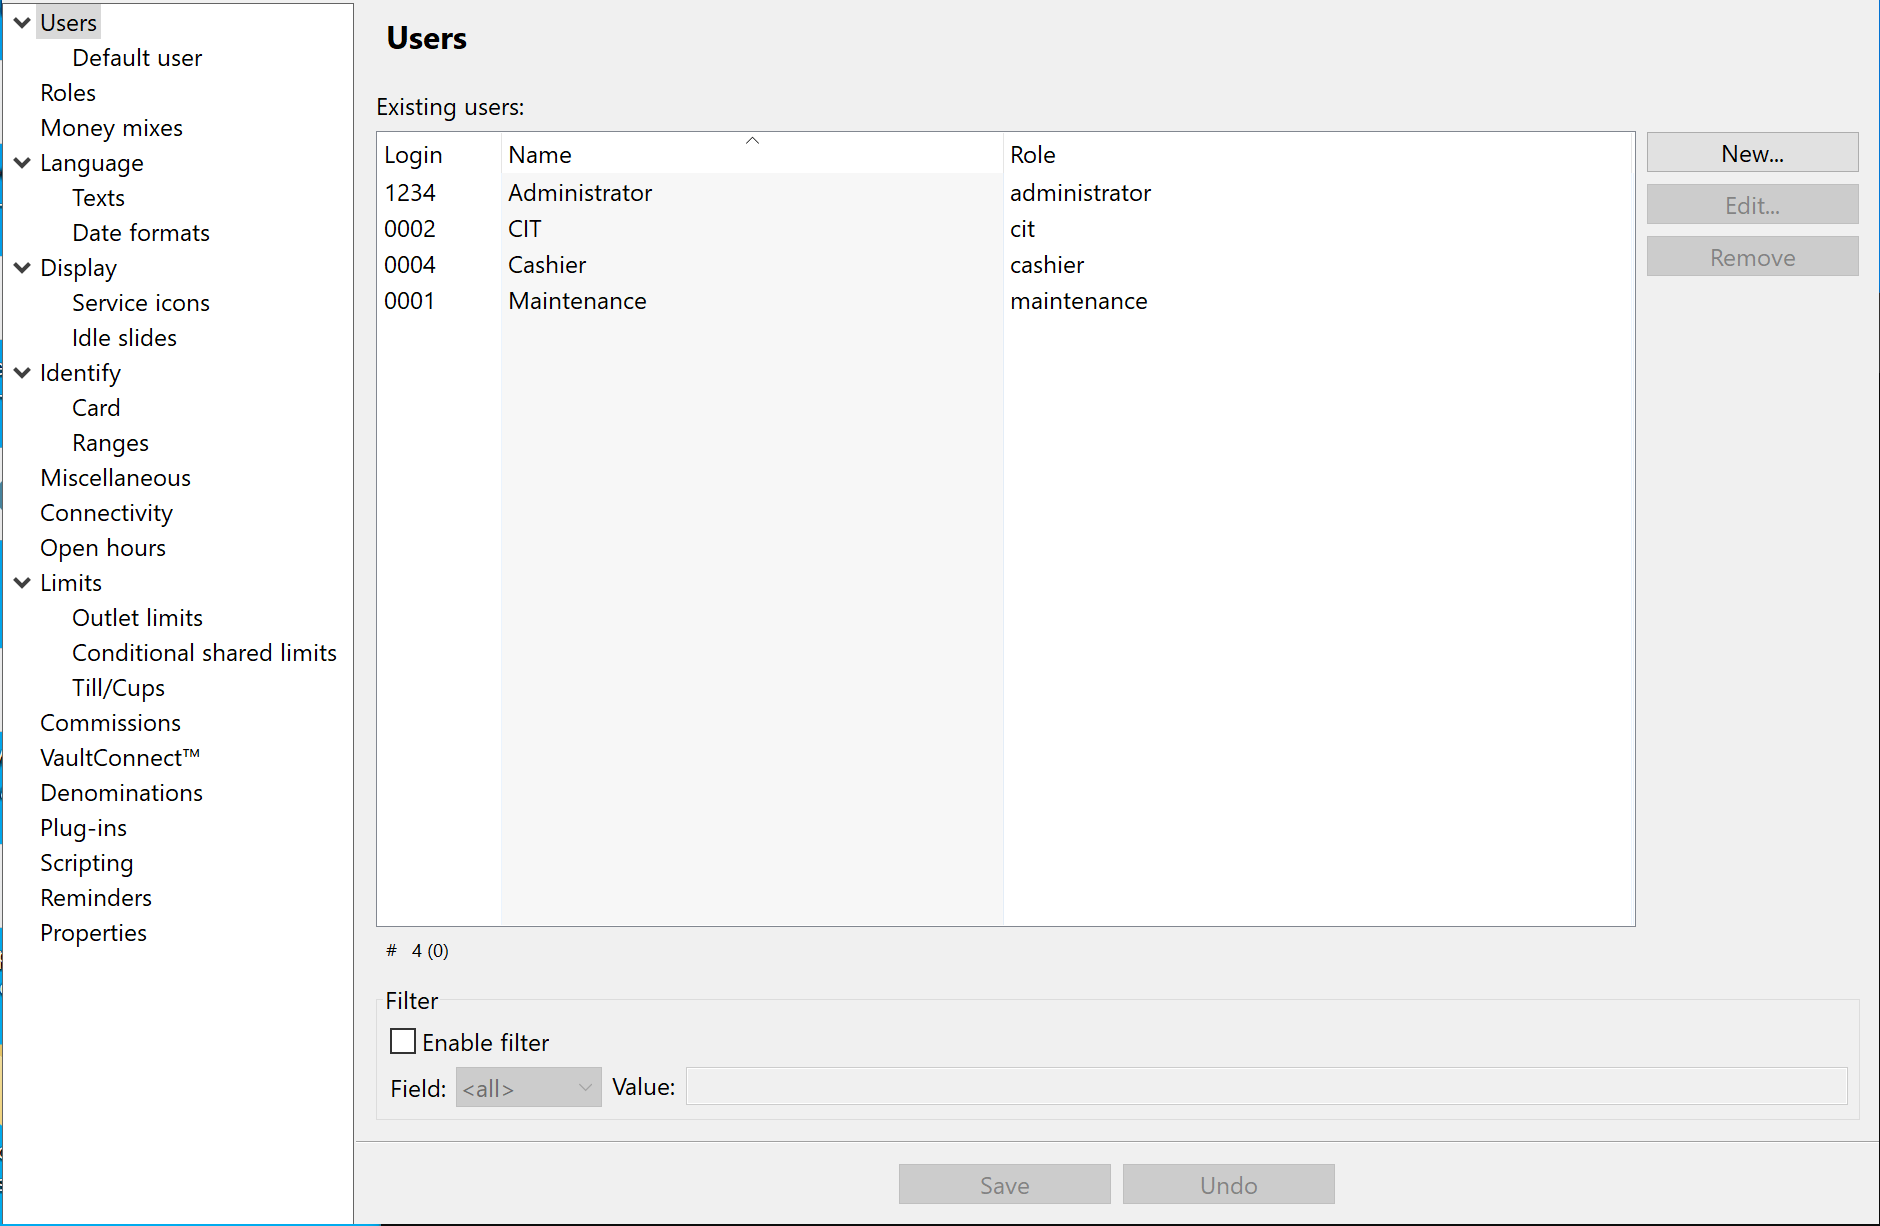
Navigation pane — Users
Use the Users view to add, edit, or remove a user account.
Note
From the View menu, you can select whether or not to show the following two columns:
Login column —Select to show the Login column.
User list column — Select to show the User list column.
UI item | Description |
|---|---|
Login | Shows the ID of the user. |
Name | Shows the name of the user. |
Role | Shows the role of the user. |
New | Select to open a wizard where you add a new user account. |
Edit | Select to edit the settings of the selected user account. |
Remove | Select to remove the selected user account. |
Enable filter | Select if you want to filter the displayed users. The options are:
|
Save | Select to save the configuration. |
Undo | Select to ignore changes to the configuration. |
See also
Connect on-Device Studio User Guide
Connect on-Device Studio navigation pane
Create new user — General settings tab
Create new user — Login settings tab
Create new user — Account settings tab
Navigation pane — Users — context menu
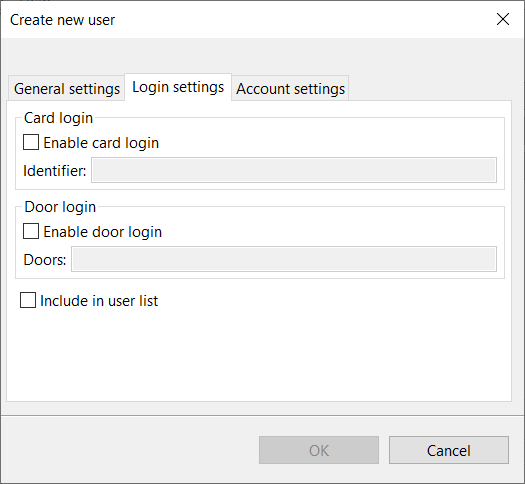
Create new user — Login settings tab
Use the Login settings tab to enable card and door login.
UI item | Description |
|---|---|
Enable card login | Select to enable the user to use a card to identify when logging in. |
Identifier | Enter the card number to use. |
Enable door login | Select to enable the user to login by opening a door. |
Doors | Select the browse button (...) to open a dialog for selecting door identifiers valid for login. The browse button is only available if the machine has been started successfully at least once. On a first-time installation, you must enter the door identifiers manually. |
Include in user list | Select to include the user account in the user list. For more information, see Navigation pane — Miscellaneous. |
OK | Select to save the changes. |
Cancel | Select to ignore the changes and close the dialog box. |
Note
The browse button that opens the Doors dialog box is only available if the machine has been started successfully at least once. On a new installation, you must enter the door identifiers manually.
Login settings — Doors
Use the Doors dialog box configure the door identifiers for login.
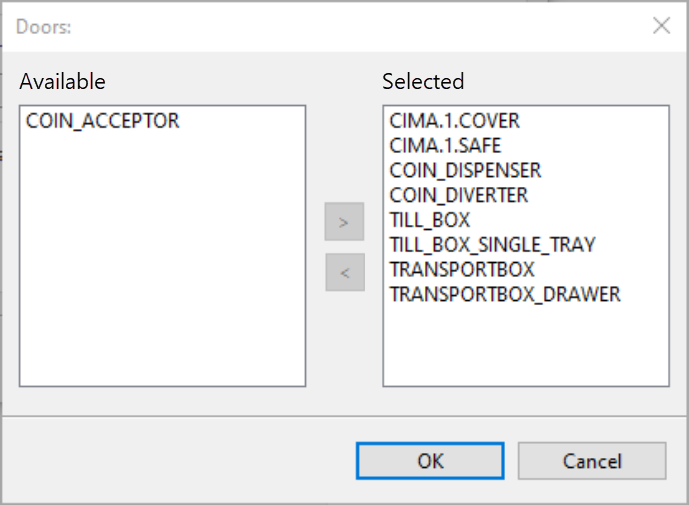
Note
The browse button that opens the Doors dialog box is only available if the machine has been started successfully at least once. On a new installation, you must enter the door identifiers manually.
UI item | Description |
|---|---|
Available | Shows a list of available door identifiers. |
Selected | Shows the list of selected door identifiers. |
< | Select to add the selected door identifiers. |
> | Select to remove the selected door identifiers. |
OK | Select to save the changes. |
Cancel | Select to ignore the changes and close the dialog box. |
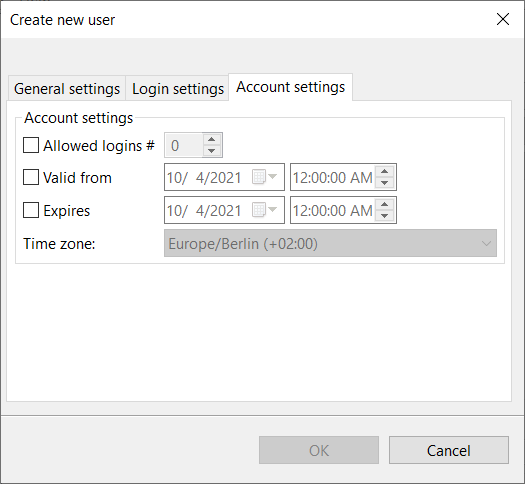
Create new user — Account settings tab
Use the Account settings tab to configure the following.
the number of times the user can sign in using the user account
the date and time when the user account becomes valid
the date and time when the user account expires
the local time zone in which the user account Valid from/Expires applies
 |
UI item | Description |
|---|---|
Allowed logins # | Enter the number of times the user can sign in to the user account. |
Valid from | Enter the date and time from which the user account is valid. |
Expires | Enter the date and time when the user account expires. |
Time zone | Select the time zone in which the user account 'Valid from' and 'Expires' settings apply. |
OK | Select to save the changes. |
Cancel | Select to ignore the changes and close the dialog box. |
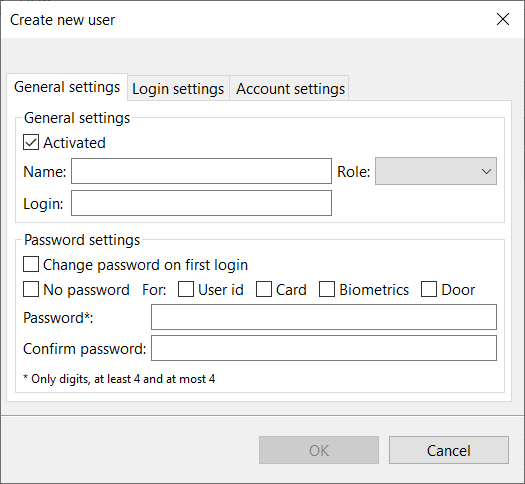
Create new user — General settings tab
Use the General settings tab to enter general user information.
UI item | Description |
|---|---|
Activated | Clear to disable the login for an account without deleting it. |
Name | Enter the name of the user, |
Login | Enter the user ID. |
Role | Select the role for the user. |
Change password on first login | Select to force the user to choose a new password on first login. |
No password | Select to enable login without any password, regardless of login method. |
For: |
|
Password | Enter a new password for the user account. |
Confirm password | Enter the password for the user account again to confirm it. |
OK | Select to save the changes. |
Cancel | Select to ignore the changes and close the dialog box. |
Navigation pane — Users — Default user
Use the Default user configuration to act as a template when adding new users. The settings you configure here are automatically added to the new user. You can select whether or not the new user account is activated immediately when created, set password requirements, and determine whether or not to include the default user in the user list.
UI item | Description |
|---|---|
Activated | Select to set new user accounts to active when the account is created. |
Change password on first login | Select to require the user to change the password when first signing in to Connect on-Device. |
No password | Select if you don't require new users to provide a password when signing in to Connect on-Device. |
User ID | Select to require a combination of a password and a user ID to identify when signing in. |
Card | Select to require a combination of a password and a card to identify when signing in. |
Biometrics | Select to require a combination of a password and biometrics to identify when signing in. |
Door | Select to require a combination of a password and opening a door to identify when signing in. |
Include in user list | Select to include the user in the group displayed on the start screen when User list is configured. For more information, see Navigation pane — Miscellaneous. |
Save | Select to save the configuration. |
Undo | Select to ignore changes to the configuration. |
Navigation pane — Users — context menu
Use the Users context menu to edit or remove a user account, activate/deactivate the account, and to select whether or not to include the account in the user list on the start screen.

Note
You access the context menu by right-clicking a user role.
UI item | Description |
|---|---|
Edit | Select to open a wizard from which you can edit the selected user account. |
Remove | Select to remove the selected user account. |
Activated | Select to activate the user account |
Include in user list | Select to include the user account in the User list. |
Navigation pane — Roles
Use the Roles view to configure user roles and the permissions associated with the roles.
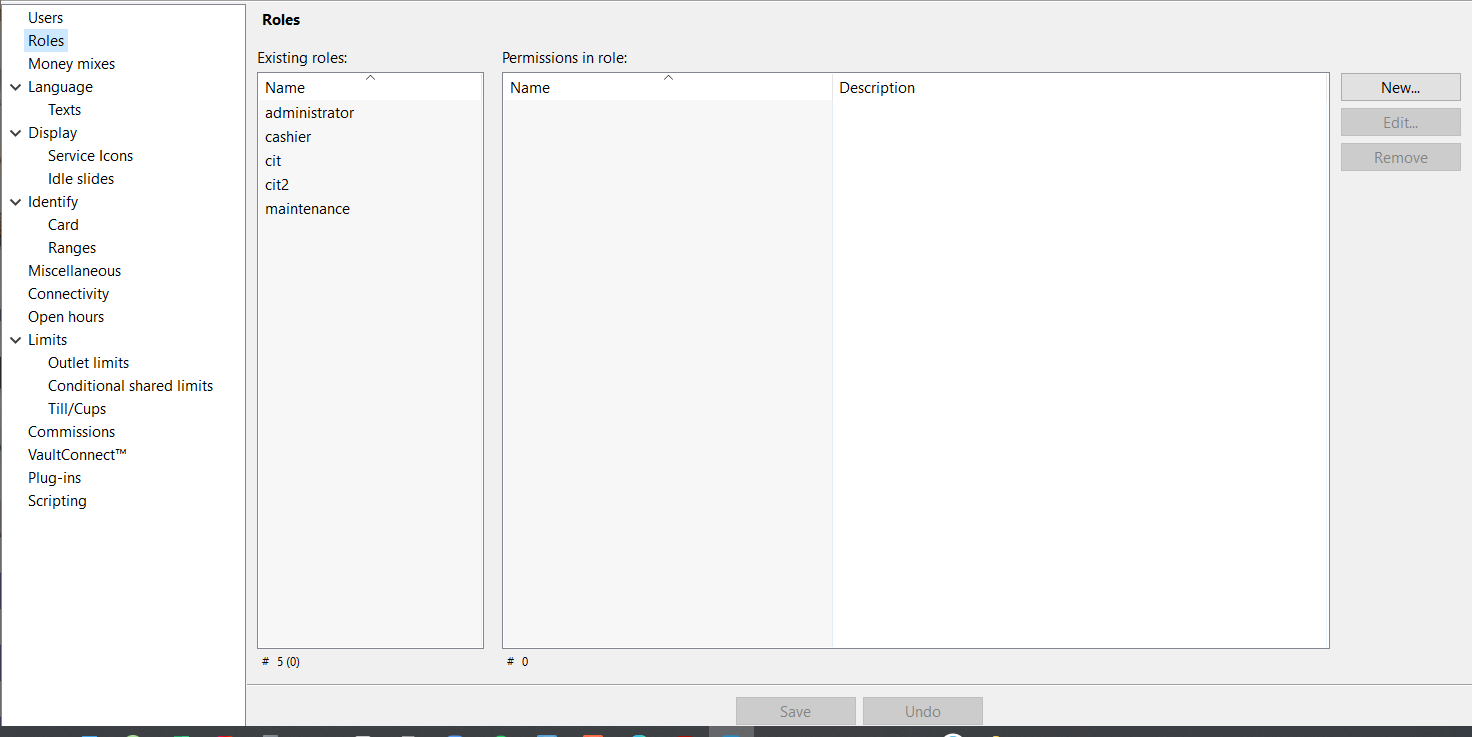
UI item | Description |
|---|---|
Existing roles | Shows the names of the existing roles |
Permissions in role | Shows the names and descriptions for the permissions associated with the selected role. |
New | Select to add a new role. |
Edit | Select to edit the selected role. |
Remove | Select to delete the selected role |
Save | Select to save the configuration. |
Undo | Select to ignore changes to the configuration. |
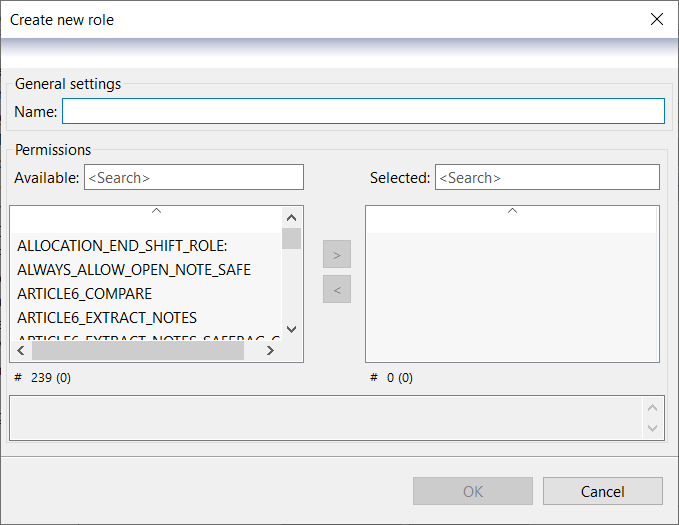
Create new role
Use the Create new role wizard to create a new user role.
UI item | Description |
|---|---|
Name | Type a name for the new role. |
Permissions | Shows a list of permissions you can assign to the role. If additional permissions are required, a dialog box automatically opens. Press Ctrl + space in the dialog box to show a list of available additions. |
Available | Shows the permissions you can select. |
Selected | Shows the selected permissions. |
| Use to assign the selected permissions. |
| Use to remove one or several selected permissions. |
OK | Select to save the changes. |
Cancel | Select to ignore the changes and close the dialog box. |


Selected permission must have an addition given
Use the Selected permission must have an addition given dialog box to configure additional permissions required for a previously added permission.
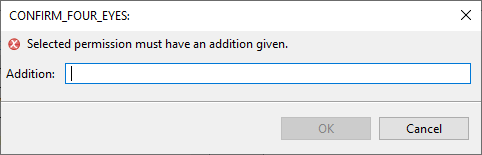
Tip
If additional permissions are required, a dialog box automatically opens. Press Ctrl + space in the dialog box to show a list of available additions.
UI item | Description |
|---|---|
Addition | Type a name for the new role. |
OK | Select to save the changes. |
Cancel | Select to ignore the changes and close the dialog box. |
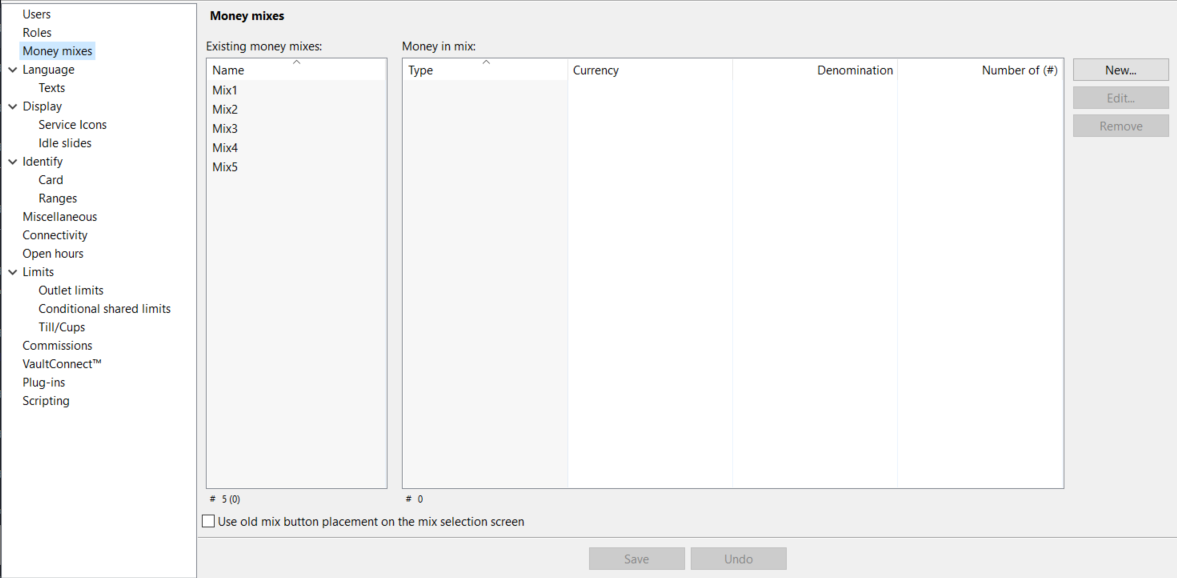
Navigation pane — Money mixes
Use the Money mixes view to configure
 |
UI item | Description |
|---|---|
Existing money | Select the name of the money mix you want to edit. |
Money in mix | Shows the coins and/or notes included in the mix. The options are:
|
New | Select to add a new money mix. |
Edit | Select to edit the selected money mix. |
Remove | Select to delete the selected money mix. |
Use old mix button placement on the mix selection screen | Select to place the first three mixes to the left side and the following two to the right on the screen. If this option is cleared, the first four mixes are placed to the left and the following four mixes are placed to the right on the screen. |
Save | Select to save the configuration. |
Undo | Select to ignore changes to the configuration. |
Create new money mix
Use the Create new money mix dialog to create a new mix of notes and coins of a certain currency and denomination, edit a money mix, or delete a money mix.
Money mixes are used to tell a device what the required mix of money is at the beginning or end of a shift.
Important
You must add a money mix before setting permissions for money mixes.
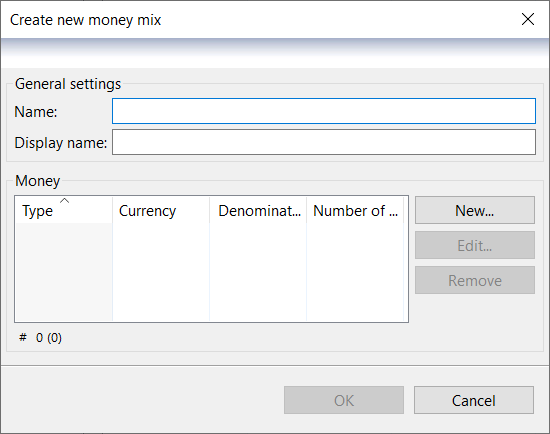
UI item | Description |
|---|---|
Name | Enter a name for the new money mix. This name is used, for example, when configuring permission for a user to dispense a certain money mix. |
Display name | Enter the name that is shown on screen and on receipts. |
Money | Displays the following:
|
New | Select to open the Create new money dialog where you add a note or coin of a certain currency and denomination to your money mix. |
Edit | Select to open the Edit money dialog where you edit a note or coin of a certain currency and denomination used in the money mix. |
Remove | Select to delete money of a certain type, currency, and denomination used in the money mix. |
OK | Select to save the changes. |
Cancel | Select to ignore the changes and close the dialog box. |
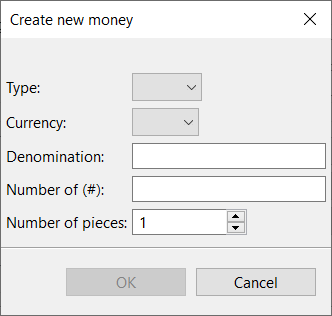
Create new money
Use the Create new money dialog to create a note or coin of a certain currency and denomination to use in a money mix.
UI item | Description |
|---|---|
Type | Select COIN or NOTE. |
Currency | Select the currency of the coin or note. |
Denomination | Enter the denomination of the coin or note. |
Number of (#) | Enter the number of coin rolls. |
Number of pieces | Select the number of coins in a coin roll. |
OK | Select to save the changes. |
Cancel | Select to ignore the changes and close the dialog box. |
Note
A coin roll is also called bank roll or coin wrapper.
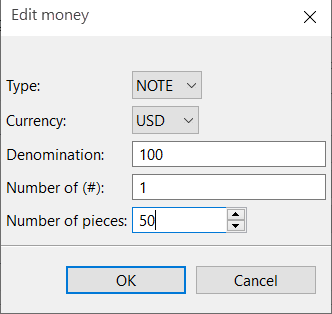
Edit money
Use Edit money to edit a note or coin, of a certain currency and denomination, used in a money mix.
UI item | Description |
|---|---|
Type | Select COIN or NOTE. |
Currency | Edit the currency of the coin or note. |
Denomination | Edit the denomination of the coin or note. |
Number of (#) | Edit the number of coin rolls. |
Number of pieces | Edit the number of coins in a coin roll. |
OK | Select to save the changes. |
Cancel | Select to ignore the changes and close the dialog box. |
Note
A coin roll is also called bank roll or coin wrapper.
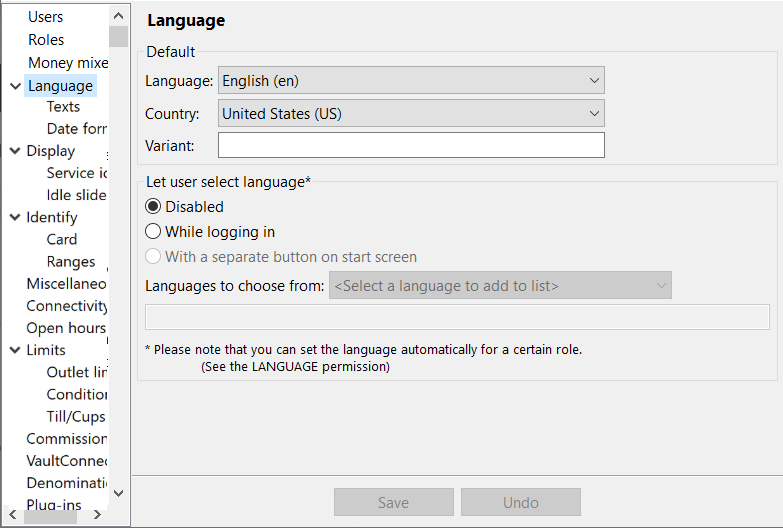
Navigation pane — Language
Use the Language view to configure the display language in Connect on-Device. You can configure a different display language for the Operator view.
Note
The option to configure a different language for the Operator view is available from version 3.15.
UI item | Description |
|---|---|
Language | Select the display language for Connect on-Device. |
Country | Select the country where the machine is located. The selected country determines the date and time formats and the thousand separator. |
Variant | Enter a variant for a customized translation for a specific customer or for a specific market, such as 'en_US' for the American market. |
Operator | Select the box to specify a different language, country, and variant for the Operator view. |
Disabled | Select if you don't want the user to be able to select language. |
While logging in | Select if the user is to select language when logging in to Connect on-Device. |
With a separate button on start screen | Select if you want to add a button for language selection to the start screen. |
Languages to choose from | Lists the available languages. |
Save | Select to save the configuration. |
Undo | Select to ignore changes to the configuration. |
See also
Connect on-Device Studio User Guide
Connect on-Device Studio navigation pane
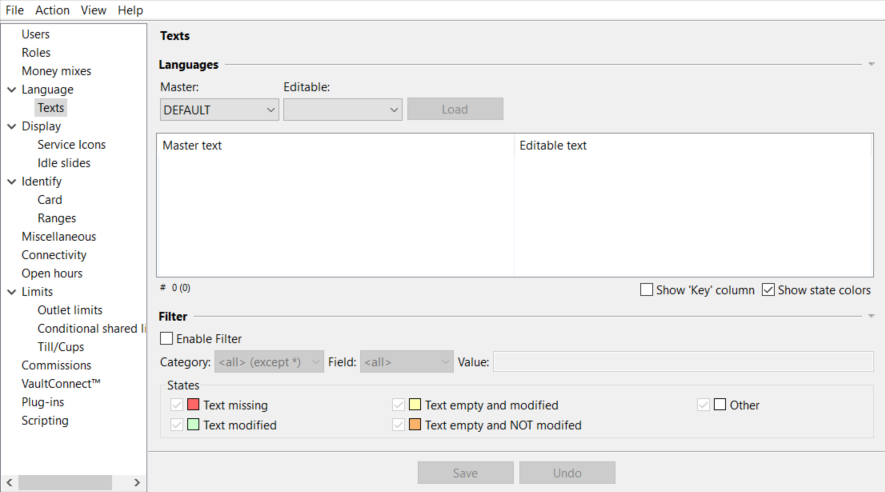
Navigation pane — Language — Texts
Use the Texts view to add or edit translations of texts in the Connect on-Device user interface for a specific language, country, or variant.
 |
UI item | Description |
|---|---|
Master | Select the translation you want to base your edits on. DEFAULT is the English version that you get in the installation. |
Editable | Select the language, country, or variant you want to edit. |
Load | Select to load the translations for the Master and the selected editable language, country, or variant. |
Show 'Key' column | Select to show which <key> the translation relates to. Translations are text files in the format:
For example:
|
Show state colors | Select to show the rows in the translation table in colors representing their status. New translations are shown in red if this option is selected. |
Enable filter | Select to make it possible to show translations only for a specified category. |
Category | Enter the category you want to filter the translations on. For example, User view or Receipts. |
Field | Enter the field to filter on. The options are: "Master text", "Editable text", or a key that matches the value in the Value box. |
Value | Enter the value to filter on. |
States | Select to only filter on missing values, modified values, or values of some other state. |
Save | Select to save the configuration. |
Undo | Select to ignore changes to the configuration. |
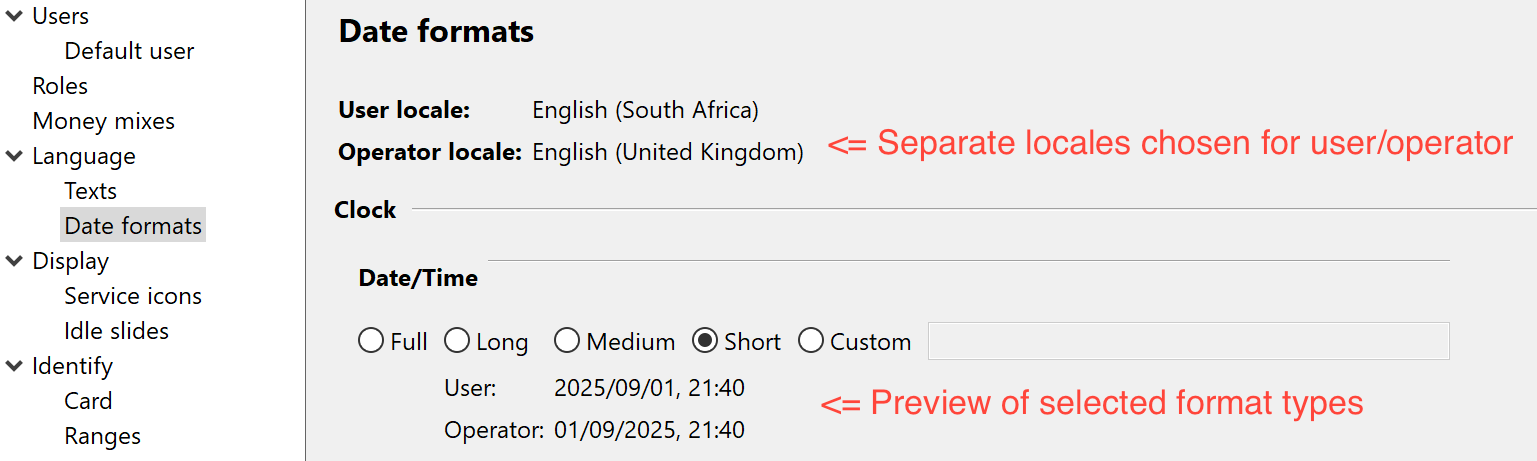
Navigation pane — Language — Date formats
Use the Date formats view to configure how the date and time are shown in the Connect on-Device user interface and on receipts.
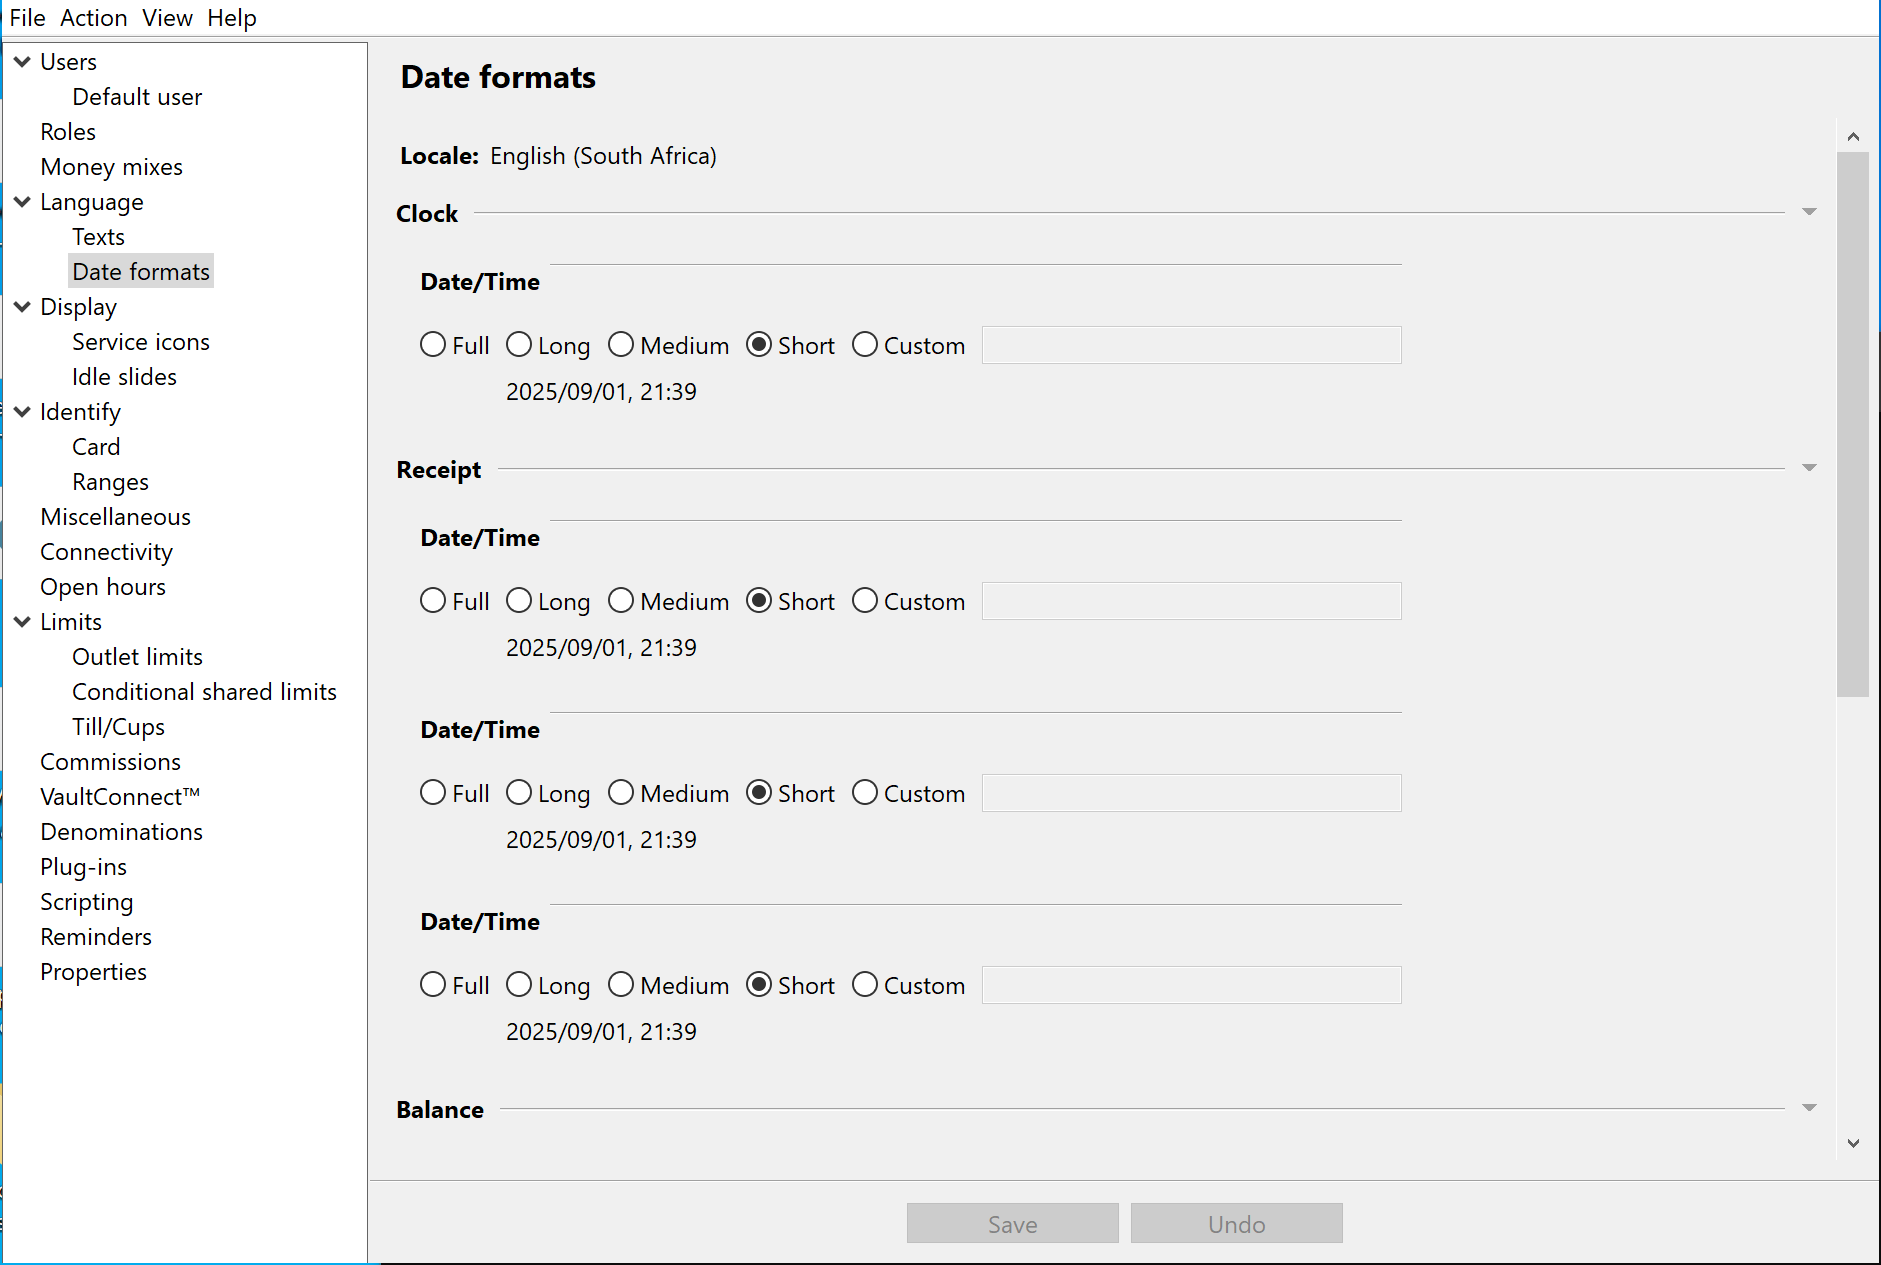
When you have selected an option, a preview shows how the date and time will be shown. Depending on your locale, the date and time are shown in a different format.
UI item | Description |
|---|---|
Date formats | Shows the date and time formats configured for the Connect on-Device user interface and receipts. |
Locale | Shows the language, region, and cultural preferences. |
Clock - Date/Time | Select how date and time are shown at the top of the Connect on-Device user interface. |
Receipt - Date/Time | Select how date and time are formatted on all receipts. |
Balance - Date/Time | Select how reported transaction timestamps are shown on screen. Requires the SHOW_USER_BALANCE permission and that the server supports it. |
Transaction list - Date/Time | Select how transaction timestamps are shown on, for example, 'Daily total' receipts. |
Save | Select to save the configuration. |
Undo | Select to ignore changes to the configuration. |
See also
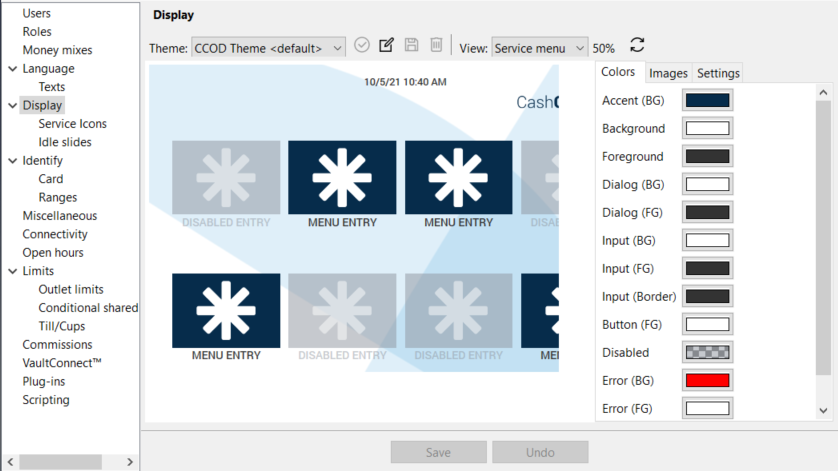
Display view
Use the Display view to change display settings, such as themes, colors, images, and miscellaneous settings.
 |
UI item | Description |
|---|---|
Theme | Select one of the predefined themes for the Connect on-Device screen. |
 | Select to set the selected theme as the default theme. |
| Select to add a new theme. |
| Select to save the selected theme. |
| Select to delete the selected theme. |
View | Expand the list to see a preview of the selected theme on different screens in the user interface. |
| Select to reload the view. |
Colors | Select the tab to configure the colors used for the specified areas of the screen. |
Images | Select the tab to select the images that are shown on different parts of the screen. The options are:
|
Settings | Select the tab to configure what to show on the screen, such as:
|
Save | Select to save the configuration. |
Undo | Select to ignore changes to the configuration. |


See also
Display view — Colors tab
Use the Colors tab to change the colors for the selected display.
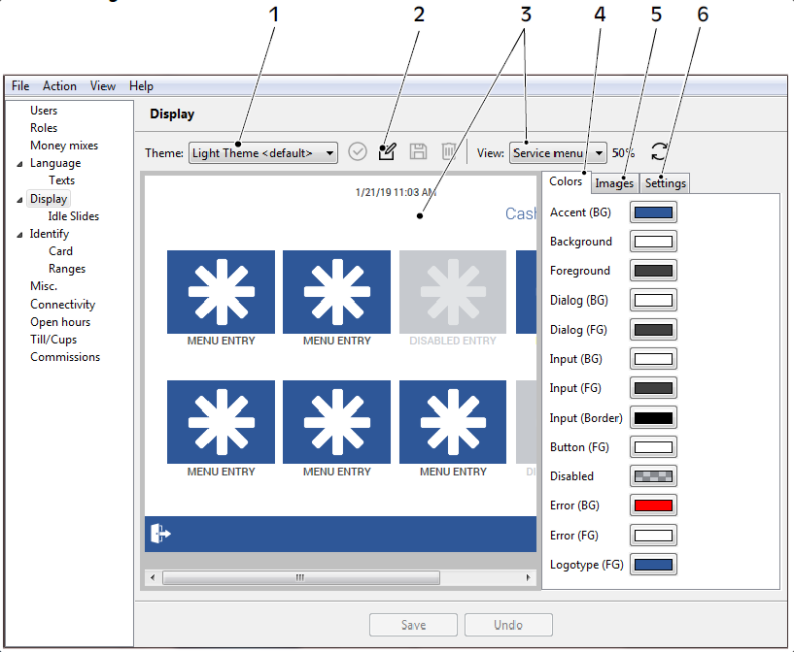 |
1. Theme 2. Create new theme 3. Displays changes made to the selected view 4. Colors tab 5. Images tab 6. Settings tab
Display view — Images tab
Use the Images tab to change the images for the selected display.
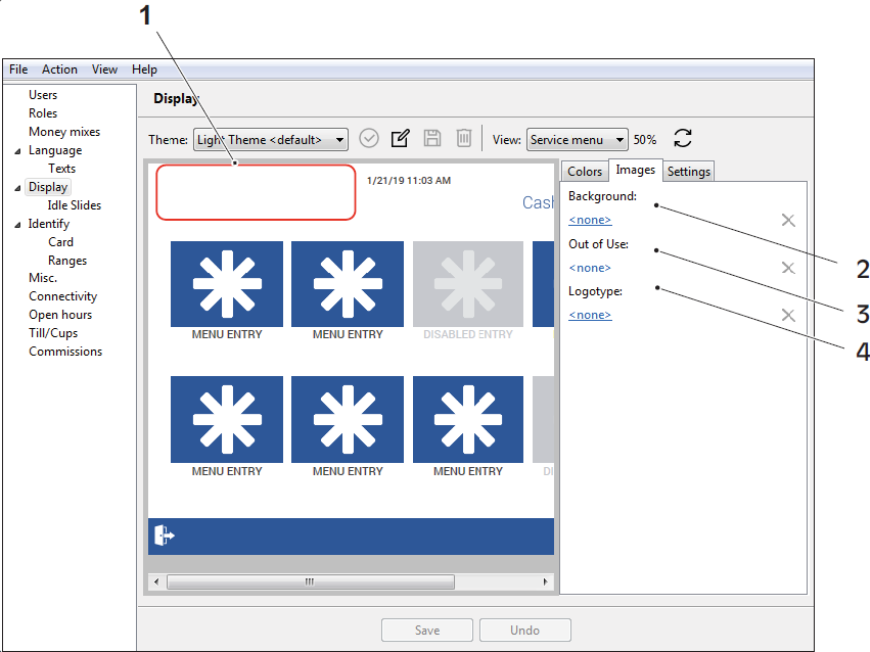 |
1. Logotype area 2. Background image 3. Out of use image 4. Logotype image
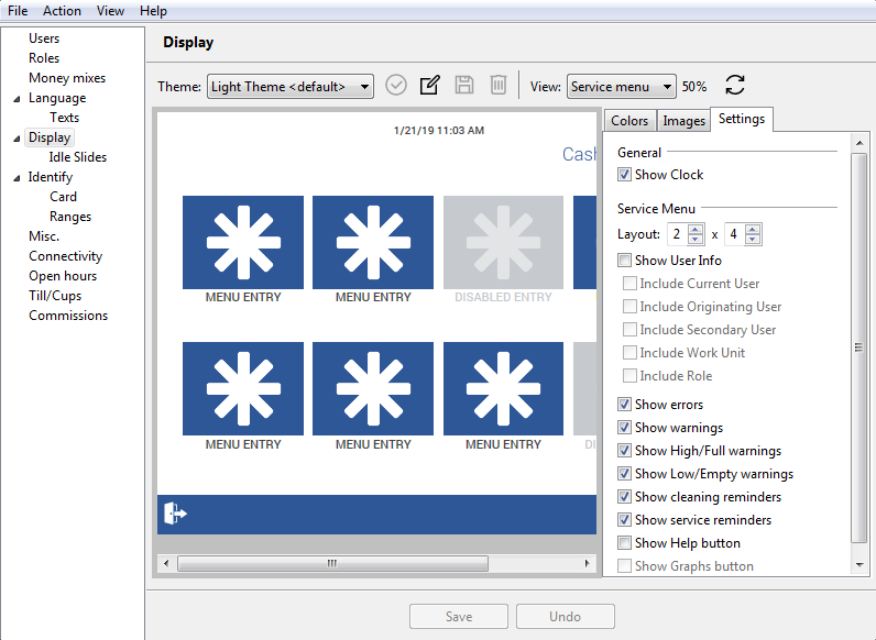
Display view — Settings tab
Use the Settings tab to change miscellaneous settings, such as layout, errors, and warnings, for the selected display.
 |
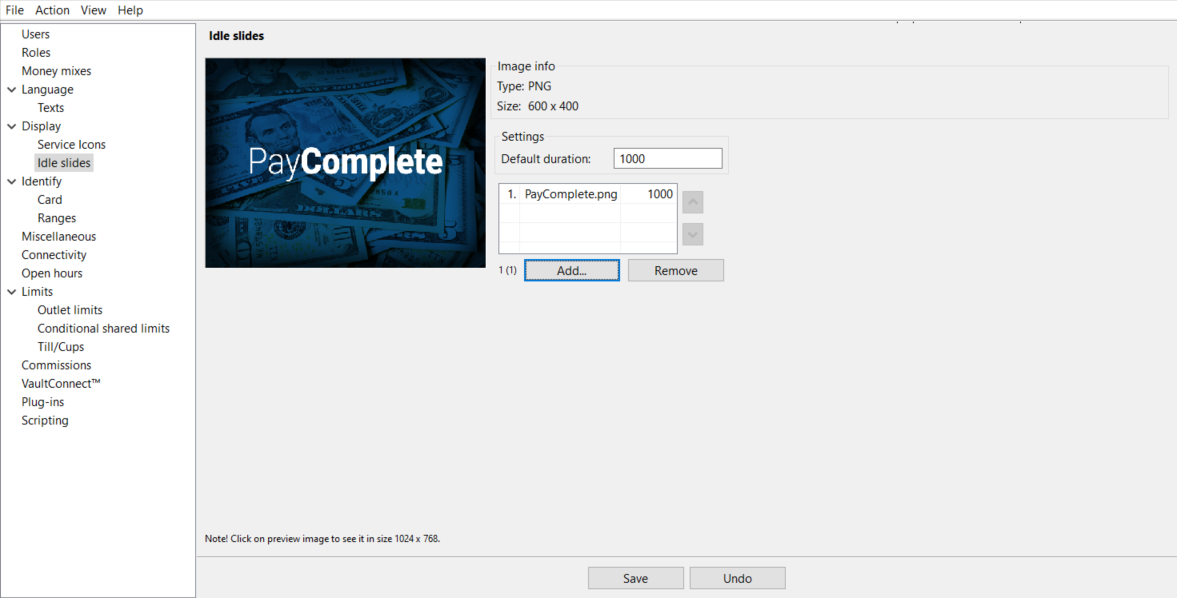
Navigation pane — Display — Idle slides
Use the Idle Slides view to select the slides that are shown on the screen when Connect on-Device is idle.
 |
UI item | Description |
|---|---|
Type | Shows the file type of the image file. |
Size | Shows the size of the image file. |
Default duration | Type the time in milliseconds each slide is shown before the screen shows the next slide. |
Add | Select to add another image. Each image is shown for the configured duration before changing to the next image in the list. |
Remove | Select to remove the selected image. |
Save | Select to save the configuration. |
Undo | Select to ignore changes to the configuration. |
See also
Navigation pane — Display — Service icons
Use the Service icons view to view the available service icons and to add/remove custom icons.

Note
Default icons are icons included by default in a fresh installation.
Custom icons are manually added icons. Custom icons are stored in the configurable area and are included when the application is upgraded.
Provided icons are icons generated by a plug-in when the plug-in is loaded during application startup.
UI item | Description |
|---|---|
Preview | Shows a preview of the service icon and the service icon name. |
< | Select to browse to the previous icon. |
> | Select to browse to the next icon. |
Filter | Type letters or a word in the icon name to filter the icons in the list. You can also select and clear the boxes to show icons of a specific type in the list. The options are:
|
Default icons | Select to show default icons in the list. |
Custom icons | Select to show custom icons in the list. |
Provided icons | Select to show provided icons in the list. |
Add | Select to add a new custom icon. |
Edit | Select to edit the selected custom icon. |
Remove | Select to delete the selected custom icon. |
Save | Select to save the configuration. |
Undo | Select to ignore changes to the configuration. |
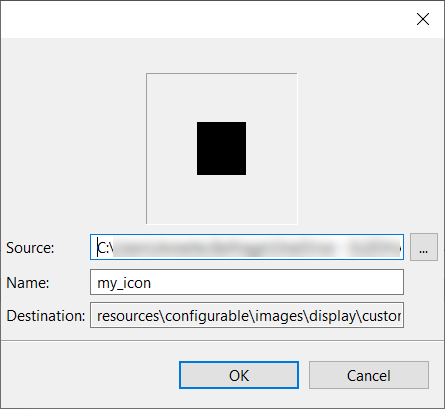
Service icons — Add
Use the Add dialog box to add a new custom icon.
UI item | Description |
|---|---|
Source | Select the folder where the icon file is saved. |
Name | Type a name that helps you identify the icon. Renaming the icon is optional. |
Destination | Shows the path to the folder where the icon is downloaded. |
OK | Select to save the changes. |
Cancel | Select to ignore the changes and close the dialog box. |
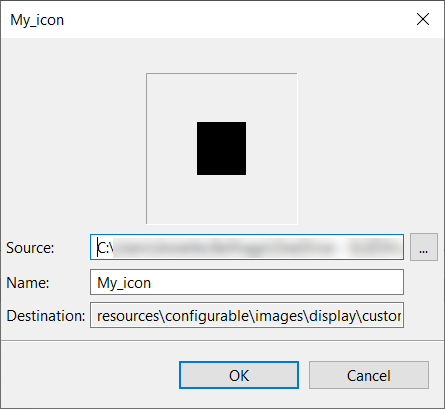
Service icons — Edit
Use the Edit dialog box to edit a custom icon. You can upload a new icon file and rename the image.
UI item | Description |
|---|---|
Source | Select the folder where the icon file is saved. |
Name | Type a name that helps you identify the icon. Renaming the icon is optional. |
Destination | Shows the path to the folder where the icon is downloaded. |
OK | Select to save the changes. |
Cancel | Select to ignore the changes and close the dialog box. |
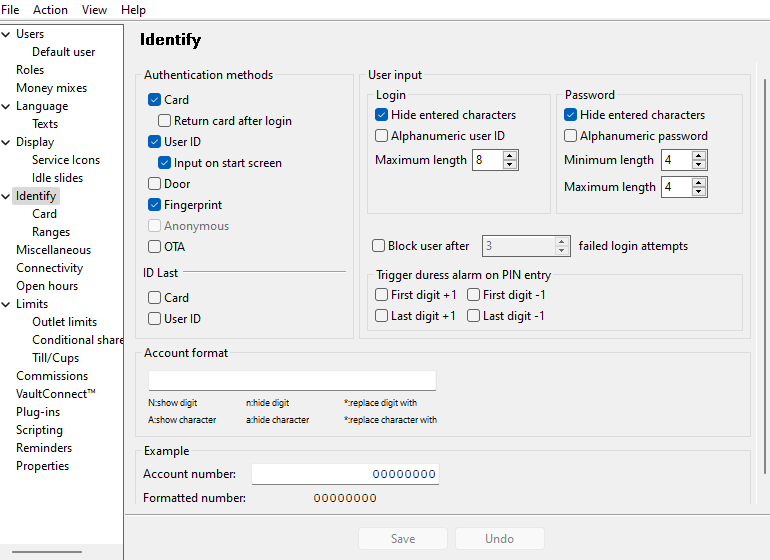
Navigation pane — Identify
Use the Identify view to configure how the user authenticates when accessing the system.
UI item | Description |
|---|---|
Authentication methods — Card | Select if the user should authenticate using a card. |
Authentication methods — Return card after login | Select if the user should authenticate using a card. Select to enable ejecting a card after login instead of keeping the card until the user logs out, which is the default behavior. |
Authentication methods — User ID | Select if the user should authenticate using a User ID. Select Input on start screen to place a pin pad on the start screen. ImportantIt isn't possible to combine User ID with Anonymous. |
Authentication methods — Door | Select if the user should start authenticating by opening a door. Select Anonymous to make it possible to log on with an unknown user. Important
|
Authentication methods — Fingerprint | Select if the user needs to authenticate with a fingerprint when signing in. |
Authentication methods — OTA | Select if the user needs a one-time access code to sign in to the machine. |
User Input— Login | Select the login conditions. The options are:
|
User Input— Password | Select the password conditions. The options are:
|
ID Last — Card | Select if a role with the DEPOSIT_ID_LAST permission should use a card to identify. |
ID Last — User ID | Select if a role with the DEPOSIT_ID_LAST permission should use a User ID to identify. |
Block user after [number] failed login attempts | Specify the number of failed login attempts before the user account is locked |
Trigger duress alarm on PIN entry | Configure how to trigger a duress alarm. The options are:
|
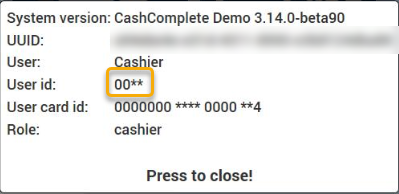
Account Format | Configure how to present the User ID on screen and on receipts.
See examples below of the result when the last two digits of the User ID are replaced with an asterisk (*). |
Save | Select to save the configuration. |
Undo | Select to ignore changes to the configuration. |
 |
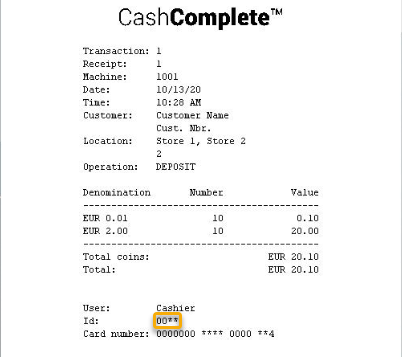 |
Account format configured to replace the last two digits of the User ID with an asterisk (*), on screen and on a receipt.
See also
Connect on-Device Studio User Guide
Connect on-Device Studio navigation pane
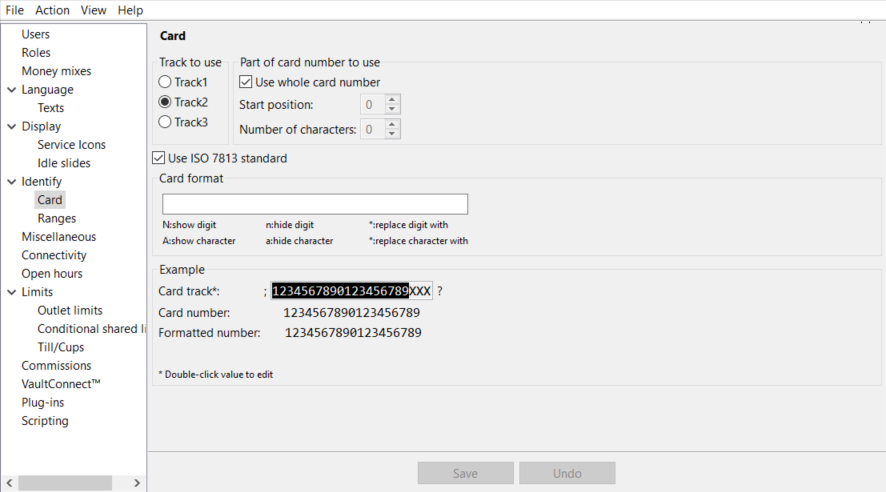
Navigation pane — Identify — Card
Use the Card view to configure how the user authenticates using a card.
 |
UI item | Description |
|---|---|
Track to use | Select the track on the card that is read. |
Part of card number to use | Select the parts of the card track number Connect on-Device uses. The options are:
|
Use ISO 7813 standard | Select to use the international standard codified by the International Organization for Standardization and International Electrotechnical Commission that defines properties of financial transaction cards, such as ATM or credit cards. The standard defines the following:
|
Card format | Select to enter your own card format example |
Example |
|
Save | Select to save the configuration. |
Undo | Select to ignore changes to the configuration. |
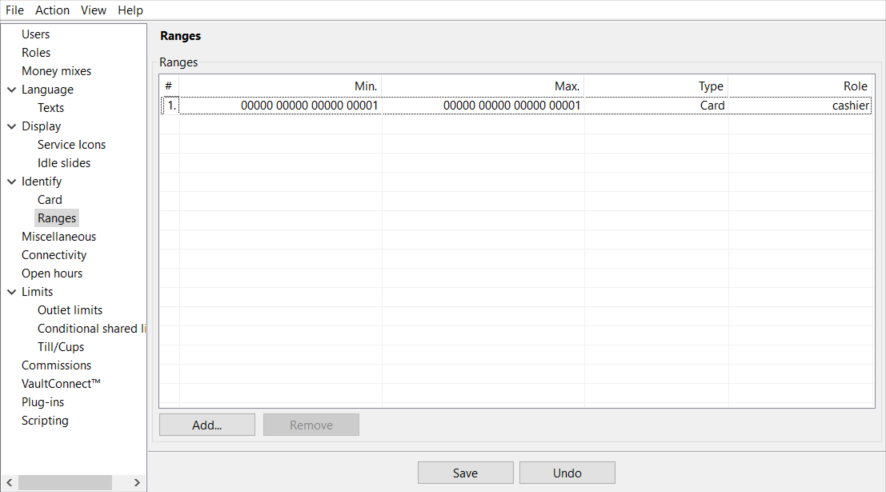
Navigation pane — Identify — Ranges
Use the Ranges view to configure the role a user is assigned when signing in using a card number or User ID within the specified range.
 |
UI item | Description |
|---|---|
Ranges | Shows the configured ranges. |
# | Shows the range number. |
Min | Shows the range minimum value. |
Max | Shows the range maximum value. |
Type | Select the sign-in type the the range is valid for. The options are:
|
Role | Select the role the user is assigned when signing in with a card or User ID within the specified range. in y. The options are:
|
Add | Select to add a new range. |
Remove | Select to delete the selected range. |
Save | Select to save the configuration. |
Undo | Select to ignore changes to the configuration. |
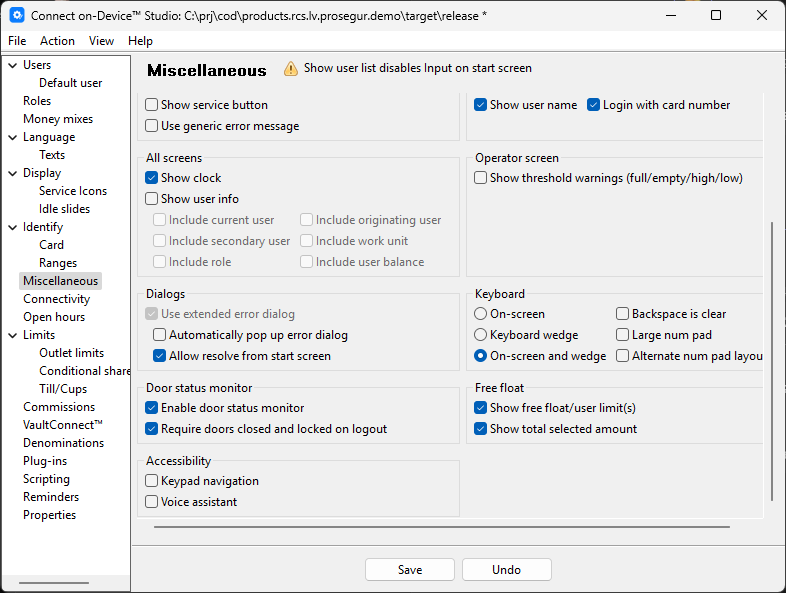
Navigation pane — Miscellaneous
Use the Miscellaneous view to configure what to show on different screens.
 |
UI item | Description |
|---|---|
Start screen: | |
Start screen | Contains configuration options for the Connect on-Device |
Show icons | Select to show icons on the start screen. |
Show high/full warnings | Select to include cassettes/boxes where contents are above high or full warning levels in error or warning dialog boxes. |
Show low/empty warnings | Select to include cassettes/boxes where contents are below low or empty levels in error or warning dialog boxes. |
Show graph button | Select to show a graph with the current cassette/box content on the start screen. |
Activate demo mode | Select to run the preconfigured slide show on the start screen. |
Touch to start | Select to start the sign-in process when the user touches the screen. Use this together with demo mode or with a slide show in cases where no start button is shown on the screen. |
Hide all text | Select to hide headings and other information texts on the idle screen. Hide all text is implicitly used when you activate demo mode or run a slide show. |
Hide errors | Select to hide device errors on the idle screen. You can show a list of device errors on the idle screen. This option hides the list of errors. An error message could look something like this: Problems with the following devices: * Note acceptor all services might not be available |
Show user list | Select to add buttons representing the users included in the 'Include in user list'. |
Activate slide show | Activate the slide show configured in the Display - Idle Slides view. |
Select Service screen: | |
Show errors | Adds an error icon to the screen. The icon is shown when an error occurs on a device. |
Show graph button | Select to show a graph with the current cassette/box content on the start screen. |
Sort alphabetically | Sorts the options in the service menu alphabetically by name. By default, the options are shown in the order they were added. |
Show warnings | Select to show warnings on the screen. |
Show high/full warnings | Select to include cassettes/boxes where contents are above high or full warning levels in error or warning dialog boxes. |
Show low/empty warnings | Select to include cassettes/boxes where contents are below low or empty levels in error or warning dialog boxes. |
Show cleaning reminders | Select to show cleaning reminders in the error dialog box. You configure cleaning reminders on the device. The reminder is shown when a condition is met, for example, after every 1000 coins. |
Show service reminders | Select to show service reminders in the error dialog box. You configure service reminders on the device. The reminder is shown when a condition is met, for example, after every 1000 coins. |
Out of Use screen: | |
Show service button | Select to show a service button on the screen. The service button opens a sign-in dialog box that leads to the Operator view. |
Login Screen: | |
Show User Name | Select to show the name of the user related to the ID entered in the PIN. |
Login with card number | Select to make the user authenticate by signing in with a card number instead of a User ID. |
All screens: | |
Show clock | Select to show a clock with the system time at the upper end of the screen. |
Show user info | Select to show user information on the screen. |
Include current user | Select to show the current user's name, ID, and card number on the screen. |
Include secondary user | Select to show the secondary user's name, ID, and card number on the screen. |
Include Role | Select to show the role name of the current user's role. |
Include Originating User | Select to show information on the screen about the user who first signed in. It is possible to log in as one user and then change to another user with more permissions. The originating user is the user who signed in first. |
Include work unit | Select to show the selected work unit on the screen. |
Operator screen: | |
Show threshold warnings (full/empty/high/low) | Select to show a warning dialog box on screen when a threshold value has been passed for box/cassette contents. |
Dialogs: | |
Use extended error dialog. | This option is available for backward compatibility reasons. This dialog box is used in older versions and shows errors and warnings on the screen. |
Automatically pop up error dialog | Select to automatically show an error dialog box when an error occurs. If you don't select this option, the error icon starts blinking when an error occurs. |
Allow resolve from start screen | Select if you want to make it possible to start an error resolver wizard from the extended error dialog box. |
Keyboard: | |
On-screen | Select to make it possible to enter text from an on-screen keyboard. |
Keyboard wedge | Select to make it possible to enter text from a connected external keyboard. |
On-screen and wedge | Select to make it possible to enter text from either an on-screen keyboard or a connected external keyboard. |
Backspace is clear | Select to make the backspace remove all entered characters, not just the last entered character. |
Large num pad | Select to give the numeric keyboard on screen large buttons instead of the default centered numeric keyboard with smaller buttons. This is particularly useful for devices with small screens, such as SDS-35/CDS-820j, where it can be difficult to hit the intended button. |
Alternate num pad layout | Select to use an alternative numeric keypad layout where Cancel is placed below 7 and backspace is placed below 9. |
Free Float: | |
Show free float/user limit(s) | Select to show the amount in the manually composed mix of notes and coins available for dispensing for the current user. |
Show total selected amount | Select to show the total selected amount, in addition to the number per denomination. |
Save | Select to save the configuration. |
Undo | Select to ignore changes to the configuration. |
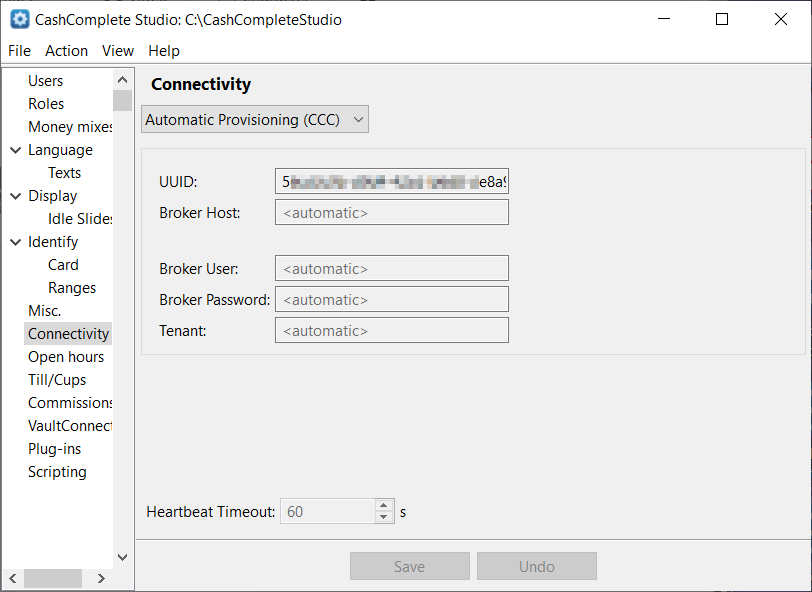
Navigation pane — Connectivity
Use the Connectivity view to configure how Connect on-Device connects to Connect and configure the heartbeat timeout.
 |
UI item | Description |
|---|---|
Drop-down list. | Select the connectivity type you want to configure. The options are:
|
UUID | Enter the universally unique identifier of the machine. This identifier is essential when registering a machine in Connect. When you have saved the UUID, it isn't possible to change it for the current machine. If you need to replace the machine, the UUID should be copied to the new machine. |
Broker host | Enter the login host node name to Connect. |
Broker user | Enter the login user name to Connect. |
Broker password | Enter the login password to Connect. |
Tenant | Enter the location of the site and machine in Connect. |
Heartbeat timeout | Select the interval at which Connect on-Device sends SystemStatus messages for the machine. By default, the interval is set to 60 seconds. Important! The Connect on-Device heartbeat setting must match the online status timeout in Connect. |
Save | Select to save the configuration. |
Undo | Select to ignore changes to the configuration. |
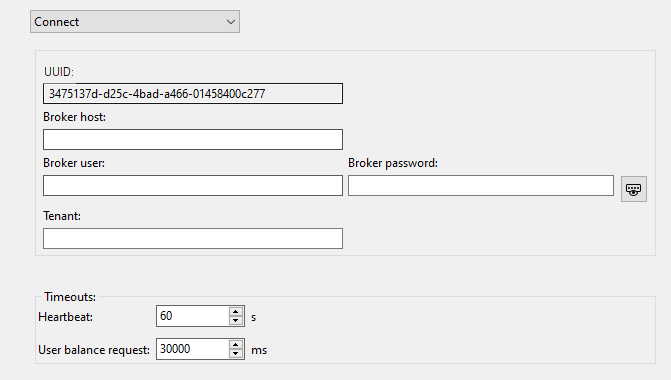
Navigation pane — Connectivity — Connect
Use the Connectivity view Connect to connect machines to Connect.
Important
The values you need to enter are sent to you via email when the tenant has been created. 'Broker' refers to the MQTT communication framework used for communication between Connect on-Device and Connect.
 |
UI item | Description |
|---|---|
UUID | Enter the universally unique identifier of the machine. This identifier is essential when registering a machine in Connect. When you have saved the UUID, it isn't possible to change it for the current machine. If you need to replace the machine, the UUID should be copied to the new machine. |
Broker host | Enter the node (URL) the machine needs to connect to. |
Broker user | Enter the (MQTT) login user name to Connect. |
Broker password | Enter the (MQTT) login password to Connect. |
Tenant | Enter the ID of the site and machine location. |
Heartbeat timeout | Select the interval at which Connect on-Device sends SystemStatus messages for the machine. By default, the interval is set to 60 seconds. Important! The Connect on-Device heartbeat setting must match the online status timeout in Connect. |
Save | Select to save the configuration. |
Undo | Select to ignore changes to the configuration. |
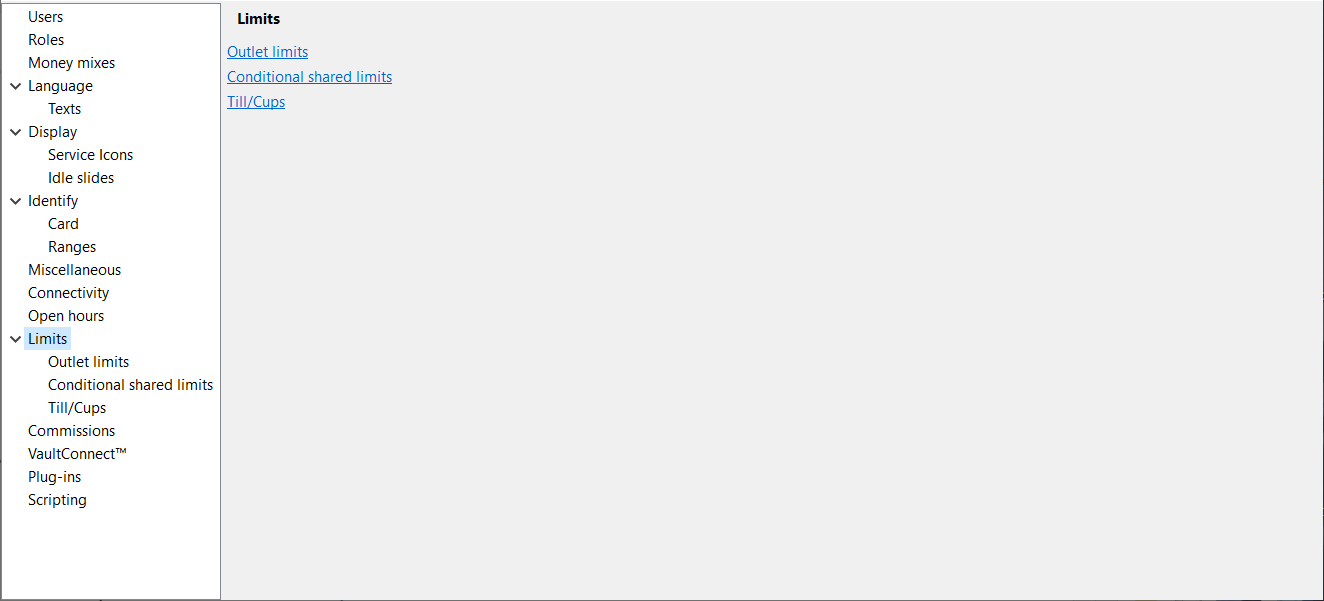
Navigation pane — Limits
Use the Limits view to configure dispense limits and conditional limits.
UI item | Description |
|---|---|
Outlet limits | Select to show a list of dispense limits per device and outlet. |
Conditional shared limits | Select to show a list of dispense limits that are only effective when a condition is met, for example, a shared dispense limit for multiple dispensers to a single tray till. |
Till/Cups | Select to show a list of denominations, maximum number of coins for the till/cup, and free float numbers. |
Tip
Open the specific views to add, edit, or delete a limit.
See also
Connect on-Device Studio User Guide
Connect on-Device Studio navigation pane
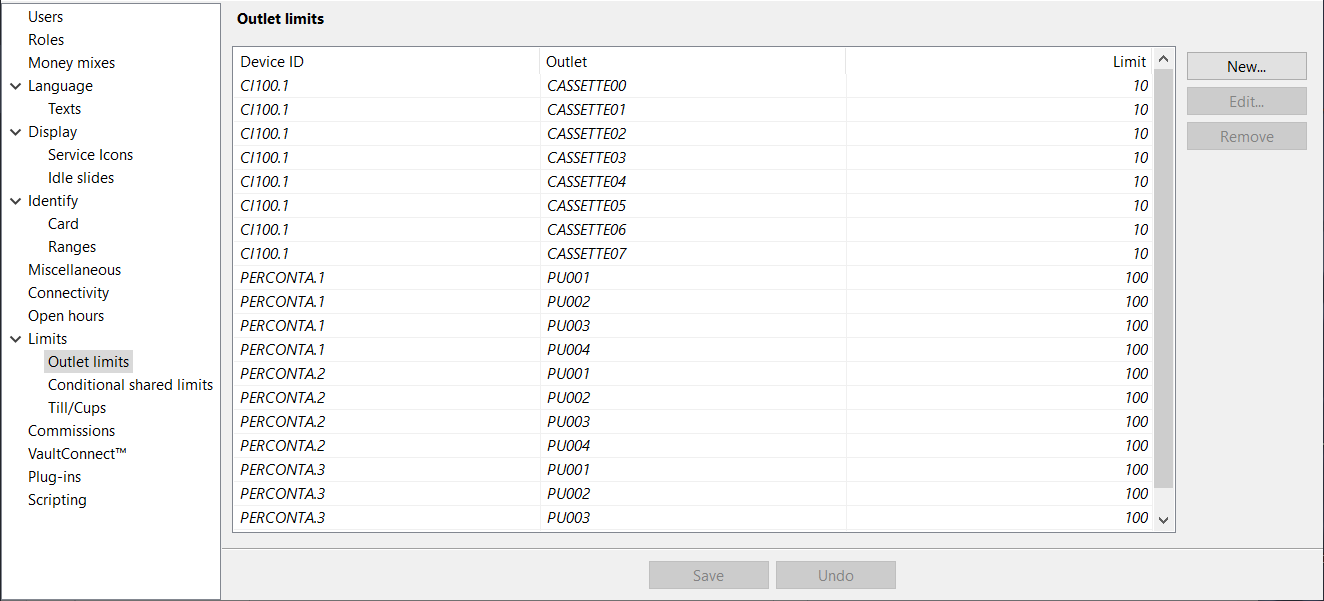
Navigation pane — Limits — Outlet limits
Navigation pane — Limits — Outlet limits
Use the Outlet limits to show a list of dispense limits per device and outlet. You can add, edit, or delete dispense limits.
UI item | Description |
|---|---|
Device ID | Shows the ID of the device the limit applies for |
Outlet | Shows the outlet ID of outlet the limit applies for. |
Limit | Shows the maximum number of items for a dispense. |
Add | Select to open a dialog box where you add a new dispense limit for the outlet. |
Edit | Select to open a dialog box where you edit a dispense limit for the selected outlet. |
Delete | Select to delete the dispense limit for the selected outlet. |
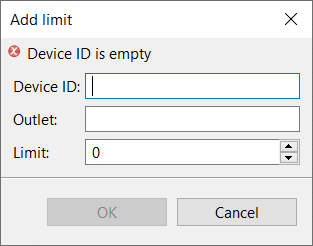
Limits — Outlet limits — Add limit
Use the Add limit dialog box to add a new limit for a device and outlet.
UI item | Description |
|---|---|
Device ID | Enter the ID of the device the limit applies for |
Outlet | Enter the outlet ID of outlet the limit applies for. |
Limit | Select the maximum number of items for a dispense. |
OK | Select to save the settings and close the dialog box. |
Cancel | Select to ignore the settings and close the dialog box. |
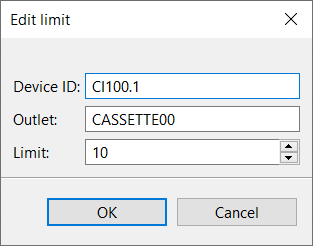
Limits — Outlet limits — Edit limit
Use the Edit limit dialog box edit a limit for a device and outlet.
UI item | Description |
|---|---|
Device ID | Enter the ID of the device the limit applies for |
Outlet | Enter the outlet ID of outlet the limit applies for. |
Limit | Select the maximum number of items for a dispense. |
OK | Select to save the settings and close the dialog box. |
Cancel | Select to ignore the settings and close the dialog box. |
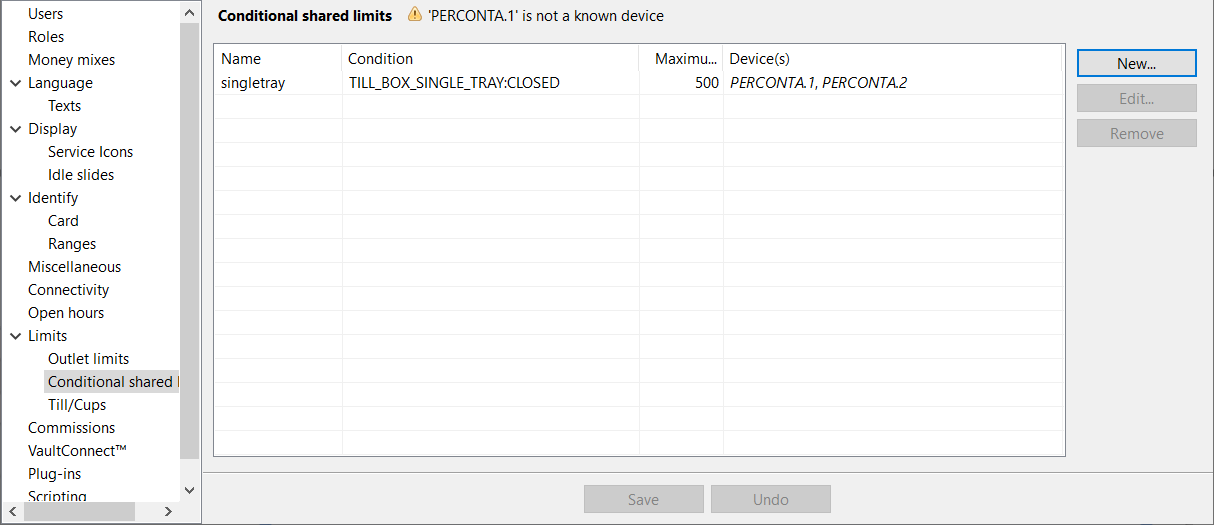
Navigation pane — Limits — Conditional shared limits
Use the Conditional shared limits to show a list of dispense limits that are only effective when a condition has been met, for example, a shared dispense limit for multiple dispensers to a single tray till. You can add, edit, or delete conditional shared limits.
Note
Conditions are made up of a sensor type and its status.
A sensor of the type TILLBOX_SINGLE_TRAY with the status CLOSED becomes the condition TILLBOX_SINGLE_TRAY:CLOSED.
UI item | Description |
|---|---|
Name | Shows the name of the conditional shared limit. |
Condition | Shows the condition that must be met for the limit to take effect. |
Maximum count | Shows the maximum number of items that can be dispensed. |
Device(s) | Shows the ID of the device(s) the limit is configured for. |
Add | Select to open a dialog box where you add a new conditional shared limit. |
Edit | Select to open a dialog box where you edit a conditional shared limit. |
Delete | Select to delete the selected conditional shared limit. |
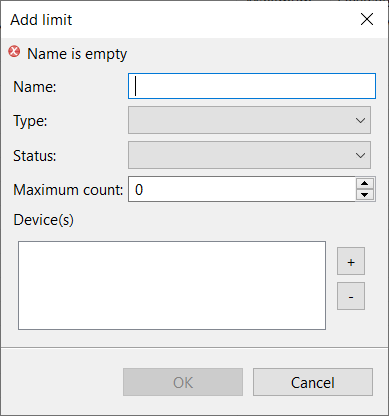
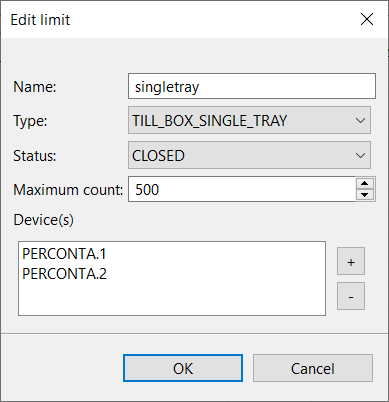
Limits — Conditional shared limits — Add limit
Use the Add limit dialog box add a new limit that is only effective when a condition has been met.
UI item | Description |
|---|---|
Name | Enter a name that helps you identify the conditional shared limit. |
Type | Select the outlet type. |
Status | Select the condition that must be met before the dispense limit applies. |
Maximum count | Shows the maximum number of items that can be dispensed. |
+ | Select to add a device ID. |
- | Select to remove a device ID. |
OK | Select to save the settings and close the dialog box. |
Cancel | Select to ignore the settings and close the dialog box. |
Limits — Conditional shared limits — Edit limit
Use the Edit limit dialog box edit a limit that is only effective when a condition has been met.
UI item | Description |
|---|---|
Name | Enter a name that helps you identify the conditional shared limit. |
Type | Select the outlet type. |
Status | Select the condition that must be met before the dispense limit applies. |
Maximum count | Shows the maximum number of items that can be dispensed. |
+ | Select to add a device ID. |
- | Select to remove a device ID. |
OK | Select to save the settings and close the dialog box. |
Cancel | Select to ignore the settings and close the dialog box. |
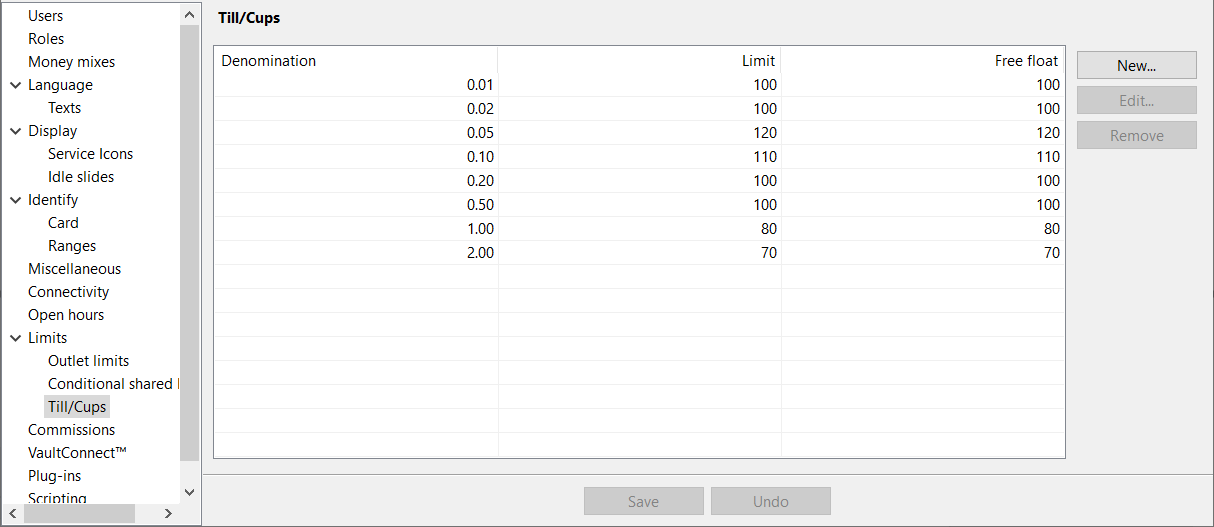
Navigation pane — Limits — Till/Cups
Use the Till/Cups view to configure denominations, maximum number of coins for the till/cup, and free float numbers.
Note
This option is only available for RCS 400 and the settings are optional.
UI item | Description |
|---|---|
Denomination | Shows the available denominations. |
Limit | Shows the maximum number of coins of the specified denomination for the till/cup. |
Free float | Shows the maximum dispensable number of notes and coins of a certain denomination for a dispense operation. Note! If both 'Limit' and 'Free float' have been specified, the smallest number applies. |
Add | Select to open a wizard where you add a denomination and configure maximum number of coins and a free float number for the till/cup. |
Edit | Select to open a wizard where you edit a denomination, the maximum number of coins and the free float number for the till/cup. |
Remove | Select to delete the selected limit for the till/cup, |
Save | Select to save the configuration. |
Undo | Select to ignore changes to the configuration. |
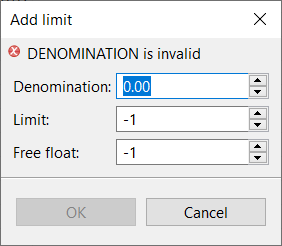
Limits — Till/Cups — Add limit
Use the Add limit dialog box to add denominations, maximum number of coins for the till/cup, and free float numbers.
UI item | Description |
|---|---|
Denomination | Select a denomination. |
Limit | Select the maximum number of coins of the specified denomination for the till/cup. |
Free float | Select the maximum dispensable number of notes and coins of a certain denomination for a dispense operation. Note! If both 'Limit' and 'Free float' are specified, the smallest number applies. |
OK | Select to save the settings and close the dialog box. |
Cancel | Select to ignore the settings and close the dialog box. |
Limits — Till/Cups — Edit limit
Use the Edit limit dialog box to edit a denomination, maximum number of coins for the till/cup, and free float number.
UI item | Description |
|---|---|
Denomination | Select a denomination. |
Limit | Select the maximum number of coins of the specified denomination for the till/cup. |
Free float | Select the maximum dispensable number of notes and coins of a certain denomination for a dispense operation. Note! If both 'Limit' and 'Free float' are specified, the smallest number applies. |
OK | Select to save the settings and close the dialog box. |
Cancel | Select to ignore the settings and close the dialog box. |
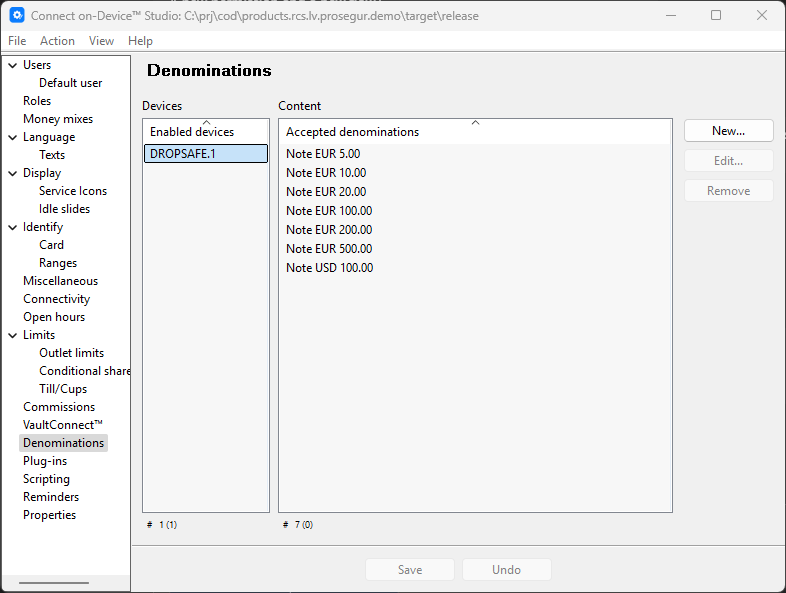
Navigation pane — Denominations
Note
This feature is available in Connect on-Device version 3.36.0 and later.
Use the Denominations view to configure supported denominations for devices. Currently, only drop safes are supported.
The device must be enabled to appear in the table.
UI item | Description |
|---|---|
Devices | Shows the enabled devices. |
Content | Shows accepted denominations. |
New | Select to add a new denomination. |
Edit | Select to edit the selected denomination. |
Remove | Select to delete the selected denomination. |
Save | Select to save the configuration. |
Undo | Select to ignore changes to the configuration. |
Navigation pane — Currency
Use the Currency view to configure currency fractions.
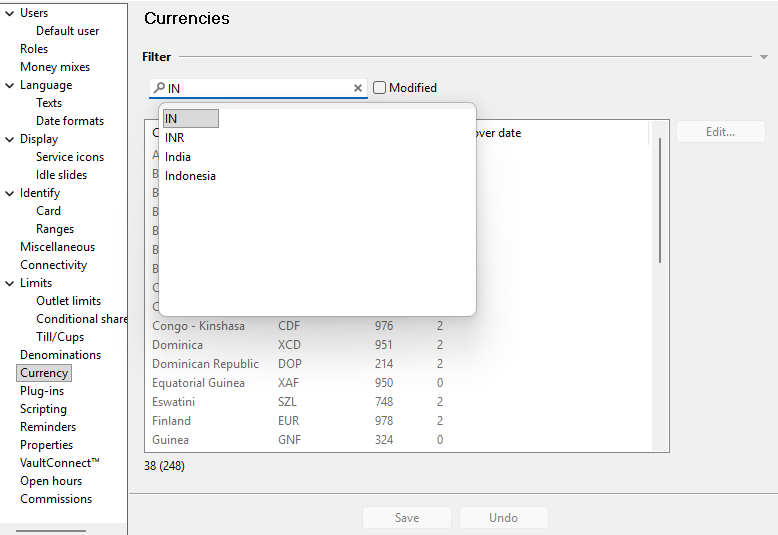
Note
Modified currencies are shown in bold text in the list.
UI item | Description |
|---|---|
Filter | Type a currency code or country to find the currency you are looking for. |
Modified | Select to only show modified currencies. |
Edit | Select to override the fraction value for the selected currency. |
Save | Select to save the configuration. |
Undo | Select to ignore changes to the configuration. |
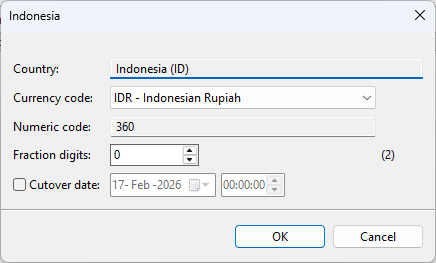
Navigation pane — Currency — Edit currency
Use the Currency view to configure currency fractions.
A fraction is a subunit of a currency. For example, cents are fractions of a dollar.
UI item | Description |
|---|---|
Country | Shows the country where the currency is used. |
Currency code | Select a different currency code if you want to override the existing currency used by the selected country. |
Numeric code | Shows the currency code. This value is not editable. |
Fraction digits | Select a value to override the existing number of digits for fractions of the selected currency. This is used, for example, on receipts. The default number of fractions for the selected currency is shown in parentheses. |
Cutover date | Select the box and then pick a date when you want Connect on-Device to start using the setting. |
Save | Select to save the configuration. |
Undo | Select to ignore changes to the configuration. |
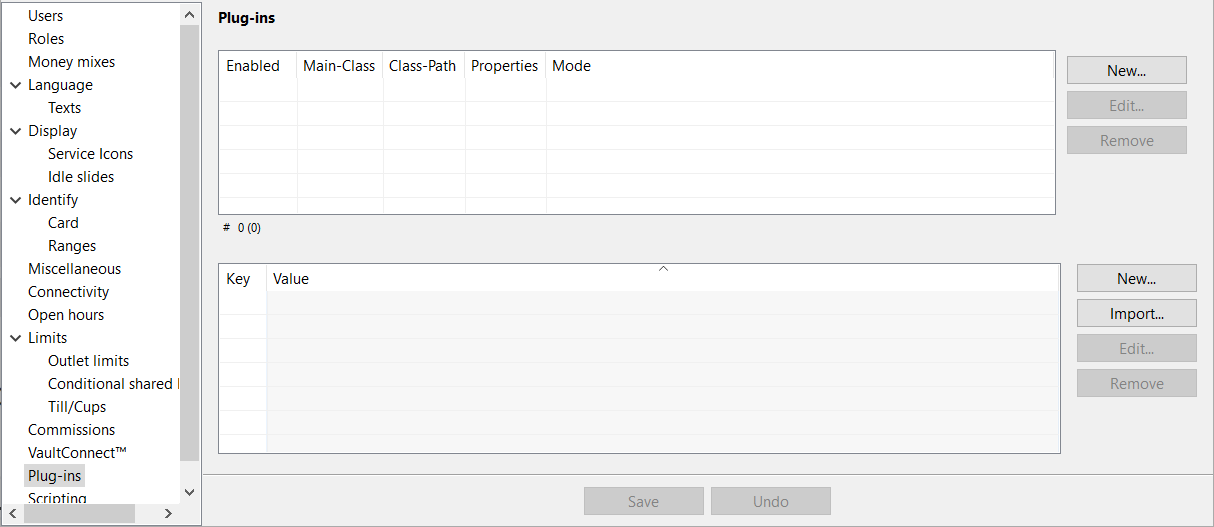
Navigation pane — Plug-ins
Use the Plug-ins view to configure custom functionality developed using the SDK.
Note
From version 3.13, Connect on-Device automatically loads unconfigured plug-ins detected in the
...data\plug-insfolder. This means that you can install a plug-in by simply dropping the required files in this folder. It also means that only removing the configuration entry doesn't disable the plug-in.From version 3.15.2, you can disable auto-load by clearing the Main-Class checkbox.
Auto-detected plug-ins are not included when exporting a ZTS package. When exporting the ZTS package, you need to manually add the plug-in to the configuration.
From version 3.15.2, removing a plug-in means that the containing JAR file is deleted from the
...\data\pluginsfolder.
UI item | Description |
|---|---|
Enabled | Shows whether or not the plug-in is enabled. |
Main-Class | Shows the fully qualified class name of the class implementing the |
Class-Path | Shows the JAR files required for the implementation. |
Properties | Shows the configuration assessed by Connect on-Device Studio to belong to the current implementation. |
Mode | Shows the mode in which the implementation was detected.
|
New | Select to add a new plug-in. |
Edit | Select to edit the selected plug-in. |
Remove | Select to delete the the selected plug-in. |
Key | Shows the abbreviated configuration key from the |
Value | Shows the configured key value. |
New | Select to add a new property to the configuration, |
Import | Select to add multiple properties to the configuration from an external file. |
Edit | Select to edit an existing property. |
Remove | Select to delete a property. |
Save | Select to save the configuration. |
Undo | Select to ignore changes to the configuration. |
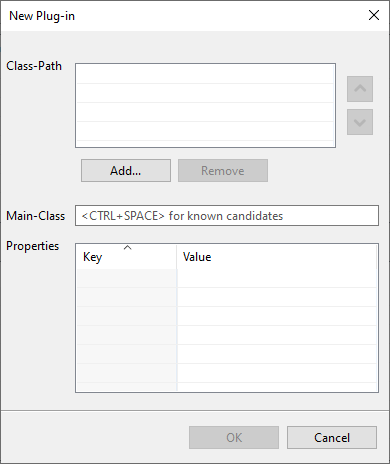
Plug-ins — New Plug-in
Use the New Plug-in dialog box to add custom functionality created using the SDK.
Note
When you add a JAR file containing one or more IOPlugin implementations, the first found implementation is automatically selected. This might not be the implementation you intended to use.
UI item | Description |
|---|---|
Class-Path | Shows the required JAR files for the implementation. |
Add | Select to add a JAR file to the plug-in class path. JAR files are stored in the |
Remove | Select to remove the selected JAR file from the plug-in class path. |
| Select to move the selected JAR file up in the plug-in class path. |
| Select to move the selected JAR file down in the plug-in class path. |
Main-Class | Shows the fully qualified class name of the class implementing the |
Properties | Shows the configuration (key-value pairs) assessed by Connect on-Device Studio to belong to the current implementation. The abbreviated key is created by keeping only the first character of a dot (.)-separated key. For example, a key |
OK | Select to save the changes. |
Cancel | Select to ignore the changes and close the dialog box. |


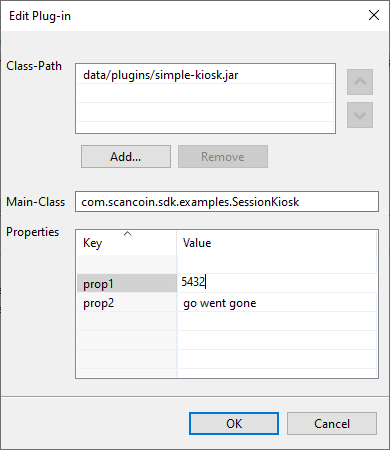
Plug-ins — Edit plug-in
Use the Edit plug-in dialog box to change custom functionality created using the SDK.
Note
When you add a JAR file containing one or more IOPlugin implementations, the first found implementation is automatically selected. This might not be the implementation you intended to use.
UI item | Description |
|---|---|
Class-Path | Shows the required JAR files for the implementation. |
Add | Select to add a JAR file to the plug-in class path. JAR files are stored in the |
Remove | Select to remove the selected JAR file from the plug-in class path. |
| Select to move the selected JAR file up in the plug-in class path. |
| Select to move the selected JAR file down in the plug-in class path. |
Main-Class | Shows the fully qualified class name of the class implementing the |
Properties | Shows the configuration (key-value pairs) assessed by Connect on-Device Studio to belong to the current implementation. The abbreviated key is created by keeping only the first character of a dot (.)-separated key. For example, a key |
OK | Select to save the changes. |
Cancel | Select to ignore the changes and close the dialog box. |
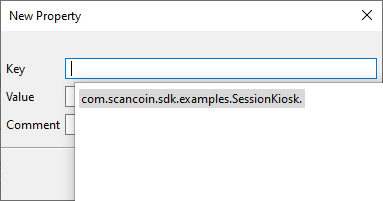
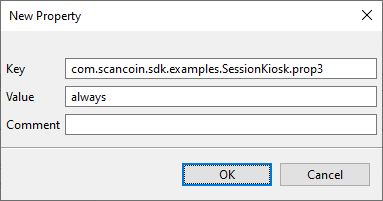
New Property
Use the New Property dialog box to add or change a key-value pair.
UI item | Description |
|---|---|
Key | Shows the configuration key from the |
Value | Shows the configured key value. |
Comment | Select to type a comment. |
OK | Select to save the changes. |
Cancel | Select to ignore the changes and close the dialog box. |
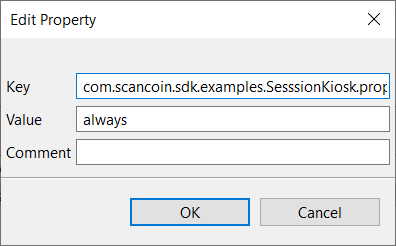
Edit plug-in property
Use Edit plug-in property to add or change a plug-in property, that is, a key-value pair.
UI item | Description |
|---|---|
Key | Shows the configuration key from the |
Value | Shows the configured key value. |
Comment | Select to type a comment. |
OK | Select to save the changes. |
Cancel | Select to ignore the changes and close the dialog box. |
Plug-ins — Import
Use the Import dialog box to review the properties found in the imported configuration file.
Note
You can edit the properties by double-clicking the value before clicking OK.
The imported properties are saved in the
com.scancoin.sdk.engineconfiguration.
UI item | Description |
|---|---|
Key Value | Shows the configuration (key-value pairs) assessed by Connect on-Device Studio to belong to the current implementation. The abbreviated key is created by keeping only the first character of a dot (.)-separated key. For example, a key |
OK | Select to start the import. |
Cancel | Select to cancel the import and close the dialog box. |
Navigation pane — Scripting
Use the Scripting view to specify the scripts you want to use in Connect on-Device.
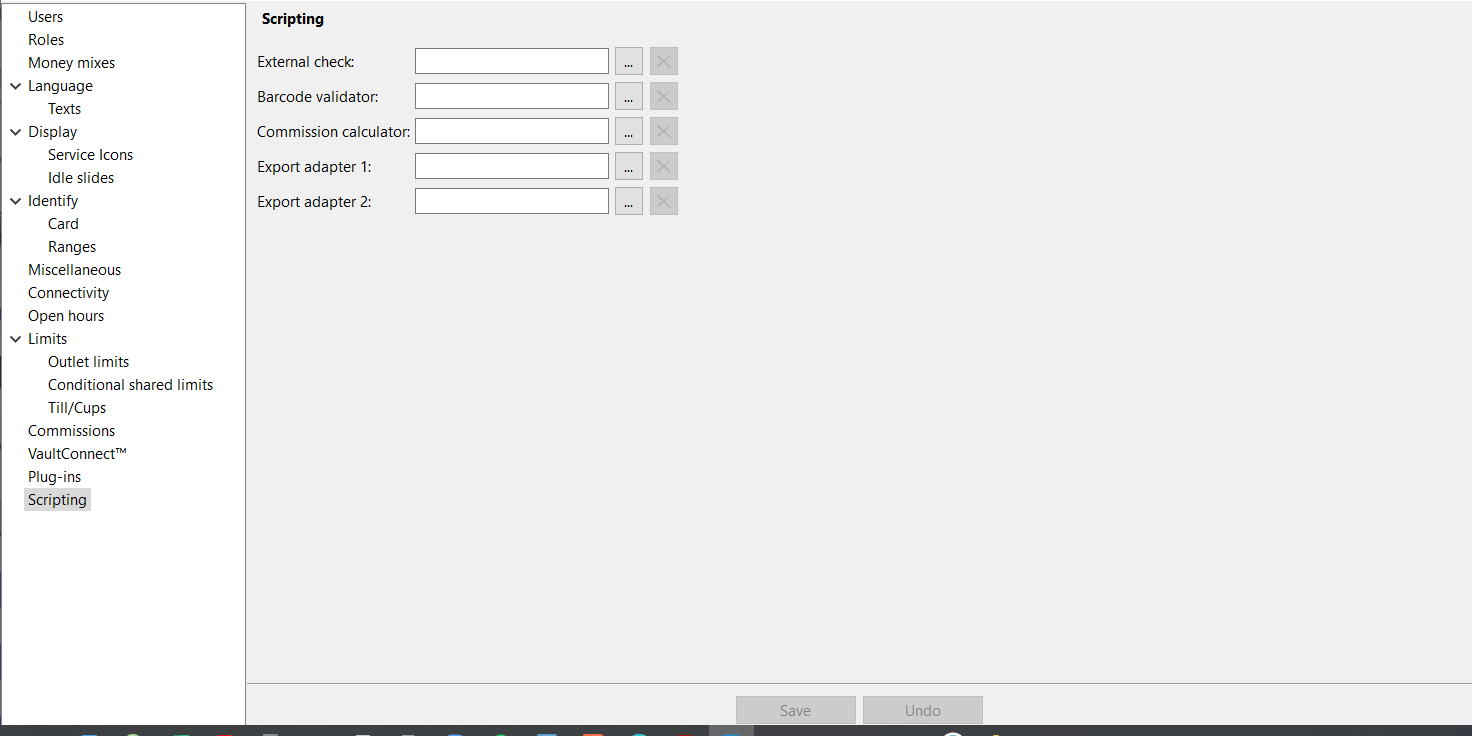 |
External check — Users are authenticated via an external system.
Barcode validator — Scanned or manually entered barcodes are validated.
Commission calculator — A custom commission calculator is used instead of the standard, percentage-based, calculator provided with the application.
Export adapter (1/2 ) — Application events, such as transactions, are forwarded to an external system.
UI item | Description |
|---|---|
External check | Select a script that authenticates users via an external system. |
Barcode validator | Select a script that validates scanned barcodes. |
Commission calculator | Select a script that calculates commissions on deposits via an external system. |
Export adapter 1 | Select a script that sends, for example, transactions to an external system. |
Export adapter 2 | Select a script that sends, for example, transactions to an external system. |
Save | Select to save the configuration. |
Undo | Select to ignore changes to the configuration. |
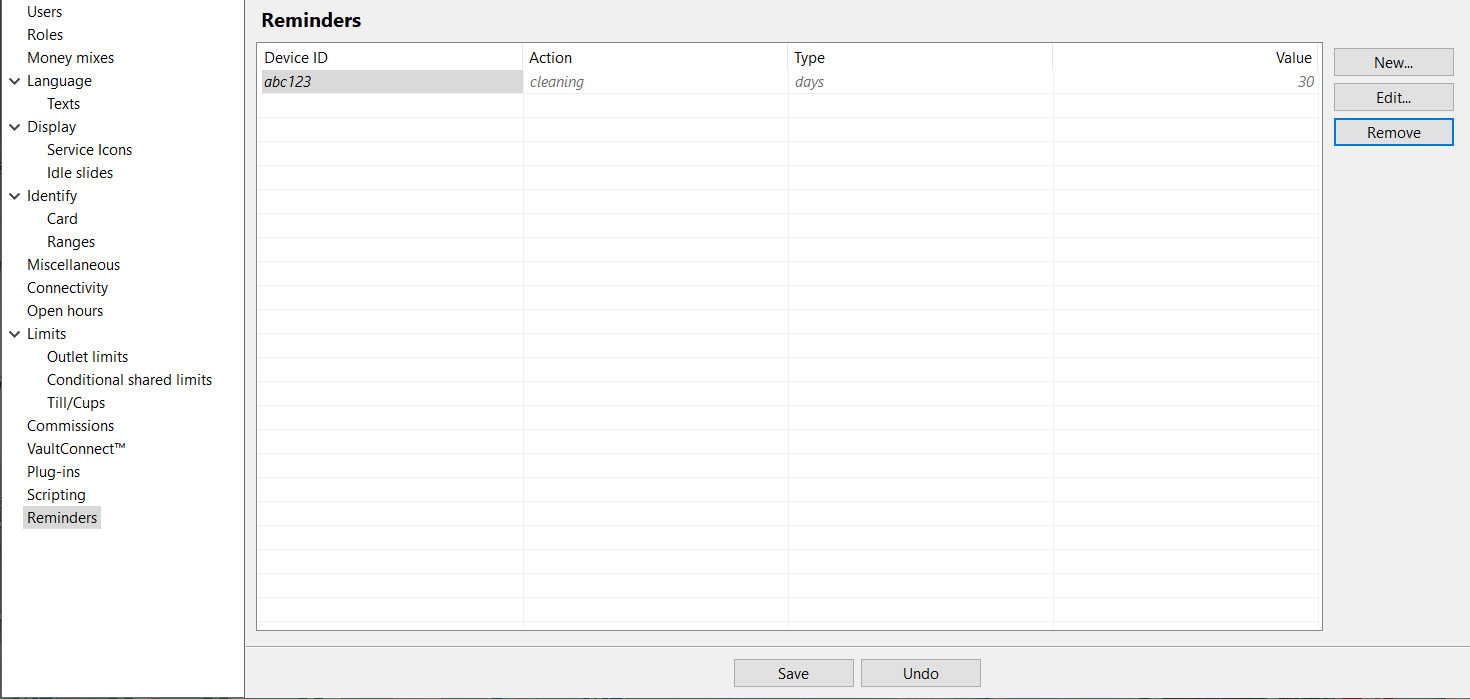
Navigation pane — Reminders
Use Reminders to configure reminders. For example, you can configure a reminder that it's time to clean the machine when the machine has counted 10.000 coins or that it's time to service the machine after the specified number of days.
When the reminders are triggered, they are shown in the Operator view under Current errors.
Note
This feature is available in Connect on-Device Studio in Connect on-Device version 3.18 and later.
This feature requires the CONFIRM_CLEANING and CONFIRM_SERVICE permissions.
UI item | Description |
|---|---|
Device ID | Shows the Device ID of the device you have configured the reminder for. |
Action | Shows the action the reminder tells you to perform. These are the options:
|
Type | Shows the type of condition that must be met before the reminder is triggered. These are the options:
|
Value | Shows the value of the condition that must be met before the reminder is triggered. Depending on the type you selected, it can be number of times or days. |
New | Select to configure a new reminder. |
Edit | Select to edit the selected reminder. |
Remove | Select to delete the reminder. |
Save | Select to save the reminder |
Undo | Select to remove all changes made since you last saved. |
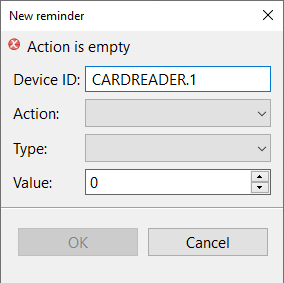
New reminder
Use New reminder to add a reminder connected to a device, such as a reminder to clean the device after the specified number of days.
Note
This feature is available in Connect on-Device Studio in Connect on-Device version 3.18 and later.
This feature requires the CONFIRM_CLEANING and CONFIRM_SERVICE permissions.
UI item | Description |
|---|---|
Device ID | Start typing to select the device for which you want to add a reminder. |
Action | Select the action you want to remind about. These are the options:
|
Type | Select the frequency. These are the options:
|
Value | Select the number of times or days that have passed before the reminder is triggered |
OK | Select to add the new reminder and close the dialog box. |
Cancel | Select to close the dialog without saving the new reminder. |
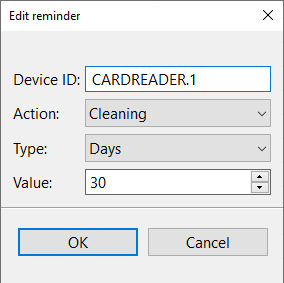
Edit reminder
Use Edit reminder to edit a reminder connected to a device, such as a reminder to clean the device after the specified number of days.
Note
This feature is available in Connect on-Device Studio in Connect on-Device version 3.18 and later.
This feature requires the CONFIRM_CLEANING and CONFIRM_SERVICE permissions.
UI item | Description |
|---|---|
Device ID | Shows the device ID of the device the reminder has been configured for. |
Action | Select the action you want to remind about. These are the options:
|
Type | Select the frequency. These are the options:
|
Value | Select the number of times or days that have passed before the reminder is triggered |
OK | Select to save the changes to the reminder and close the dialog box. |
Cancel | Select to close the dialog without saving the changes to the reminder. |
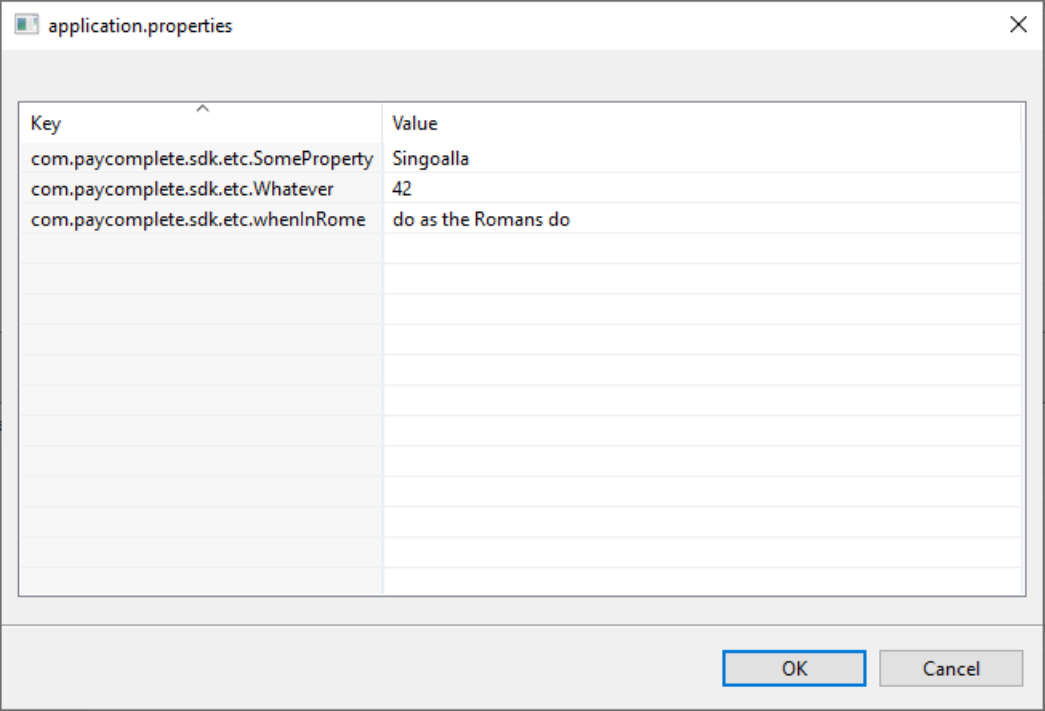
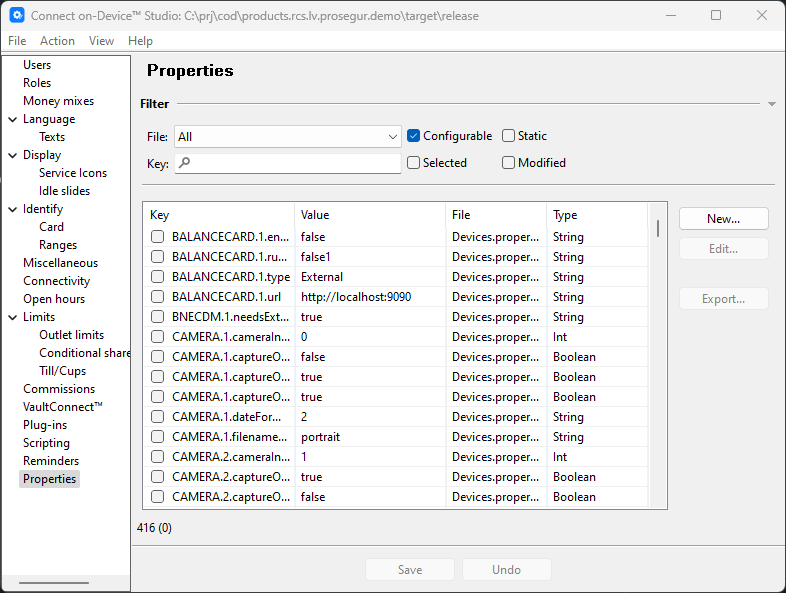
Navigation pane — Properties
Use Properties to configure and export specific properties in configuration files.
Configuration files are located both in the [installation folder]\resources\configurable\ and [installation folder]\resources\static\ folders.
Note
This feature is available from Connect on-Device version 3.18.
UI item | Description |
|---|---|
File | Select to limit the contents of the properties table to the properties from a single file or select All for all available files/properties. |
Configurable | Select to include files/properties from the |
Static | Select to include files/properties from the |
Filter | Filters the contents of the properties table to include only keys matching the entered value. Start typing to get proposals for available keys. |
Selected | Select to show only the configuration key(s) selected for export. |
Modified | Select to enable filtering on keys that were modified since the last Save or Undo. |
Properties (columns) | |
Key | Shows the property keys. |
Value | Shows the property values. |
File | Shows the file in which the property is stored. The file is only visible when you have selected All in the File box. |
Type | Shows the property type. |
Buttons | |
New | Select the button to create a new property. |
Edit | Select the button to edit the selected property. |
Export | Select to create a ZTS configuration package containing the selected property keys. |
Save | Saves the configuration. |
Undo | Select to ignore all changes made since you last saved. |
New property
Use New property to add new properties to configuration files.
Configuration files are located both in the [installation folder]\resources\configurable\ and [installation folder]\resources\static\ folders.
Note
This feature is available from Connect on-Device version 3.18.
UI item | Description |
|---|---|
File | Select the file where the new property is written. |
Key | Enter the key of the new property. |
Value | Enter the value of the new property. |
OK | Select to add the new property and close the dialog box. |
Cancel | Select to close the dialog without saving the new property. |
Edit property
Use Edit property to edit specific properties in configuration files.
Configuration files are located both in the [installation folder]\resources\configurable\ and [installation folder]\resources\static\ folders.
Note
This feature is available from Connect on-Device version 3.18.
UI item | Description |
|---|---|
File | Select the file where the property is written. |
Key | Enter the key of the property you want to edit. |
Value | Enter the new value of the property you want to edit. |
OK | Select to save the property and close the dialog box. |
Cancel | Select to close the dialog without saving the changes. |
Export
Use Export package to export a package of configuration files.
Configuration files are located both in the [installation folder]\resources\configurable\ and [installation folder]\resources\static\ folders.
Note
This feature is available from Connect on-Device version 3.18.
UI item | Description |
|---|---|
Name | Shows the base name of the exported package. The full name is <Directory>\<Name>_<Version>.zip. |
Type | Shows the type of package. You can't edit the type. |
Directory | Shows the destination directory for the exported package file. |
Version | Shows the version of the exported package. The version is made up of the date and time of the export. |
Description | Enter a description for the export package (optional). |
Key | Shows the keys of the properties included in the package. |
Value | Shows the values of the properties included in the package. |
File | Shows the files containing the properties included in the package. |
Open package in default program when complete | Select to open the export package in the default program when the export is completed. |
Open folder when complete | Select to open the directory containing the export package when the export is completed. |
OK | Select to start the export and close the dialog box. |
Cancel | Select to close the dialog without exporting the package. |
Navigation pane — VaultConnect
Use the VaultConnect view to configure the vaults you want to use in the solution.
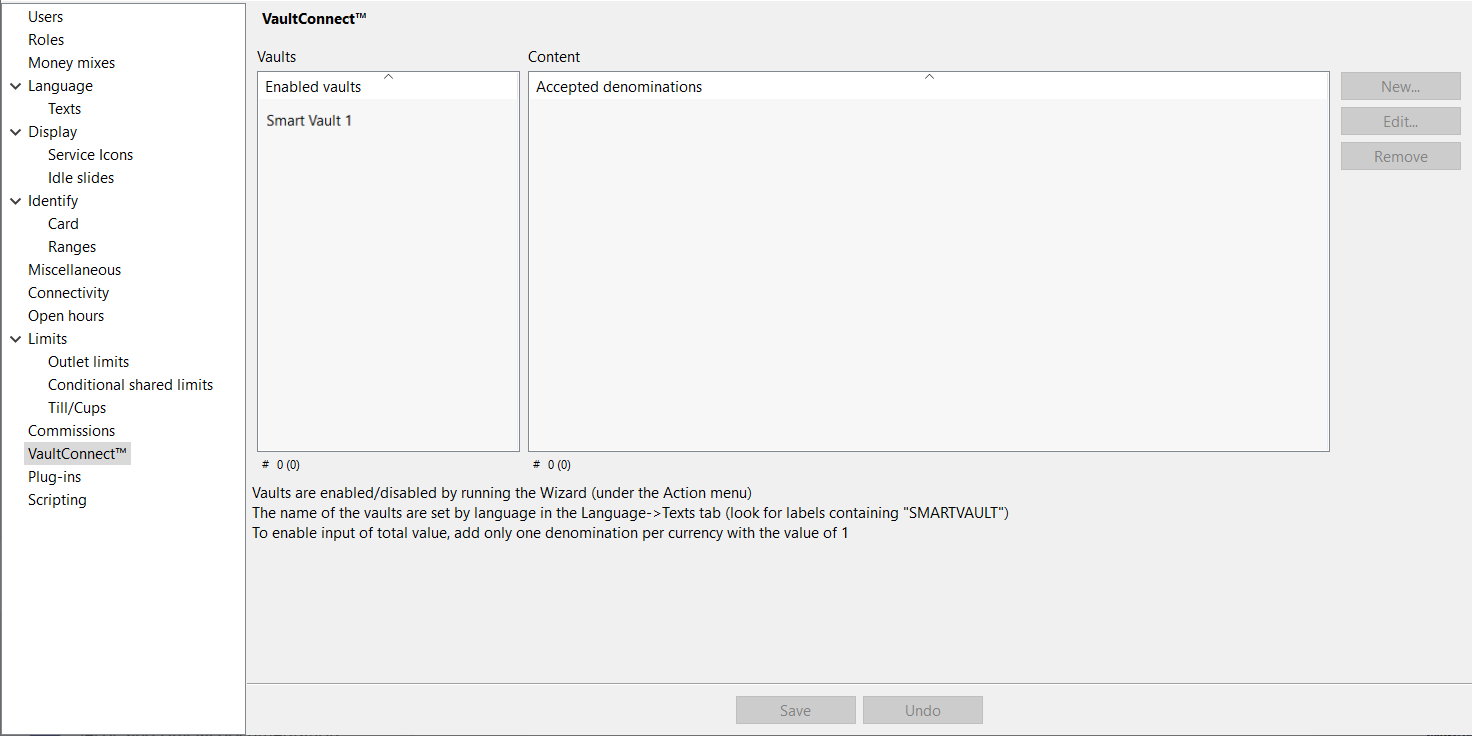
UI item | Description |
|---|---|
Vaults | Shows the vaults added to the solution. |
Content | Shows the denominations the vault can contain. |
New | Select to add a new . |
Edit | Select to edit the selected . |
Remove | Select to delete the selected |
Save | Select to save the configuration. |
Undo | Select to ignore changes to the configuration. |
Create new denomination
Use the Create new denomination dialog box to configure a new accepted denomination for the device or vault.
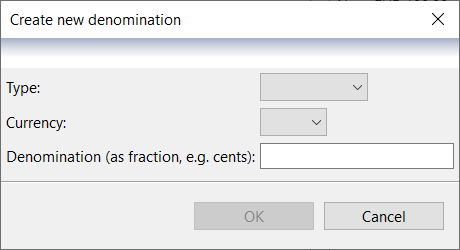
UI item | Description |
|---|---|
Type | Select COIN or NOTE. |
Currency | Select the currency. |
Denomination | Enter the smallest denomination for the selected currency, for example, cents for USD or EUR. |
OK | Select to save the changes. |
Cancel | Select to ignore the changes and close the dialog box. |
Edit denomination
Use Edit denomination to configure a new accepted denomination for the device or vault.
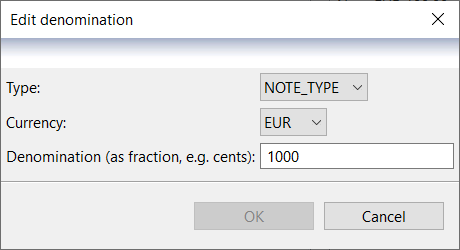
UI item | Description |
|---|---|
Type | Change COIN or NOTE. |
Currency | Change the currency. |
Denomination | Change the smallest denomination for the selected currency, for example, cents for USD or EUR. |
OK | Select to save the changes. |
Cancel | Select to ignore the changes and close the dialog box. |
Navigation pane — Open hours
Use the Open hours view to configure what to show on screen for the days and times when the machine is accessible and when it is out of use.
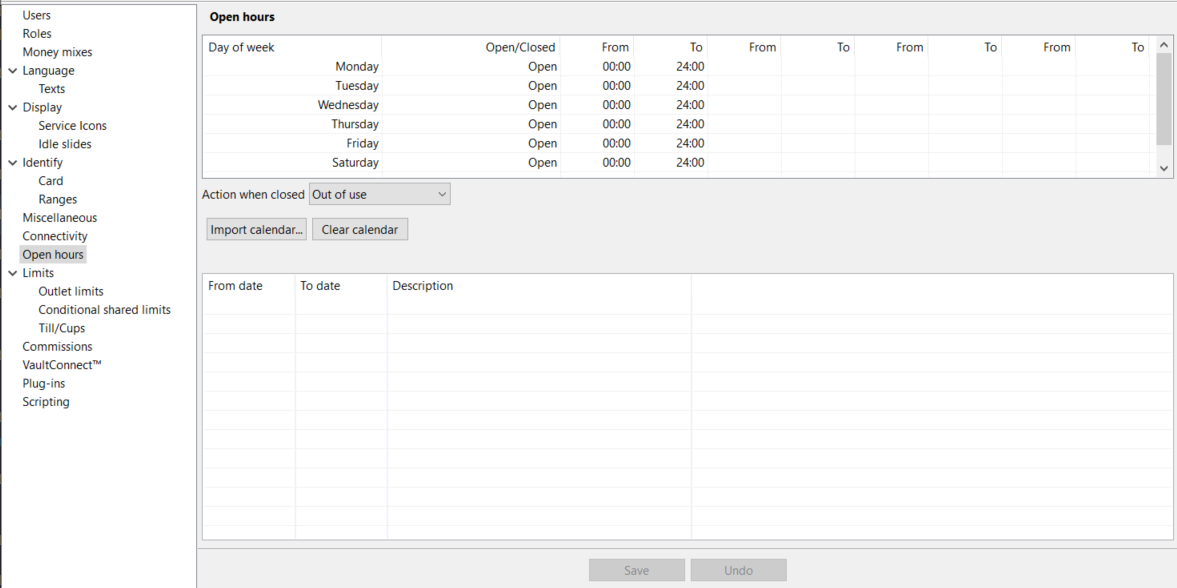
UI item | Description |
|---|---|
Day of week | Shows the day of the week. |
Open/Closed | Select whether the machine is Open (accessible) or Closed (out of use). |
From | Select the time from which the machine is Open or Closed. |
To | Select the time until which the machine is Open or Closed. |
Action when closed | Select what is shown on the screen when the machine is Open/Closed. The options are:
See the result of the options in the images below. |
Import calendar | Select to import a calendar containing times when the machine is closed (out of use). Known formats:
|
Clear calendar | Select to remove the current calendar. |
From date | Shows the date and time from which the machine is closed according to the current calendar. |
To date | Shows the date and time to which the machine is closed according to the current calendar. |
Description | If you have added a description to the calendar, it is shown here. |
Save | Select to save the configuration. |
Undo | Select to ignore changes to the configuration. |
These are examples of the result on screen depending on which Action when closed option you configure:
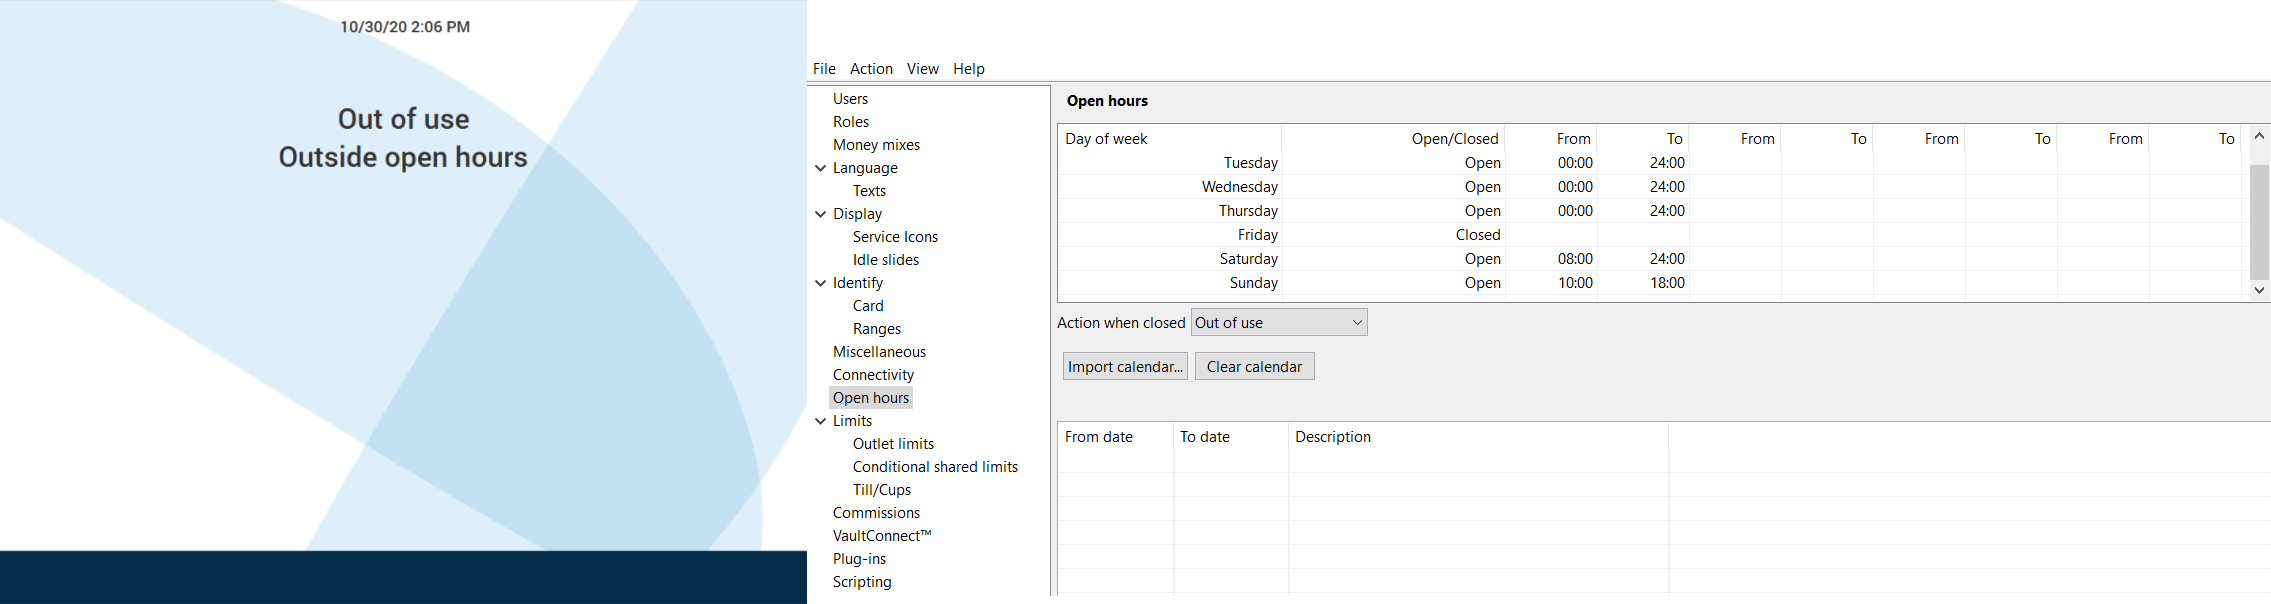 |
Out of use
 |
Show next open
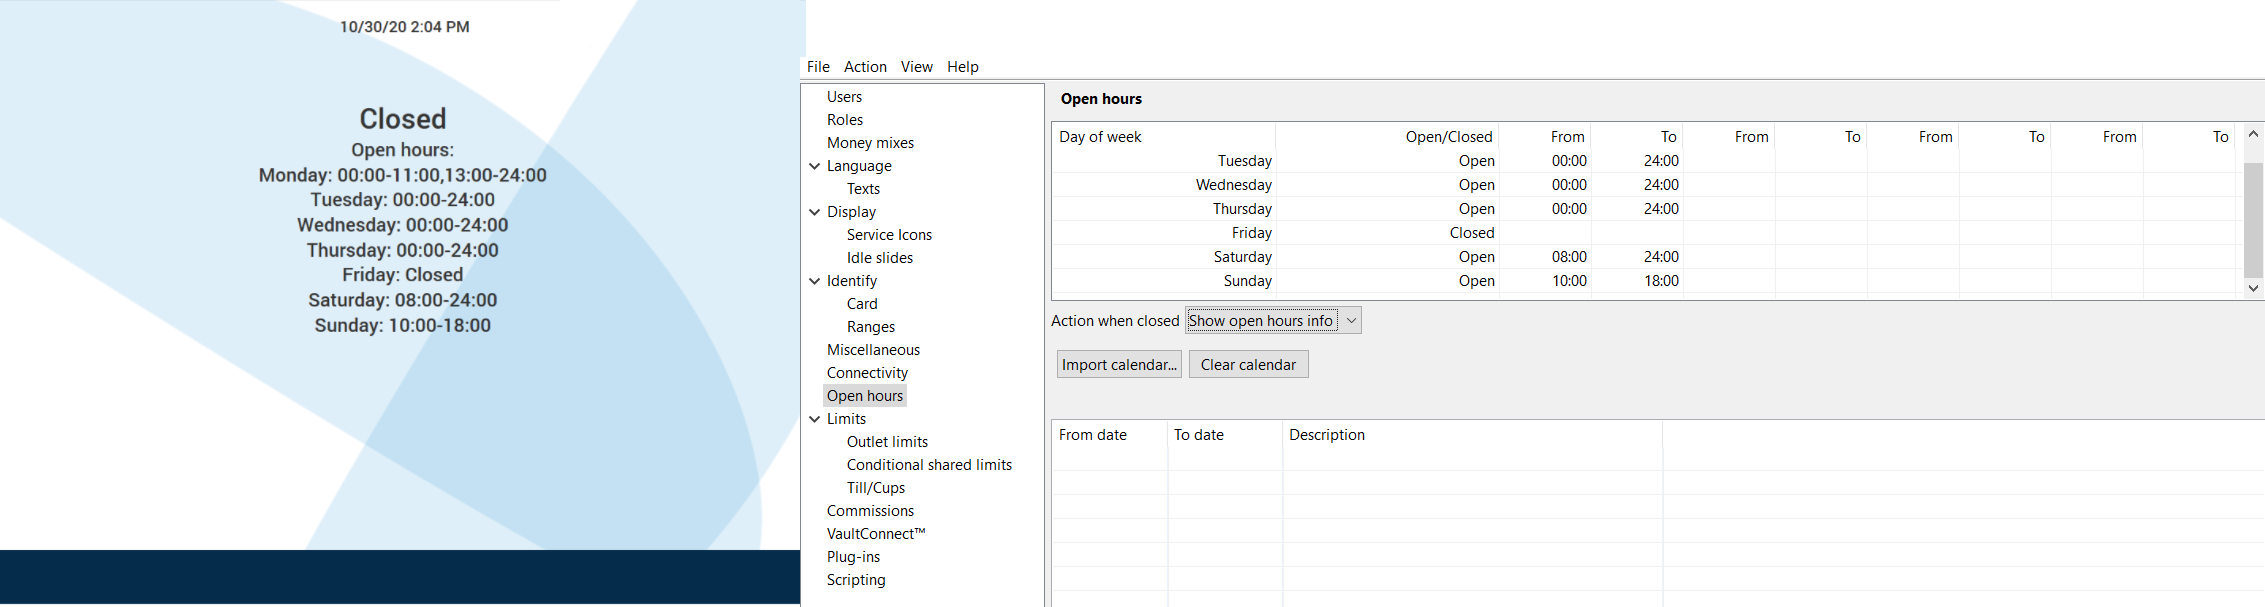 |
Show open hours info
Navigation pane — Commissions
Use the Commissions view to configure the fee for counting cash or handling foreign currencies.
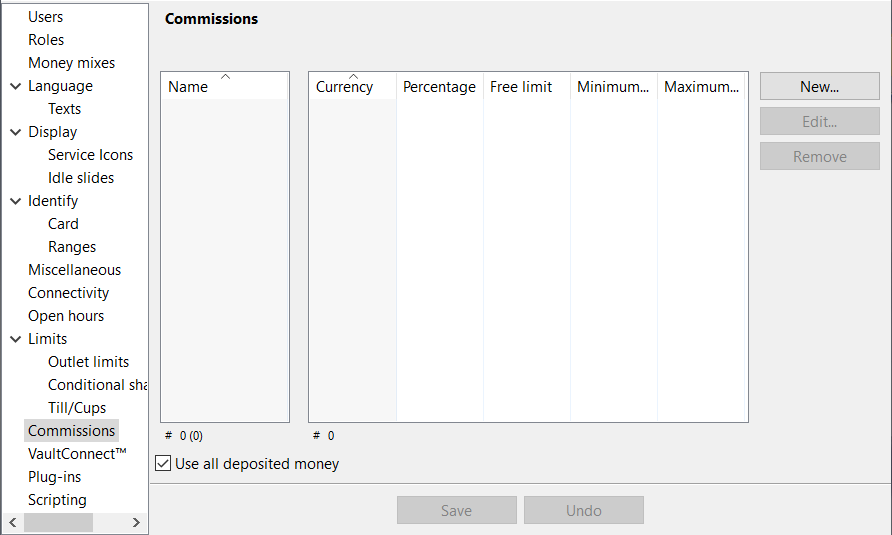 |
UI item | Description |
|---|---|
Name | Shows the name of the fee. By default, the name is the currency code. |
Currency | Shows the currency the fee applies for. |
Percentage | Shows the percentage used to calculate the deduction. If the commission is negative, percentage shows the bonus percentage of the deposited amount. If the commission is negative, the maximum percentage is 100%. |
Free Limit | Shows the amount that can be deposited without any fee. If the commission is negative, Free Limit shows the amount that has to be reached before a bonus is generated. For negative commissions, Free Limit can be 0. |
Min Free | Shows the smallest fee that can be deducted from the deposited amount. 0 = no limit. If the commission is negative, Min Fee shows the minimum bonus amount that can be generated. For negative commissions, Min Fee can be 0. |
Max Free | Shows the largest fee that can be deducted from the deposited amount. 0 = no limit. If the commission is negative, Max Fee shows the maximum bonus amount that can be generated. For negative commissions, Max Fee can be 0. |
New | Select to add a new commission rule. |
Edit | Select to edit the selected commission rule. |
Remove | Select to delete the selected commission rule. |
Use all deposited money | Select if you want to use all of the deposited amount when calculating the fee. Clear if you only want to use the amount above the minimum limit when calculating the fee. |
Save | Select to save the configuration. |
Undo | Select to ignore changes to the configuration. |
Commissions — Create new commission rule
Use the Create new commission rule dialog box to configure the rules that control commissions for everyone, a specific role, or a specific work unit.
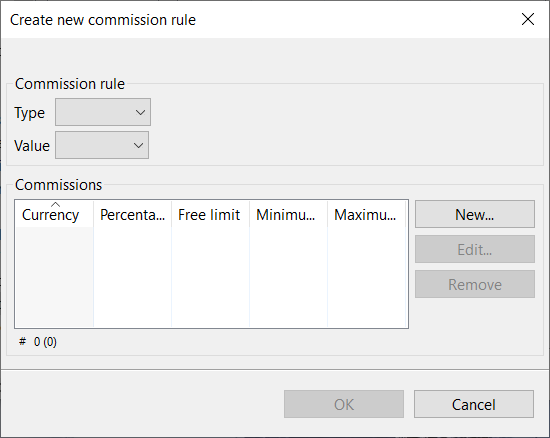
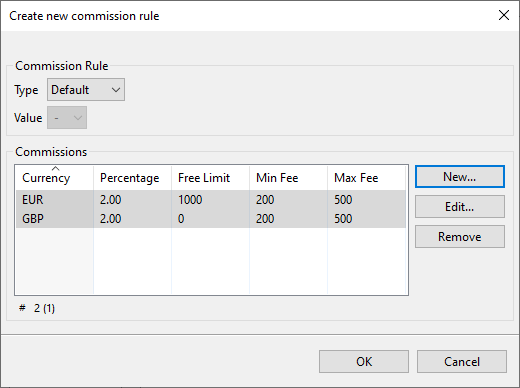
UI item | Description |
|---|---|
Type | Select the type you want to set up commission rules for The options are:
|
Value | Select to specify which role or work unit the commission rule applies for. |
Commissions | Shows the commission rules you have configured. The rules are:
|
New | Select to add a new commission rule. |
Edit | Select to edit the selected commission rule. |
Remove | Select to delete the selected commission rule. |
Save | Select to save the configuration. |
Undo | Select to ignore changes to the configuration. |
Create new commission
Use the Create new commission dialog box to configure how fees are calculated.
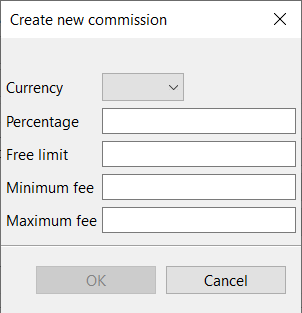
UI item | Description |
|---|---|
Currency | Select the currency the fee applies for. |
Percentage | Enter the percentage used to calculate the deduction. |
Free limit | Enter the amount that can be deposited without any fee. |
Min fee | Enter the smallest fee that can be deducted from the deposited amount. 0 = no limit. |
Max fee | Enter the largest fee that can be deducted from the deposited amount. 0 = no limit. |
OK | Select to save the configuration. |
Cancel | Select to ignore the changes and close the dialog box. |
Edit commission
Use Edit commission to change how fees are calculated.
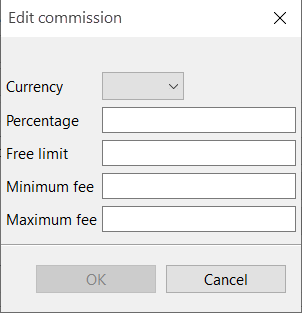
UI item | Description |
|---|---|
Currency | Change the currency the fee applies for. |
Percentage | Change the percentage used to calculate the deduction. |
Free limit | Change the amount that can be deposited without any fee. |
Min fee | Change the smallest fee that can be deducted from the deposited amount. 0 = no limit. |
Max fee | Change the largest fee that can be deducted from the deposited amount. 0 = no limit. |
OK | Select to save the configuration. |
Cancel | Select to ignore the changes and close the dialog box. |